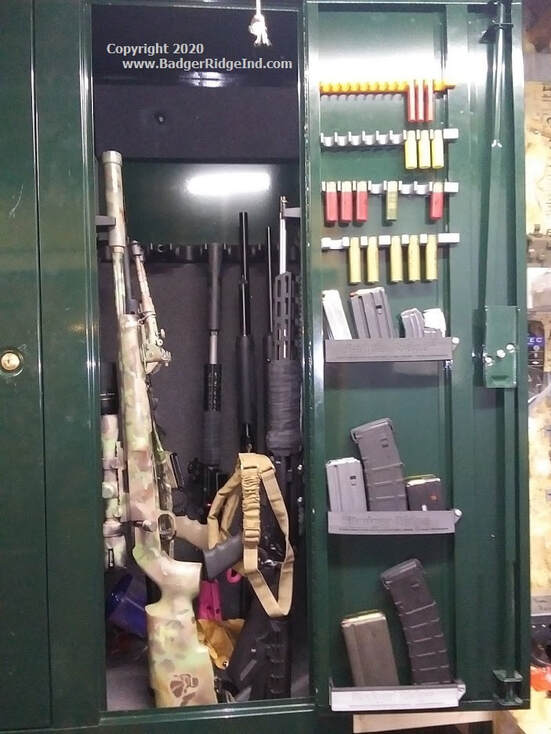
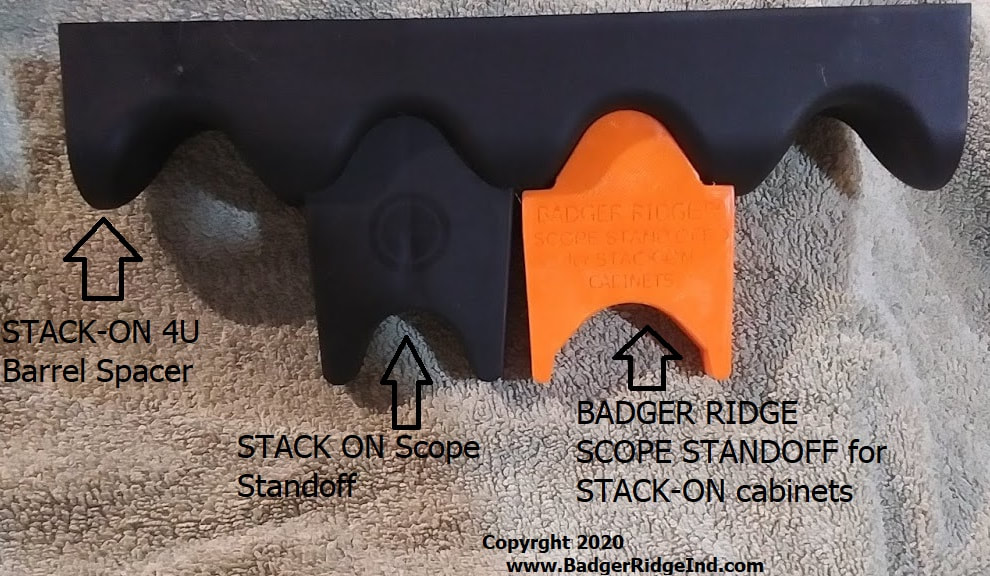
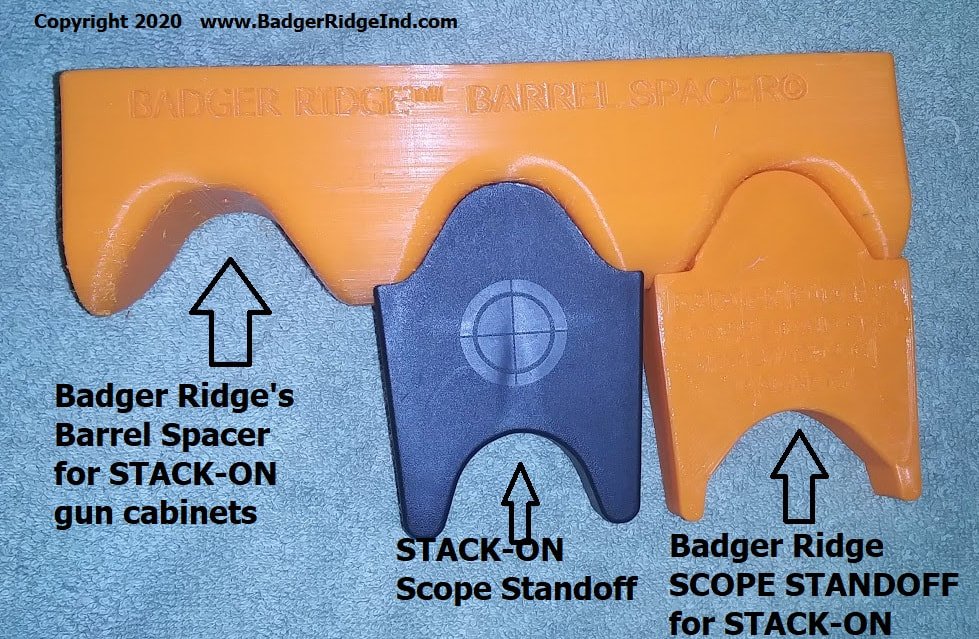
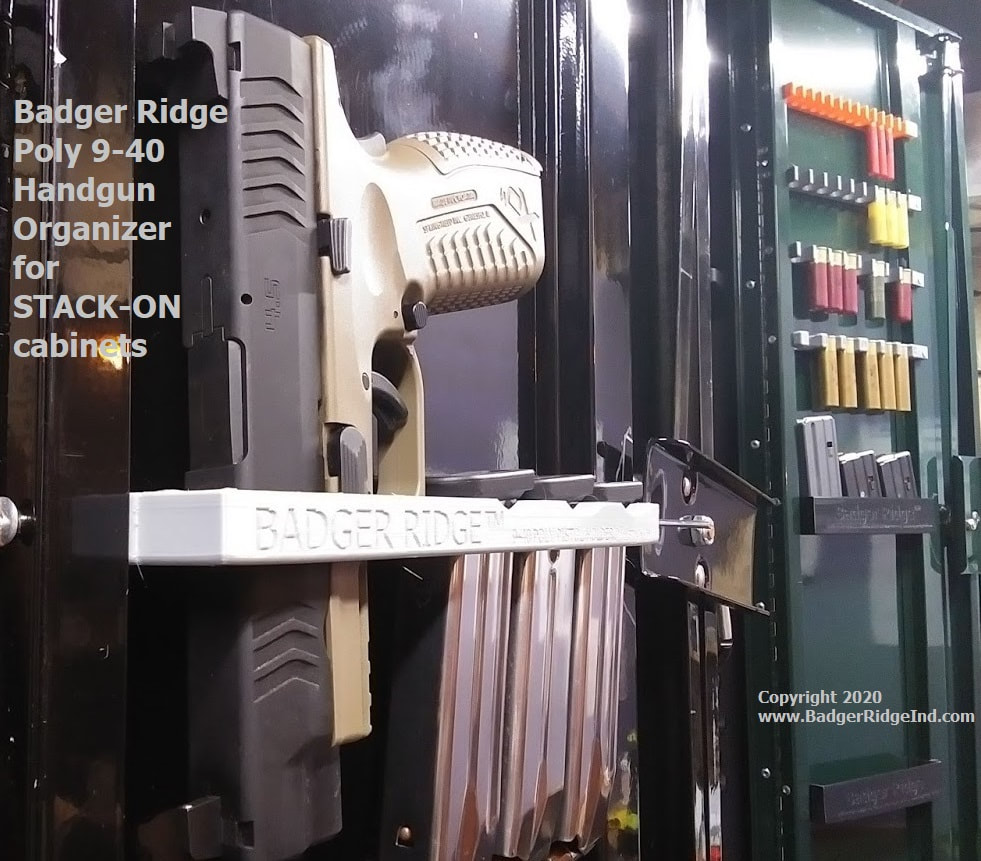
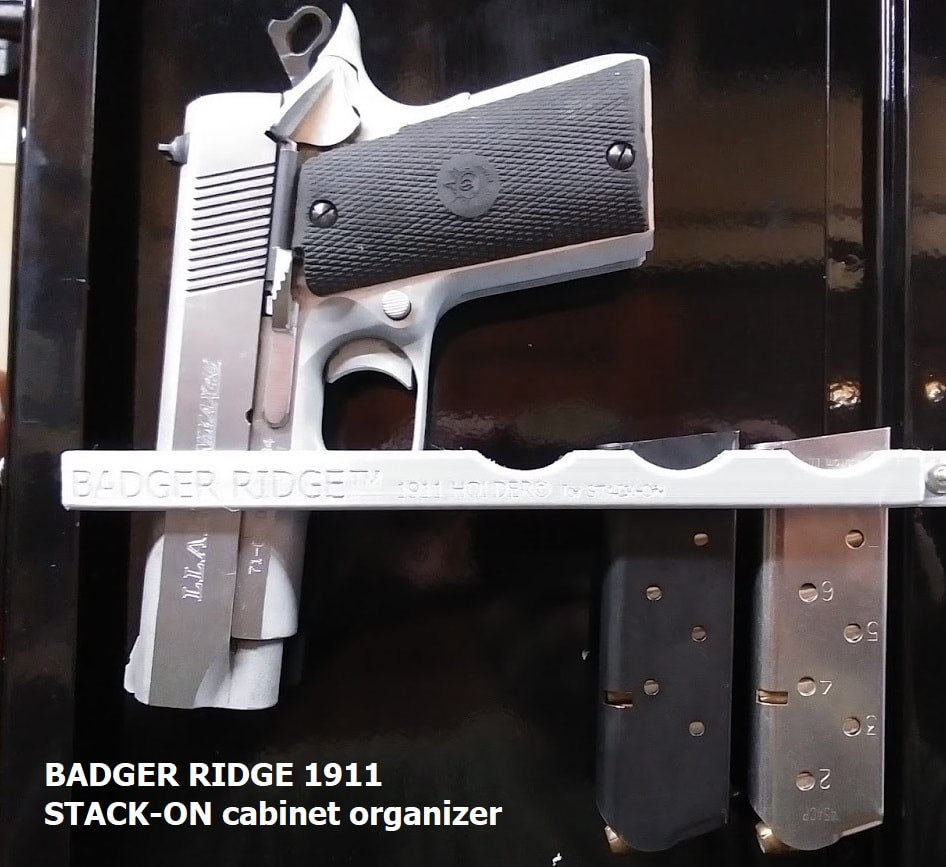
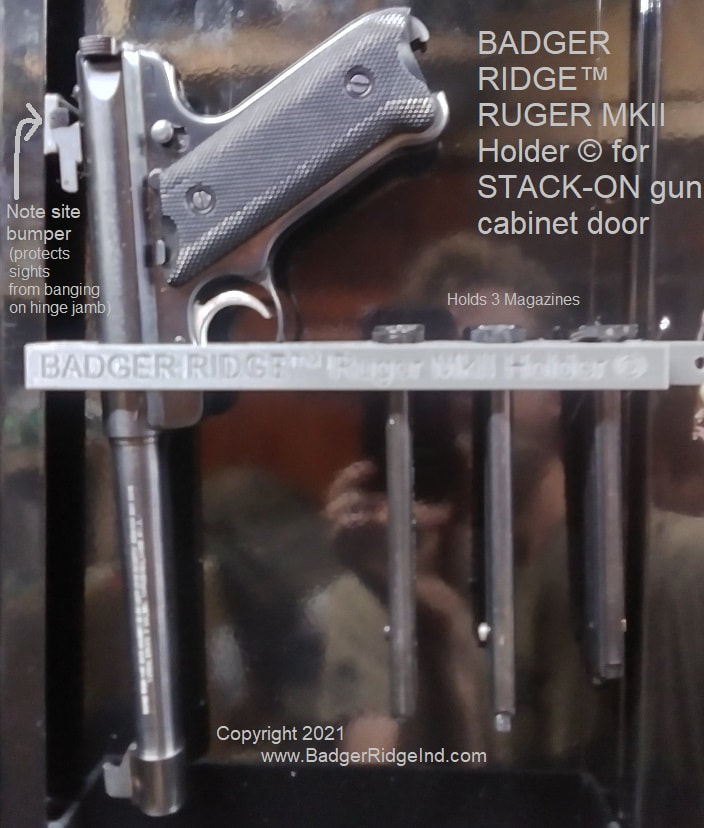
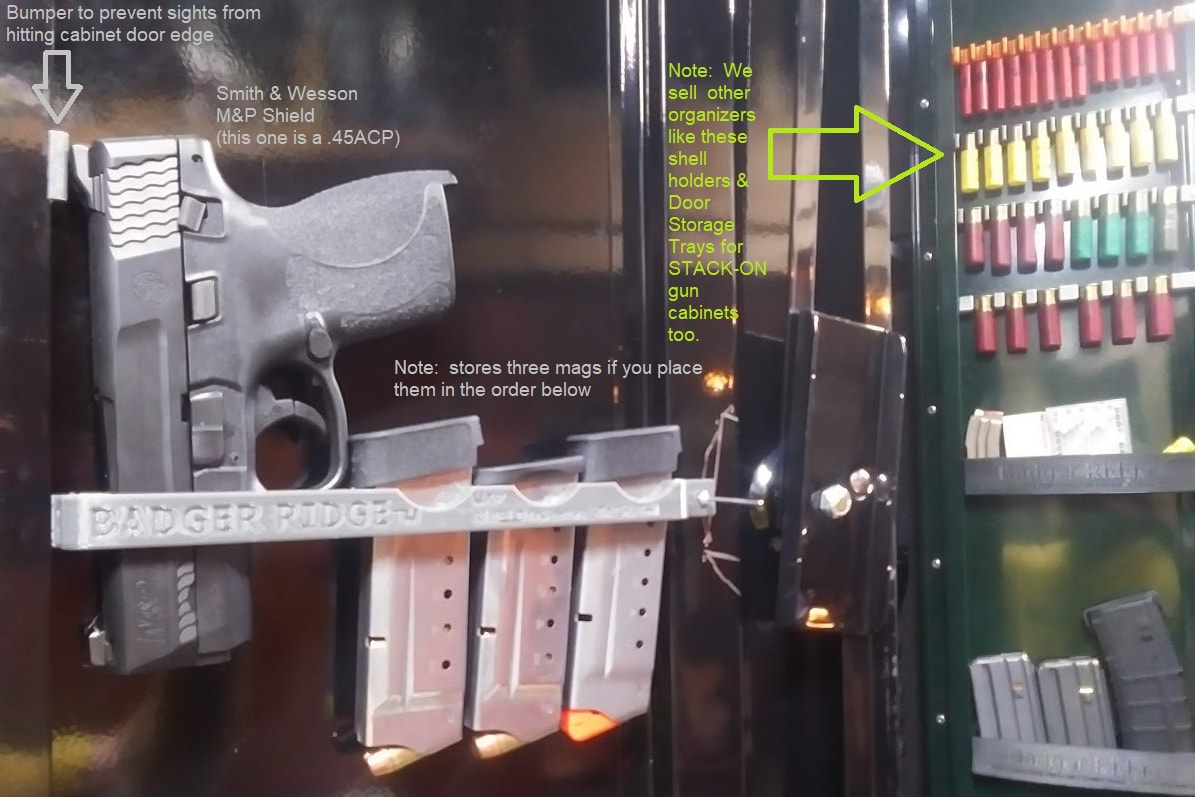
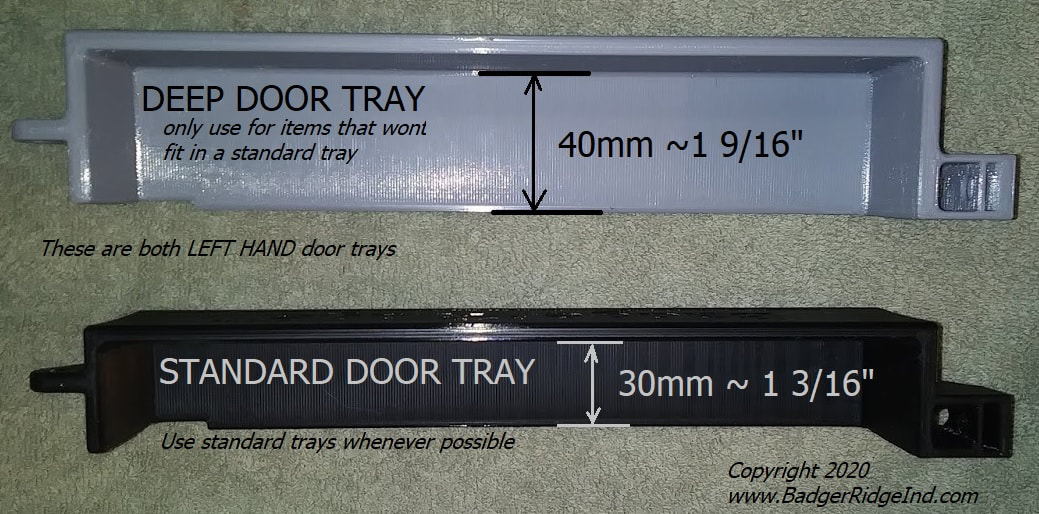
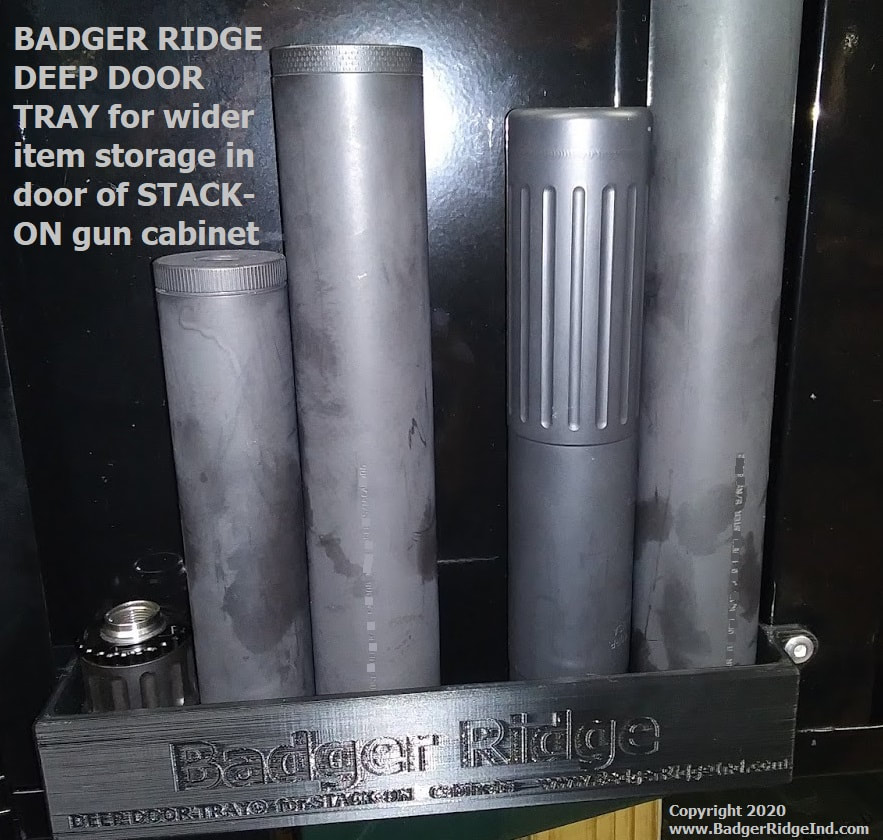
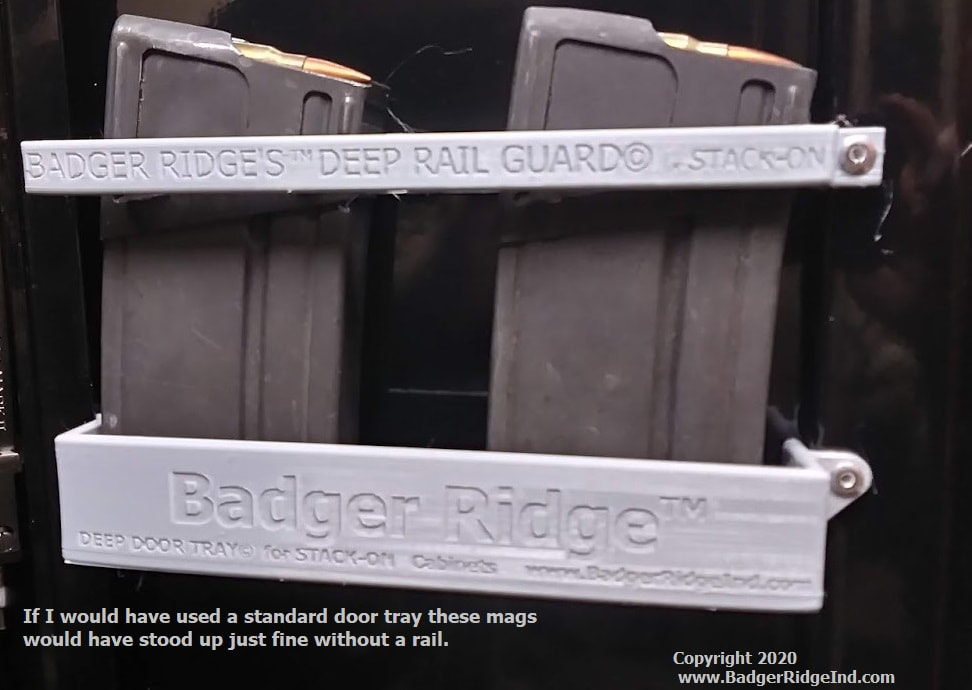
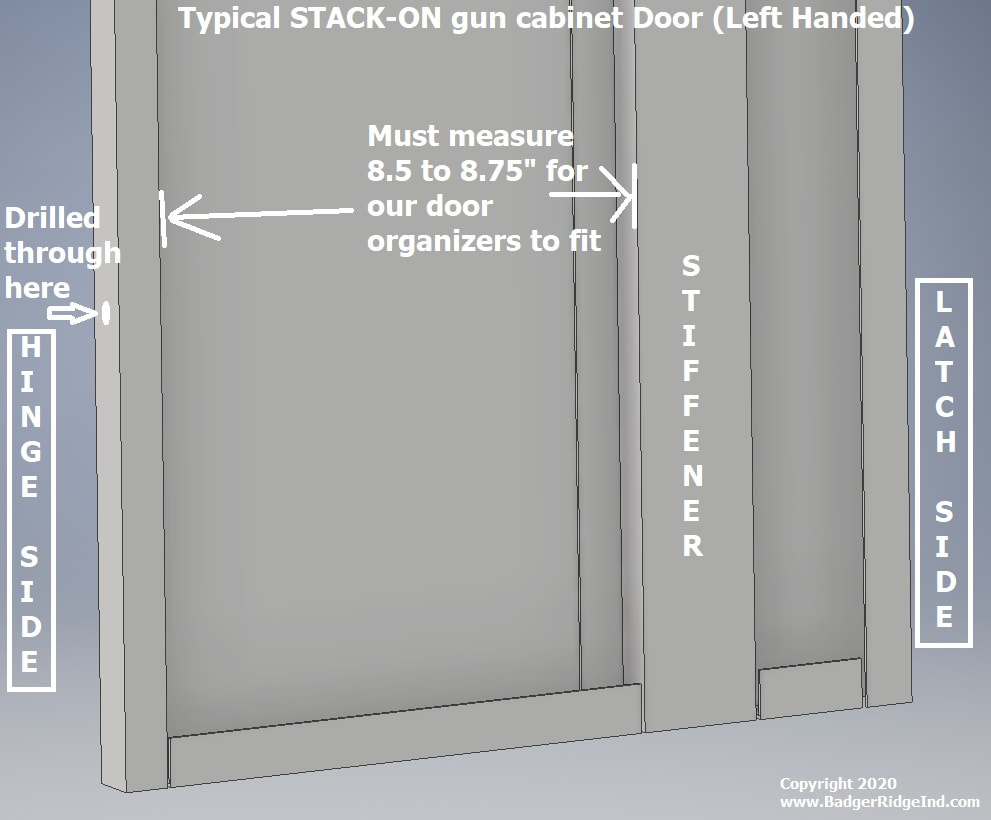
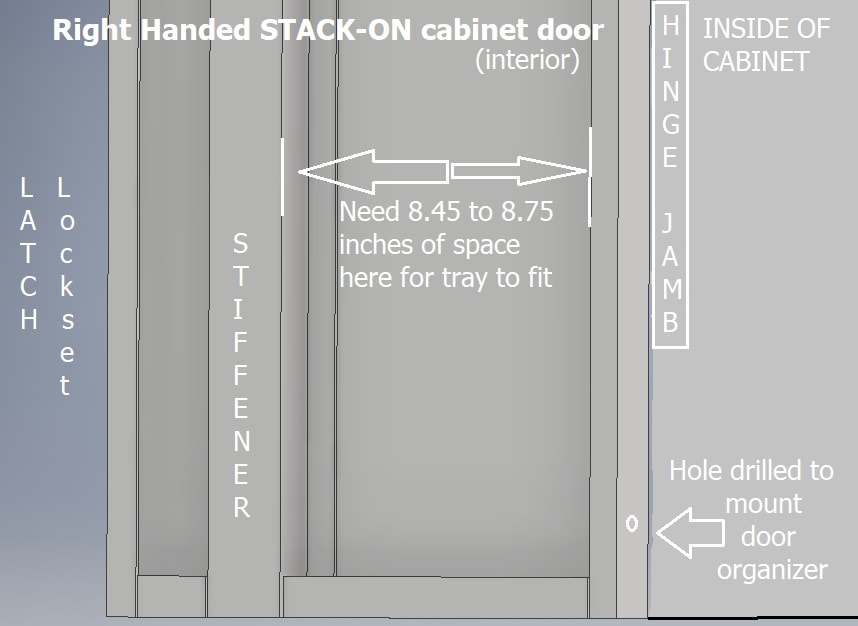
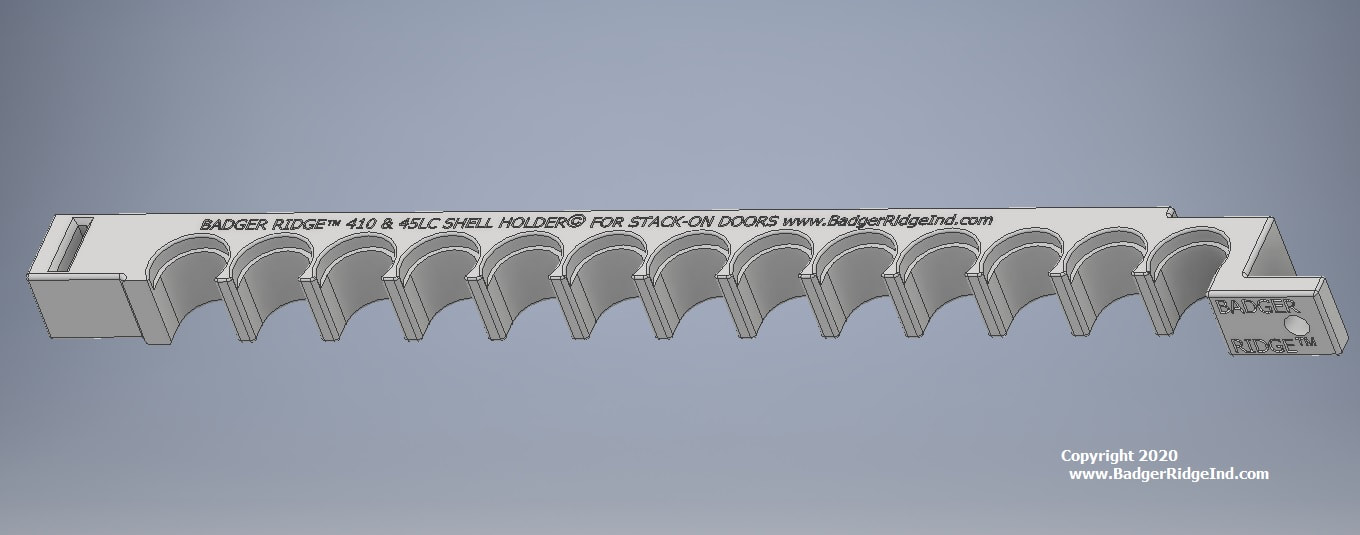
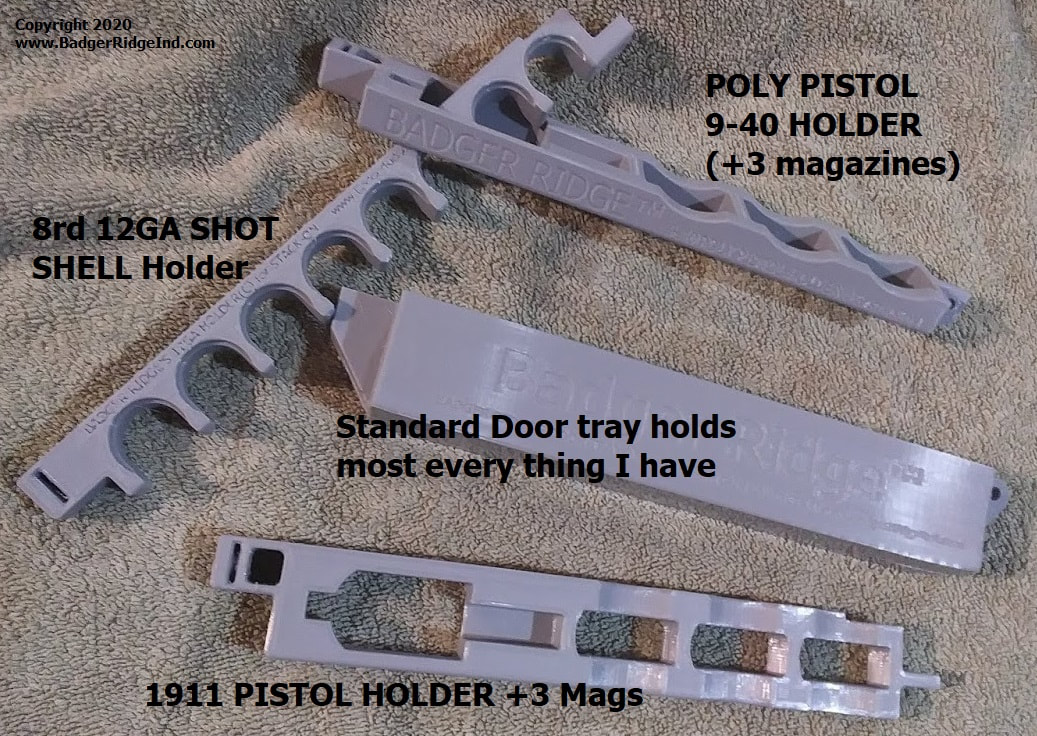
 My first cabinet above with three door trays (full of magazines) and 4 shell holders. These were my first prints and installs, please be kind! The design and my attention to detail improved as I progressed! My first cabinet above with three door trays (full of magazines) and 4 shell holders. These were my first prints and installs, please be kind! The design and my attention to detail improved as I progressed! Not sure what to do during this 'stay home' order period? I know what I did. I created a solution to my gun cabinet disorder and I'd like to offer it up to you! Thank you for visiting the Badger's Den. If an internet search brought you here looking for 209 solutions or hard to find parts for your inline muzzle loader, you are in the correct place. Please understand that we continually post new articles here; You may need to use the menus at the top or right of the page, or keep scrolling down to find what the search engine sent you here for! Or just click here to be taken to our muzzle loader product page and start looking a the solutions we sell for older inline muzzle loaders. 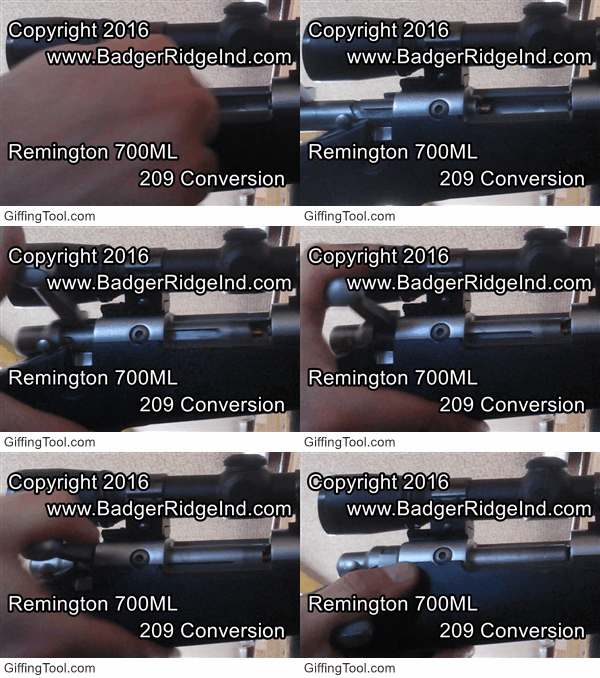 Yes we are open! YES WE STILL SERVICE AND SELL THINGS FOR OLDER INLINE MUZZLE LOADERS However, in this post I'd like to discuss our newest product/service. Gun cabinet organizers If you are curious to what I did and how it can benefit you, keep reading! If you have a 3D printer, you can purchase a license to download and print our designs (for personal use only, and not to distribute and share.. see the EULA for the details). Or you can shop our website for the various organizers we offer. Once you purchase a organization item, we'll 3D print it in tough PETG and mail them to you with instructions and fasteners to install them. My efforts thus far are on the many STACK-ON cabinets I bought to secure my firearms. Yes, I know there are much better, fireproof gun safes, but I find these to be cost effective solutions for securing firearms from children, and meeting legal requirements for secure stowage. Now I can also say I have an organized easy to use system. My dad has Homak cabinets, so I'll adapt what you see here to Homak as time and inspiration allow. If you have another brand, or an idea for an organizer item, click that contact form or call me and we can discuss. 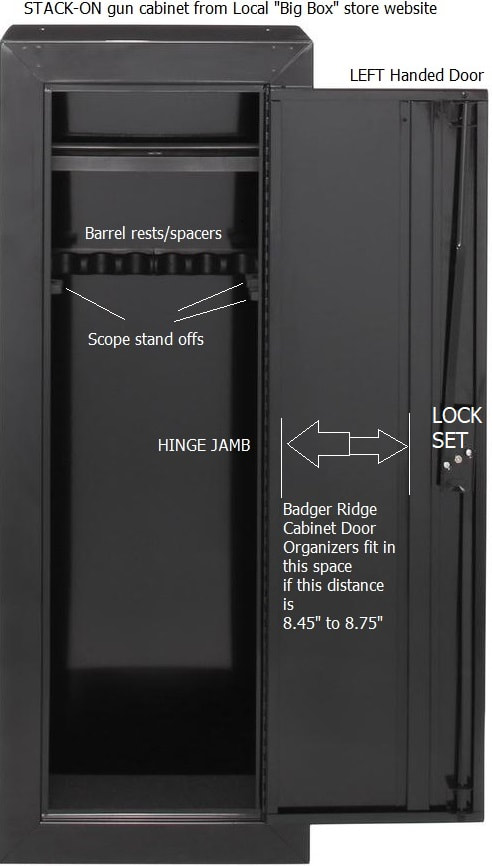 But what exactly are you looking at? What do we offer? Well I'm glad you asked! The most basic things are additional Barrel Spacers and Scope Standoffs. I found I needed them because many of my long guns had scopes, carry handles, or raised sights. And STACK-ON just didn't include enough with their cabinets. So I made my own scope standoffs (seen in orange in the adjacent pictures) But these are just the tip of the Ice berg. 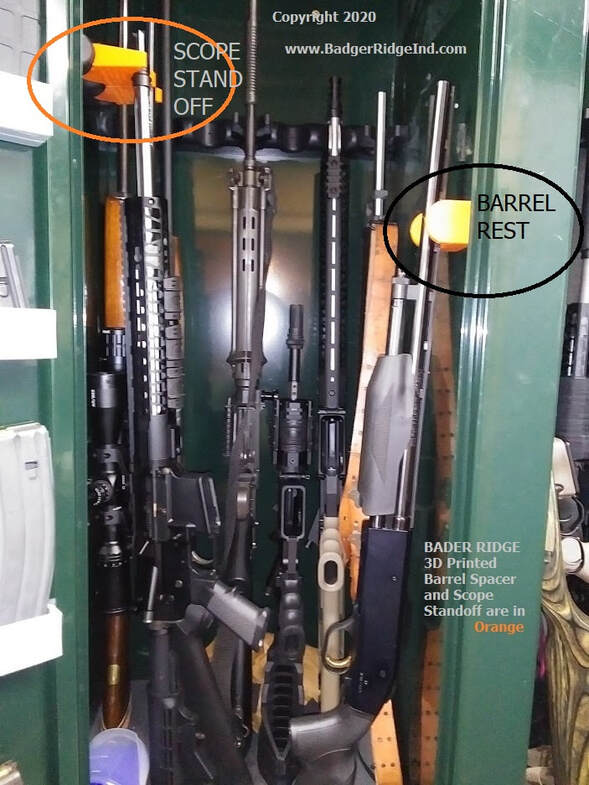 Orange items above are Badger Ridge printed organizers, this is a right handed door Orange items above are Badger Ridge printed organizers, this is a right handed door Once i got my scoped rifles in place, then I need to set up my SBR's and youth guns. They needed barrel rests in places STACK-ON didn't have them... so I made them. I mounted my short guns how I wanted. Then I decided to add storage of all the stuff floating around inside the cabinet, decided to leverage the inside of the door. Just seemed like there was a ton of easily accessible, but wasted space there. So I put it to use. I made shelves for the doors, shell holders for the shells I like to keep handy... mounts for my hand guns... and their magazines. I love the pistol holders! Plus the standard door trays work great for nearly all my fire arm related accessories: - AR-15 magazines - M-1 Enbloc clips - M-14, FN-FAL, CETME/G3 magazines, AR-308/AR-10 Magazines However I needed a deeper wider door tray to take my SDN-6 and D cell form-1 suppressor. In the picture below you can see the deep tray (most of the others in the pictures are standard door trays) Please understand that the pictured B cell cans would have fit a standard door tray, but I wanted to keep them together. The standard Door Tray is 30mm deep (that's about 1 3/16 inches), but the Deep Door tray is 40mm deep (just over 1 9/16). At first I thought I'd put the bigger deeper trays everywhere. Turns out not to be that smart of an idea: trouble with the deep trays is that they project farther into the cabinet and can engage more guns inside. Also tall items that aren't as wide as the tray (like magazines) can tip in the deep tray. Because they don't engage the vertical wall (and none of my mags were wide enough. Not sure, but maybe a Barrett 50 Cal mag would be a good fit for a deep tray? The lesson learned is: to use standard trays for nearly everything and just the deep trays for very wide items that won't fit the standard tray. For me that is my larger suppressors. Though I did design rails to mount and hold things in place that want to tip (available for both the deep tray and the standard door tray). Like these CETME/G3 mags I put in a deep tray (should have used a standard tray... wouldn't need the rail). So where is the catch? During ordering and installation it is essential to ensure the items fit the door, and only buy the deep tray if you really need to hold something that wide! I bought my STACK-ON cabinets over many years as my gun collection grew. So I'd assume there are many more cabinets out there made to these dimensions. These door mounted organizers were designed for doors with 8.45 to 8.75 inches of space between the jamb and the door's stiffener. See illustration of a typical STACK-ON cabinet door. 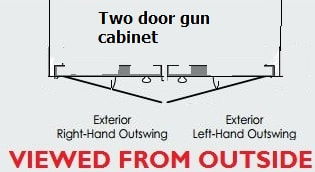 Two door gun cabinet Two door gun cabinet In my cabinets the Left Hand (LH) and Right Hand (RH) doors are mirror images of each other. So one must ensure they choose the correct items for the door they wish to mount them too. But if the customer does this, I think I got the rest of the details as simplified as possible. Please consult the illustration showing a two door gun cabinet. One door is Left Handed (LH) while the other is Right Handed (RH). What is not obvious to persons unfamiliar with door nomenclature, is that the door on the right side of a person standing in front of the cabinet is the Left Handed (LH) door. One way to understand door swing nomenclature (on out swing doors) is to imagine standing outside of the room/box/cabinet that the doors enclose, then to place one hand on the hinge, and the other on the lock set. The door is named for the hand that rests on the lock set. Another way is to imagine your spine pressed up against the jamb where the hinge is mounted. One arm would be able to reach into the cabinet, the other would have its shoulder on the hinge and be able to swing the door... the one that swings the door is what the door is named for. Or... you can just look at the pictures, look at your cabinets and write down what hand doors you have. 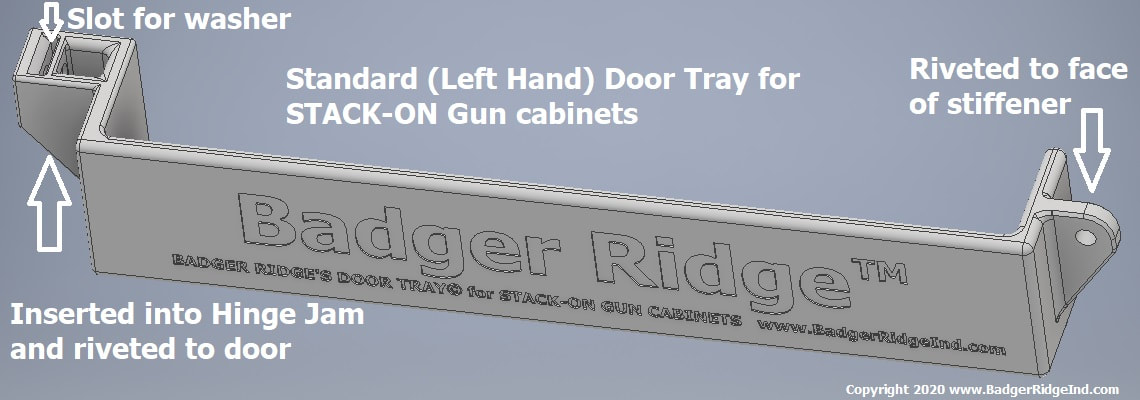 Assuming just about every STACK-ON single door cabinet is like mine (and the picture I pulled off of a big box store website) they should have a LH door. Thus double door cabinets will be the only ones to have a RH door. So I developed our organizers for LH Doors, and flipped a few of them for RH doors. Currently we only offer basic items for RH doors: Door Tray, Deep Door Tray, and 12 GA shell holders are available for both LH and RH doors, while pistol holders, 410/45LC, 44 REM Mag and 20Ga shell holders are only available in LH. Though, as the doors are symmetrical, some things (like shell holders) can be printed for the LH door and used on the RH, though they may have some features oriented down that would typically be up: such as recesses for shell rims, and the recess for the washer that engages the rivet... that can make them harder to install in RH doors, but it is possible. 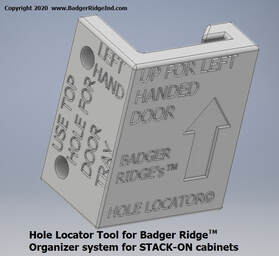 Hole Locator tool makes drilling aligned holes easier Hole Locator tool makes drilling aligned holes easier When someone purchases one of our door organizers, a hole locator is part of what is shipped, along with the needed rivets/screws/washers to install the organizer. This locator is useful in determining where to drill holes in the door hinge-jamb and is designed to snap onto the hinge side of the door. Note: When placing door trays all the way to the bottom of the door they have a small slot that should nest on the door's up turned sheet metal. This greatly increases their strength. To ensure this happens, the hole locator tool must be set on the bottom edge and the top hole used (just as the tool is labeled). Also its important to avoid holes where the hinge is spot welded to the jamb or where the organizer could interfere with the lock set. Don't worry, all this is in the written instructions too! So I've spent a lot of time and resources working on this, mostly for myself, but also I hope it will be well received and help others. The more ambitious and well equipped person may chose to purchase the EULA and print their own organizers. However feel free to chose to have us print them for you. I've made many refinements along the way, and will continue to develop and improve this product with customer feed back. We will print in PETG (one of the toughest FDM 3D printer filaments) and have multiple colors to choose from beyond what you've seen here in these pictures, though through it all, I've become fond of light grey. If you are interested, please take a look at these in our store, contact us via the contact form, or give us a call... especially if you have different brand of cabinet or an idea for a fire arm or cartridge I don't have. We look forward to helping you!
0 Comments
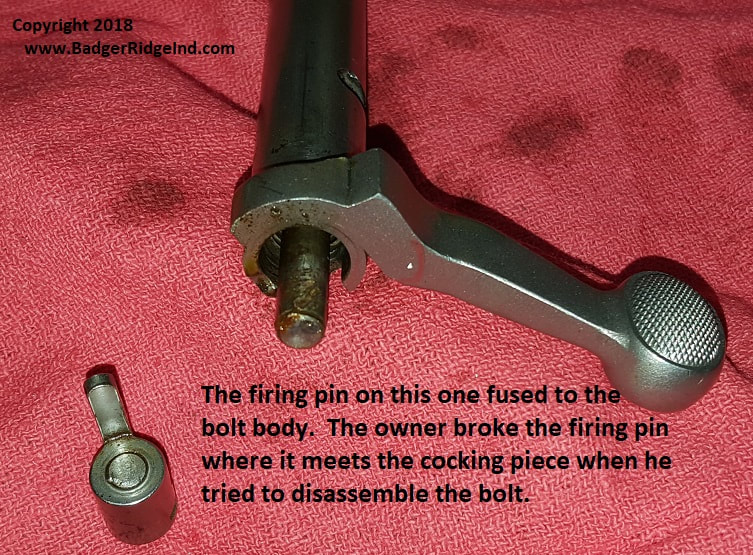
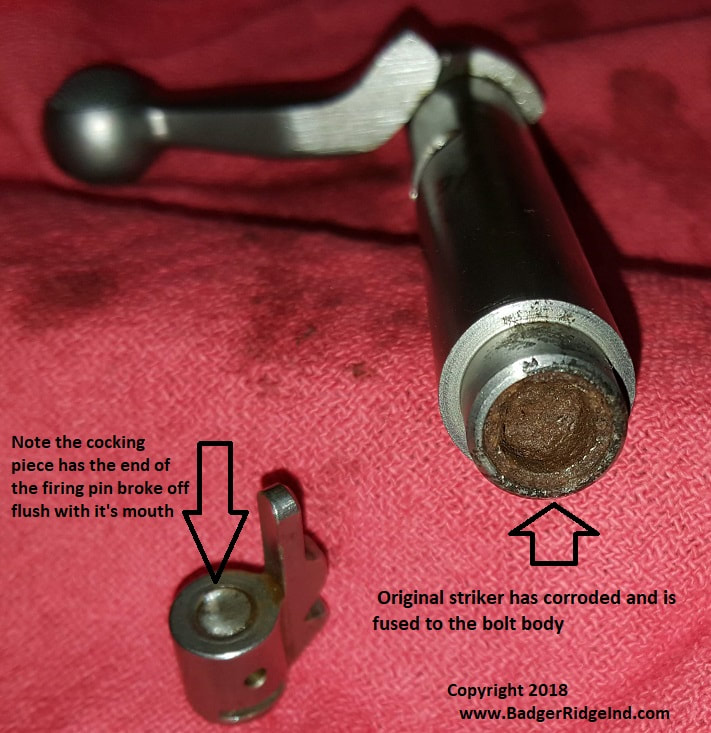
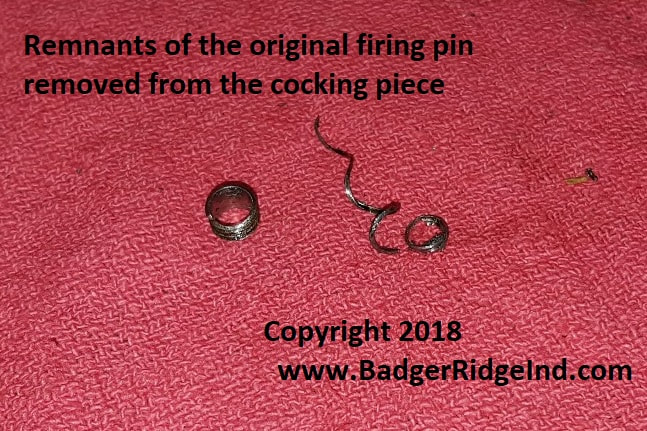
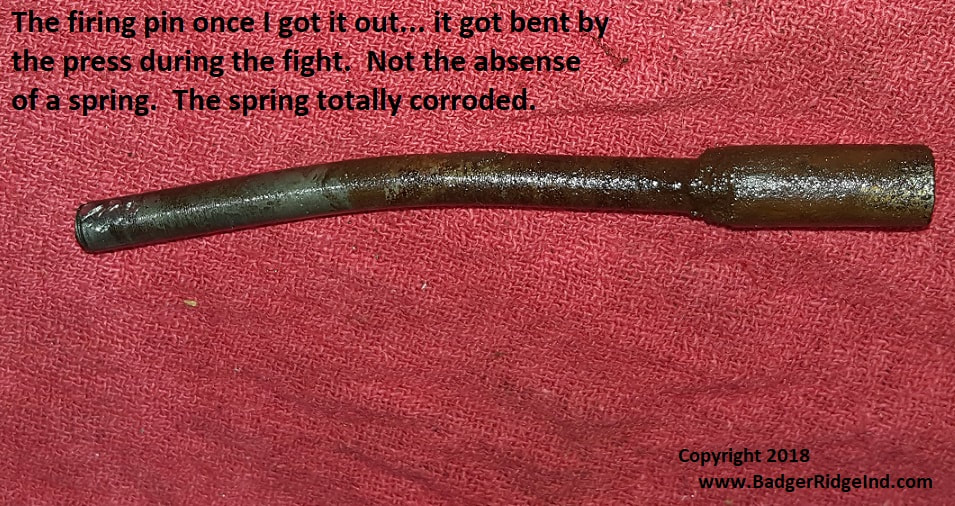
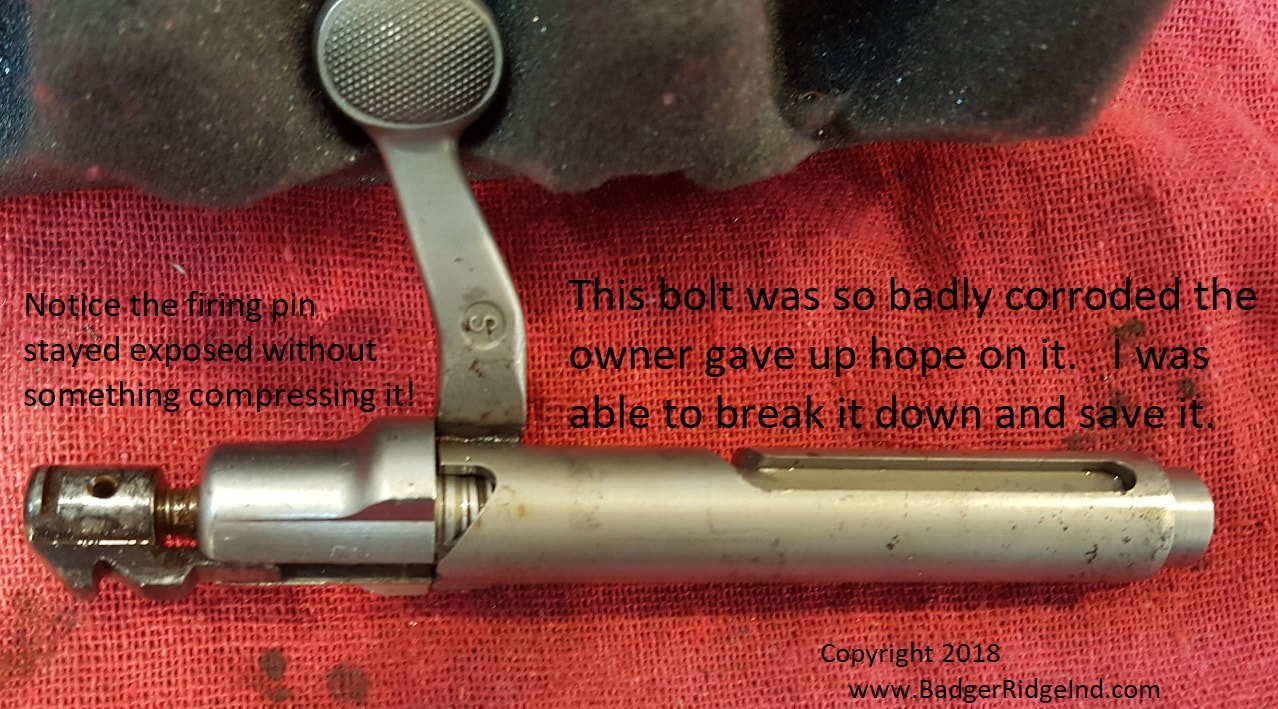
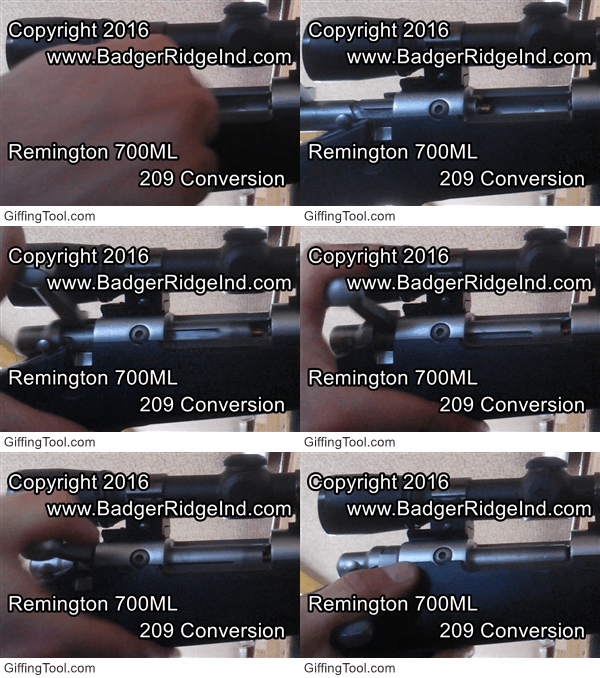 Our Remington 700 ML 209 kit in action Our Remington 700 ML 209 kit in action Welcome to the blog of the company that has the best fix for your Ruger 77/50 and Remington 700 ML/MLS. Our kits are the fix for blow-back, miss fires, etc. Our kits are Blackhorn209 compatible and seal up the breech with 209 primers. If an internet search brought you here, your search is over. This blog has lots of articles about those two rifles and our products for them. You can click on the links in them or in the banner at the top of the screen to find the items you may be interested in. The Remington 700 ML and Ruger 77/50 are our specialty. They both came from the factory with the same fatal flaw: blow-back coursing backwards through the bolt from each firing. The Remington and Canadian 209 mods didn't improve this. If anything they only made blow-back worse. If not quickly and properly cleaned after firing, the bolt will corrode and freeze up. Our kits correct this fatal flaw by sealing up the breech. But not everyone has our kit yet, and seeing these rifles are all 10 to 20 years old, it's all to common for some one to have shot and then put it away without a proper cleaning. Be thankful if the bolt was at least removed! Getting a frozen bolt out of a rifle is a nightmare! So beyond installing our 209 system on bolts that have been well to decently cared for, we frequently get challenged when folks send us neglected froze up bolts. Sometimes we get them before they get beat on, other times we get to see if we can pick up the pieces and make it work. You can read more about some of the crazier ones we get here in the "Badger's Den" by clicking the "Maintenance" subcategory on the menu bar. If you have a tough Remington or Ruger bolt, please reach out to us via our contact form. We'll get back to you with a cell phone number and email address so we can start the process! When the owner of the bolt seen here contacted me asking if I could help, once I replied to him, he was thoughtful enough to text me pics. After looking at his pictures, I was pretty sure I could fix it: But I wasn't certain what parts of his I could salvage and what parts I would need to replace. The bolt plug looked good, which was surprising... usually when folks try to take these apart and break them they mangle something. So I counseled him that I was confident I could fix it, but couldn't be sure of the price until I had it in my hands, tore it down, and scrubbed it all clean. I commonly have to sell new components in cases like this, or have to ask for some more money beyond the basic install fee for my time and tools/materials I put into fixing these. But I told him to start by buying our standard kit and installation, then send me the all the pieces he had from the bolt, and we'd take it from there. When the parts came, it was very clear that the striker/firing pin was fused to the body pretty solid. I tried my normal tricks to get it loose, and even tried to press it out with my jig and 12 ton press. It wouldn't budge. So I began flushing the gunk I could out of it from the back end of the bolt, and tried the jig and the press again. No luck. It actually kept breaking the sacrificial pin I built into the jig to keep from over stressing stuff: This bolt wouldn't break free. Frustrated: I filled the back end of it up with Kroil penetrating oil to sit over night. Worst case, I'd have to sell the customer a new bolt body (we make and sell them). I then turned my attention to the cocking piece. I chucked it up in my lathe and tried drilling it out left handed, that normally does the trick but it didn't budge. So I tried small holes with screw removers wedged in, and every other trick I knew, but it wouldn't budge. So I ended up just drilling it out and leaving the little spiral of the V from the thread in it and then picking that out. It was a bit tougher than removing a screw from a blind hole as it all kept fracturing where the cross pin was drilled through, and it's a deep hole proportionally to its diameter. But eventually I got the parts deep towards the bottome out with a bottoming tap and a small dental pick. I'm glad I could save the customer from having to buy a new one (but we do stock them). I left the bolt body to sit for the evening so that the penetrating oil could do its work. When I came back the next morning none of the Kroil had seeped through to the nose. That wasn't a good sign, as it meant that pin was wedged in there and sealed. I tried the jig and the press again. I sheared the breakaway pin (I was really frustrated having to fab more break away pins!). So I made a new jig that didn't have a shear pin. Either I was going to break the pin free of the bolt body, or I'd break the bolt in the press. At this point I had nothing to lose. Luckily for the customer the 12 ton press and the new jig (and probably the Kroil) did the trick, the pin busted free of the bolt body, but bent the old firing pin the the process, which made it super tricky to get out, but I managed to get creative and work that one out. I was amazed. Typically when I break these apart there are sections of mainspring that come out. In this case the mainspring had completely corroded. It must have been all that corroded mess that I had flushed out the first evening!
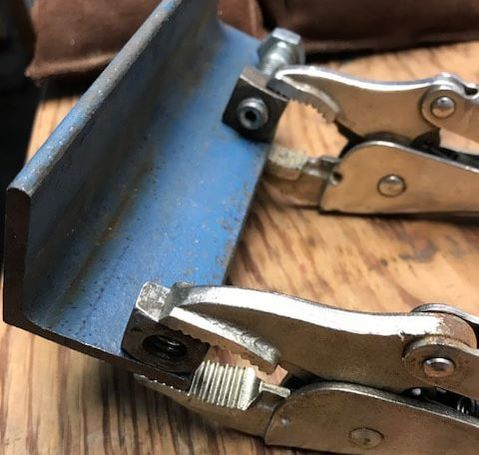
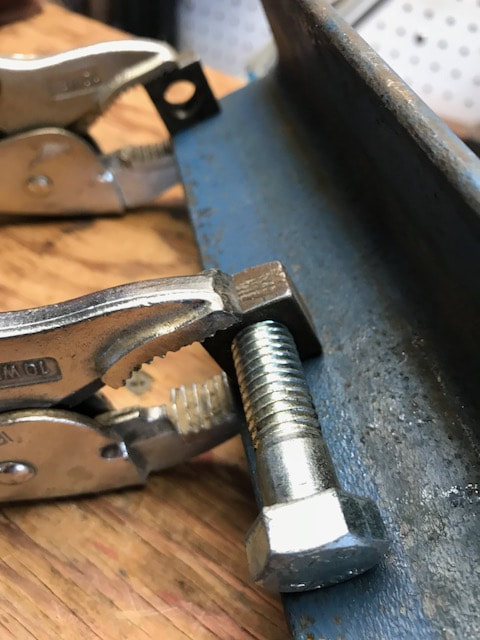
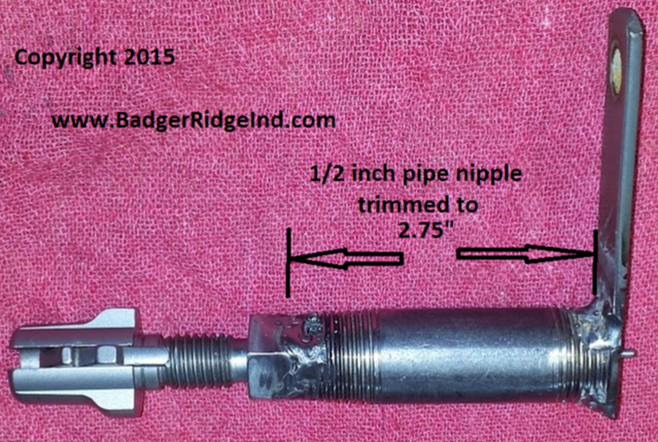
Anyways from here it was just cleaning up all the crud, and removing any pitting that would interfere with the new firing pin. Now that I had the parts all apart and cleaned up: it was just a normal installation. I asked the client for a little more money and sent his bolt back to him: Crisis corrected. If you have a tough Remington or Ruger bolt, please reach out to us via our contact form. We'll get back to you with a cell phone number and email address so we can start the process! 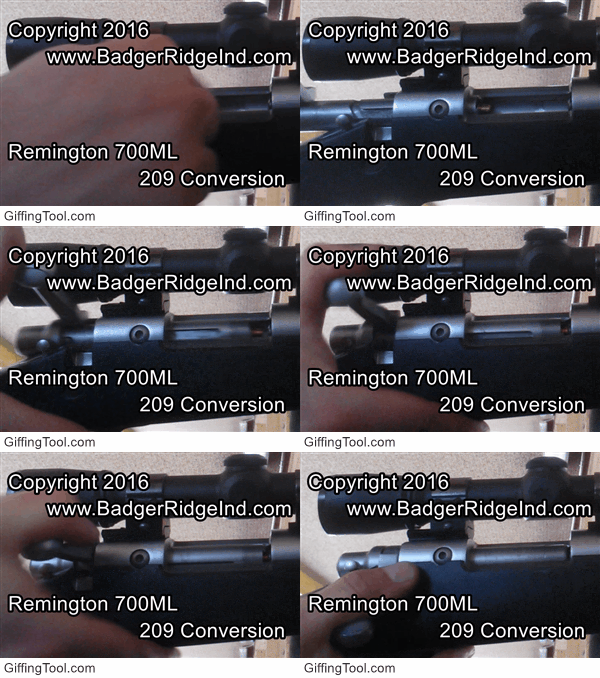 Welcome to the website with the only conversion kit you'll ever want on your Remington 700 ML or Ruger 77/50. I've been writing and updating this blog for years. If an internet search brought you here, you will find what you are looking for by reading through these articles or finding the topic you are interested in along the right hand side. The Remington 700 ML and Ruger 77/50 are our specialty. They both came from the factory with the same fatal flaw: blow-back coursing backwards through the bolt from each firing. The Remington and Canadian 209 mods didn't improve this. If anything they only made blow-back worse. If not quickly and properly cleaned after firing the bolt will corrode and freeze up. Our kits correct this fatal flaw by sealing up the breech. But not everyone has our kit yet, and seeing these rifles are all 10 to 20 years old, it's all to common for some one to have shot and then put it away without a proper cleaning. Be thankful if the bolt was at least removed! Getting a frozen bolt out of a rifle is a nightmare! I was contacted by a Remington 700 owner who admitted he shot his rifle a few years ago, removed the bolt but never cleaned. He had soaked the bolt in penetrating oil for a couple of days, but he couldn't get it to budge. I recommended he buy our 209 conversion with installation, send me the bolt, and if it wasn't too much additional work I wouldn't bother him. He was on a tight budget and couldn't afford our 209 conversion. So, I told him to purchase our legacy mainspring replacement service and ship me the bolt. We'd go up from there as my time and replacement parts required. We have new bolt bodies, mainsprings, and more! Once I got the bolt in my hands, it looked like any other Remington 700 bolt with the Canadian 209 mod, but indeed I couldn't compress the mainspring nor get it to move when I put it in a rifle. I proceeded to soak it a couple of days in penetrating oil as well. After the penetrating oil bath it still wouldn't budge, so I put it in the jig I made for these bolts and pushed on the firing pin with my 12 ton press. That worked! The firing pin finally gave way and "protested" a little as it protruded. From there I had to cut the firing pin off at point where it threads into the cocking piece. I removed the remnant threaded end from the cocking piece. Then I reversed the bolt in the jig and pressed out the pin from the back: Because it was corroded through in multiple places: most of the mainspring came out (in 3 pieces) with the firing pin, but not all of it. The bolt plug wouldn't unscrew, even after I cleaned it up. I realized the back end of the mainspring had fused itself to the bolt plug, so back into penetrating oil for another night. The next day I managed to get the bolt plug to break free of the body. Removed the mainspring that had fused itself to it, and cleaned up all the pitting. After a lot of cleaning, scrubbing, and gingerly re-freshening of threads: the cocking piece, bolt body, and bolt plug ended up being serviceable. As I had to sacrifice the original firing pin to get it apart, I pulled an old used Canadian firing pin out of my junk bin. All I needed was a new mainspring to put it all back together. The client made my additional trouble 'right' with a few more dollars and it all went back in the mail. While the customer is always right, and he is very happy... I have to admit it didn't sit right with me to do so much work just to leave the bolt with a leaky setup that will likely fail even if properly cared for... and if neglected it will totally lock up again. I really felt this rifle needed our sealed breech 209 conversion. But the customer is always right. Hope this has helped you. If we can help you in anyway (perhaps with a Ruger 77/50 or Remington 700 ML) please use the Contact page to reach out. We usually reply within 24 hrs. Be sure to mention what type of muzzle loader you have! 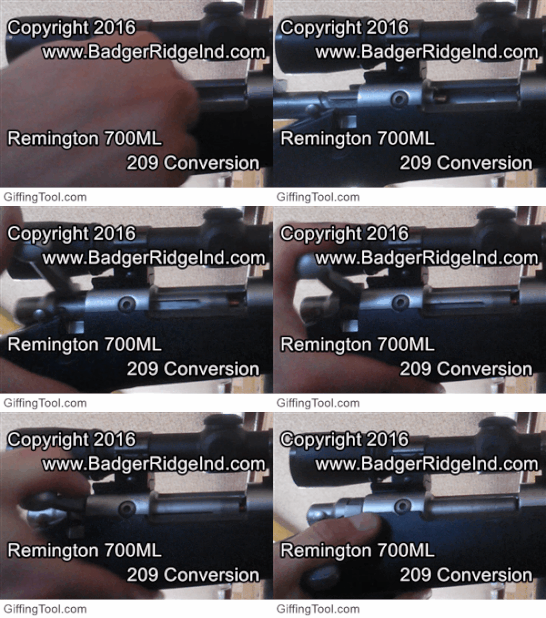 You know you have a great product (like our sealed breech 209 conversions) when so many of your customers take the time to write such detailed, complete, messages. Below is what Al R from Indiana had to say about our Remington 700 ML 209 conversion that he installed himself. For purchasing information click here, or on the pictures of the kit. If you don't want to read his insightful feedback, feel free to click the topics along the right side to find what you want concerning our Ruger and Remington 209 conversions (or click any of these blue links). Good morning, Yesterday I converted the bolt on our family-owned Remington 700ML. My son, Matt, (who is much more computer savvy than I am) ordered it about 7 or 10 days ago. For the sake of you knowing how much mechanical background this (very satisfied) customer has, in 1966 I was an apprentice tool-and-die guy. Within a year or so in the apprentice program I changed career course and enrolled in engineering school, which has paid the bills for the last 50 years, until my retirement. Over the years I accumulated a small hobby garage machine shop (drill press, vertical mill, engine lathe, shaper, welders, etc.). I consider myself an upper-echelon, non-professional, hobbyist. With those credentials, I hereby give a grade of “A” to Badger Ridge for your VERY complete instructions (both electronic and hard copy) and the materials kit for making a Remington 700ML 209 Bolt Conversion. Certainly the key to doing the conversion yourself is “Tool 002”. I’ve attached a photo of my rendition of “Tool 002” that didn’t require welding. (It was only 10°F here yesterday in central Indiana, and I didn’t want to have the shop doors open to do the welding). The B/M for my “Tool 002” is: (1) short piece of angle or barstock (2) #10 ViseGrip pliers (2) ½-13 nuts (while square is best, heavy hex would be ok, and standard nuts would work) (1) ½-13 hex head cap screw, drilled to accept firing pin The other suggestion I have is to recommend that when tapping the cross pin (out and in) the instructions need to prescribe support, or it will bounce, (and eventually bend), I suppose. I used a machinist V-block, but anything could be shimmed up and made to work. As to tuning the breech plug, Fiocchi 209 primers will not fit in my rifle without tuning. I can’t wait to get the scope mounted and some Blackhorn powder and take the gun to the range, once it warms up. On a larger picture, projects like 209 Conversions make America stronger, as DIY people who do these types of projects are problem solvers that extends way beyond a single 209 Bolt Conversion. I’m a strong believer in “Made in America”. I’m glad to see that you’re doing your part. Best wishes to Badger Ridge for 2018, and keep up the good work!! Sincerely, Al Al, Thanks for the kind words, encouragement, and insight on an easy way to improvise a firing pin tool. As for the cross pin removal: I like to use the pipe nipple with the welded nut bolt tool on 700ML's... it holds it all very well, and holds best when clamped in my vice. Makes tapping the pin out a breeze. With this tool I've had little trouble removing all but the most stubborn cross pins. If the pin doesn't want to budge, usually trying from the other side is all it takes. However for the really stuck ones, I do place the cocking piece on the anvil of my vice, or in a V block and use hard strikes to remove the pin. When putting it all back together, using the roll pin we include with the kit (and de-burring the pin with a little light filing) usually requires little undue force. I tend to use the tool I welded up quick (two nuts welded to small angle... similar to the one you shared) when I work on un-threaded cocking piece firing pins that have to have solid dowel pins... and with solid dowl pins, I pre drill 3/32, then disassemble & chase each hole individually with a #41 drill bit. This way the solid dowel pin floats into place (so there is little friction on the pin requiring hard strikes).
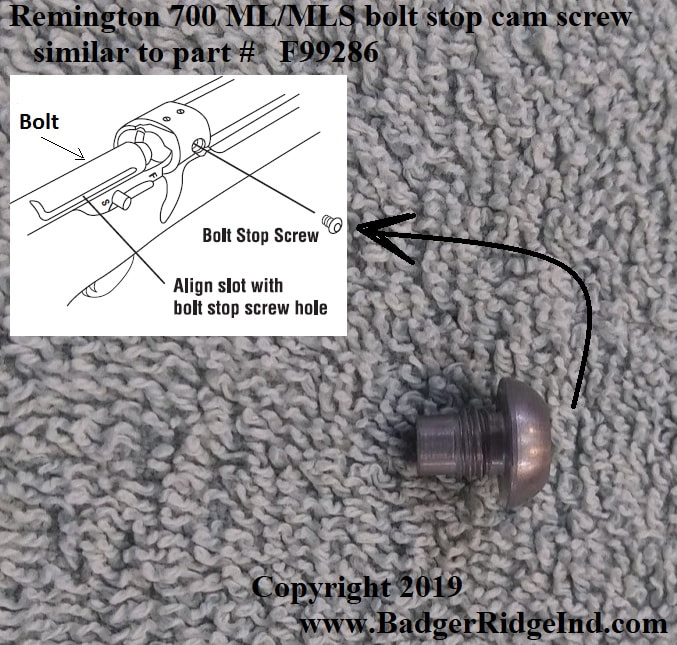
As for primer recommendations: Yes, Fiocchi and other European 209 primers are typically fatter than US primers. (I used recommend standard CCI but now that CCI changed their dimensions and color [now they are silver] I cannot recommend them, and instead suggest Federal or Remington primers). With most of these you will probably have to tune. Remember if a primer sticks in the nose, a dry fire usually will loosen it. Thanks again for writing in and allowing me to share your message with everyone, Tom 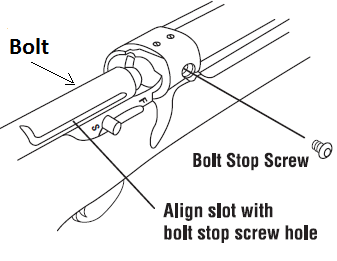 Excerpted from Remington Manual Excerpted from Remington Manual We're always looking to help Remington 700 ML/MLS shooters. So on top of our awesome 209 Conversion Kit, Brand new Bolts, New Bolt Bodies, Mainsprings, Vent liners, etc, we now sell replacement bolt stop cam follower screws. So if you lose yours (we've had a few folks contact us asking for help) we can help you out. We had these made out of 416 Stainless steel to produce something similar to the Remington part #: F99286 Note: Our stainless steel screw will work just fine in blued alloy rifles.
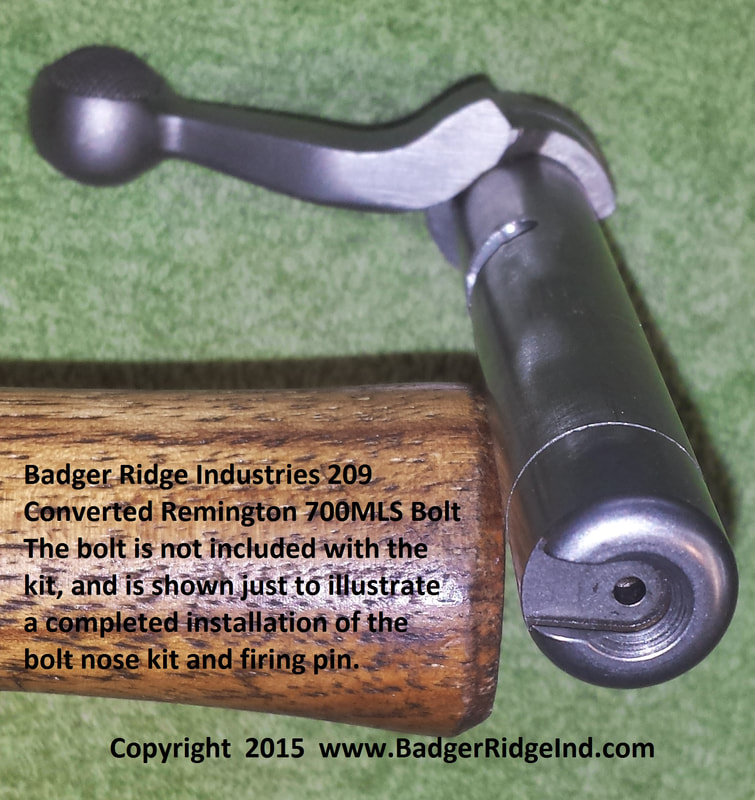
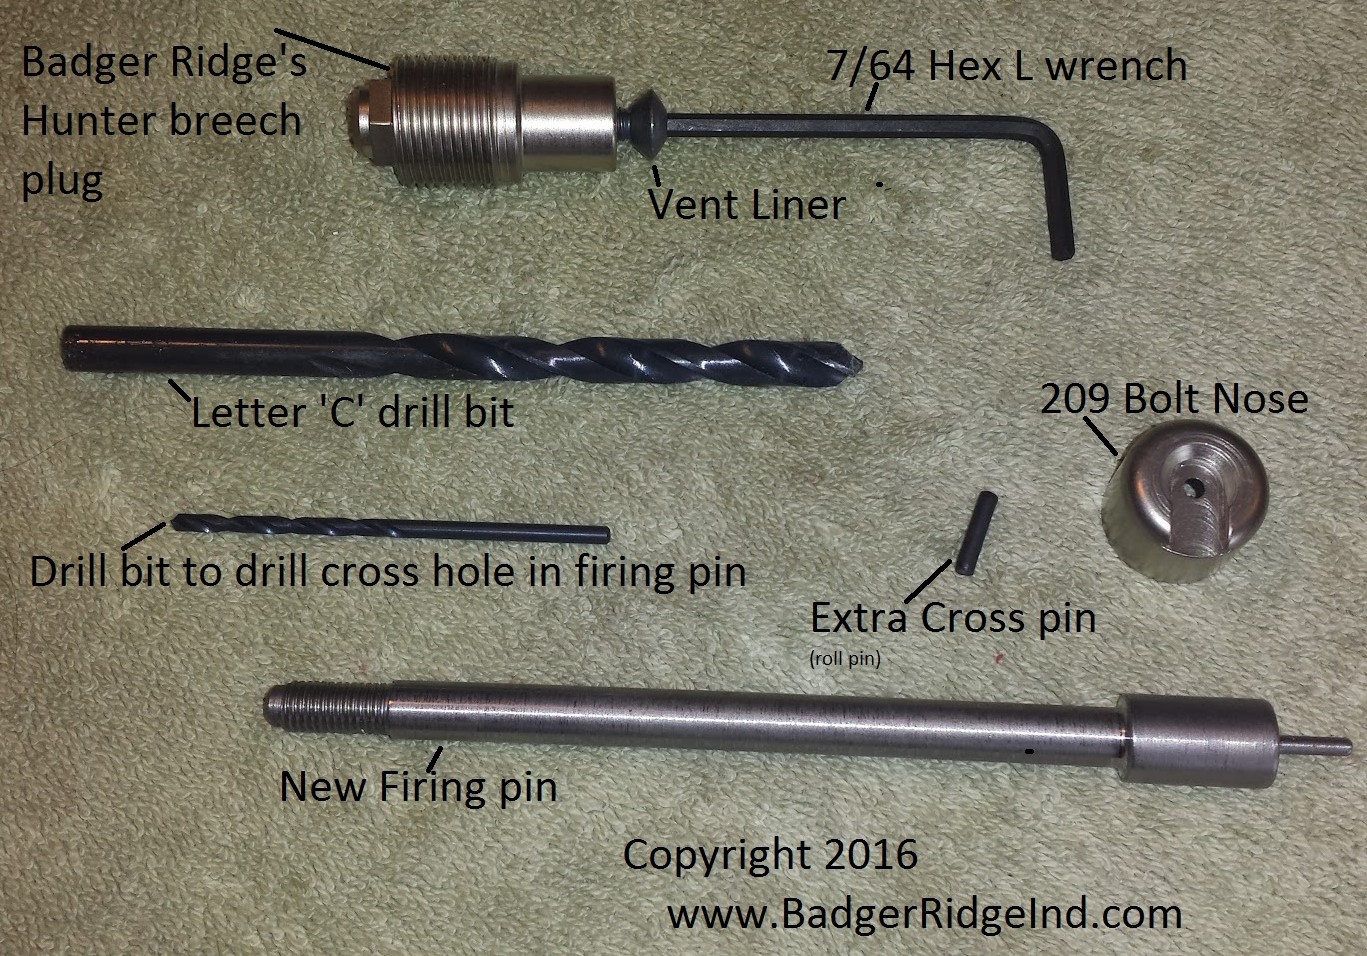
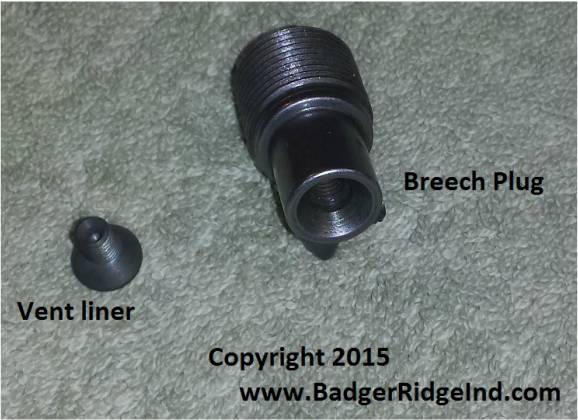
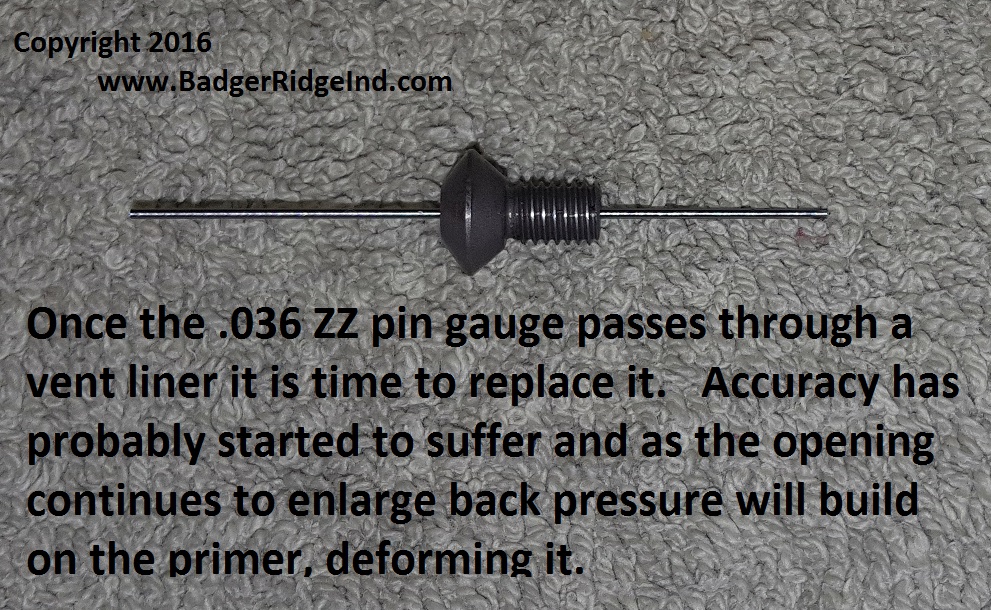
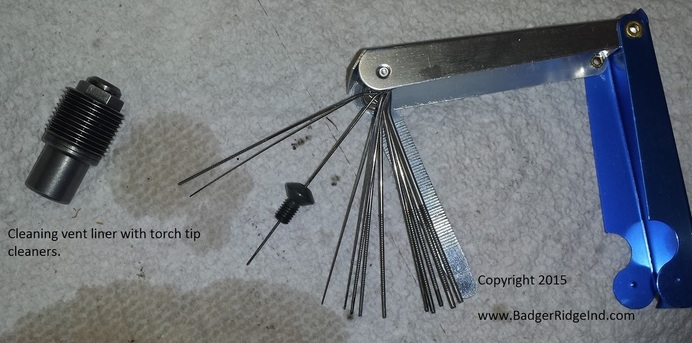
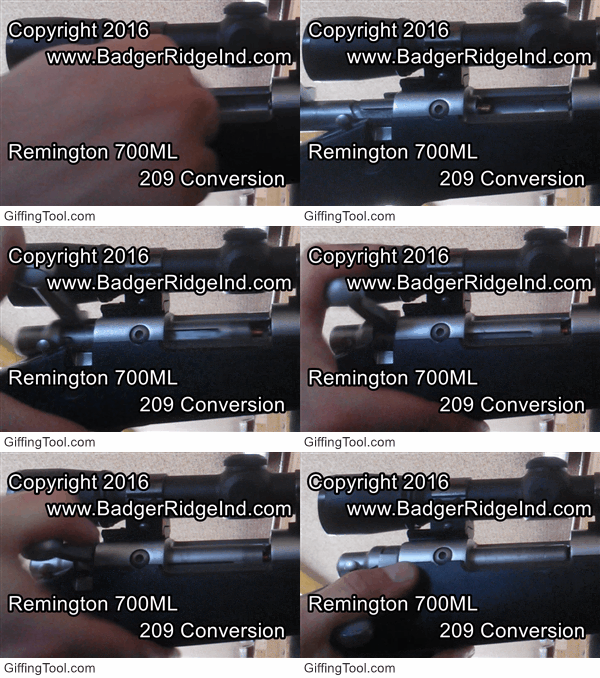 The Remington 700 ML 209 shot shell conversion kit we sell is very different from the original rifle's system, or any other 209 systems available for the 700 MLS. Our system uses a bolt nose that holds and feeds the primers into our unique breech plug. The action of the bolt swages the 209 primer into the breech plug; sealing it up, and essentially eliminating blow back. Thus it requires a little different maintenance than the original system. Most of that is due to our breech plug being of a different design: It uses a vent liner. So people only familiar with the old system, do have a new component and some learning to do. But it's not hard; it is simple breech plug maintenance. The instructions that come with the kit explain this, and it gets into more depth in our Frequently Asked Questions (FAQ). There is a lot of good reading in our FAQ but I wanted to emphasize it again here. Excerpted from the instructions that come with the kit: Breech plug maintenance: After firing 209 primers, burnt priming compound will coat the flash chamber & the flash hole of the Vent Liner. To clean: remove the breech plug & ream the flash chamber gently with a just under size drill bit (7/32). Use torch tip cleaners to clean the vent liner. Scrub & remove all fouling with the appropriate solvents, & place anti seize on all breech plug/vent liner threads before using the breech plug. Eventually the vent liner will wear out; it should be replaced when it’s interior has opened to .036” or accuracy will suffer. Always use a vent liner in the breech plug, or you may see excessive/unsafe pressures at the primer!!! 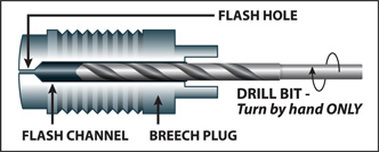 Generic breech plug from Blackhorn209.com Generic breech plug from Blackhorn209.com None of this is new to anyone who has owned or used many of the newer designs that use 209's to seal up the breech. Here is an generic breech plug maintenance image from Blackhorn209.com: 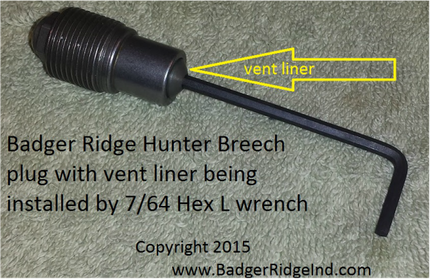 The main difference between our breech plug and the generic one above it that ours uses a vent liner to form the flash hole. This is because each shot erodes away part of the flash hole, and if the flash hole was machined into the breech plug eventually the entire breech plug would require replacement. It's much better to only have to purchase an inexpensive common vent liner, over replacing an entire breech plug. 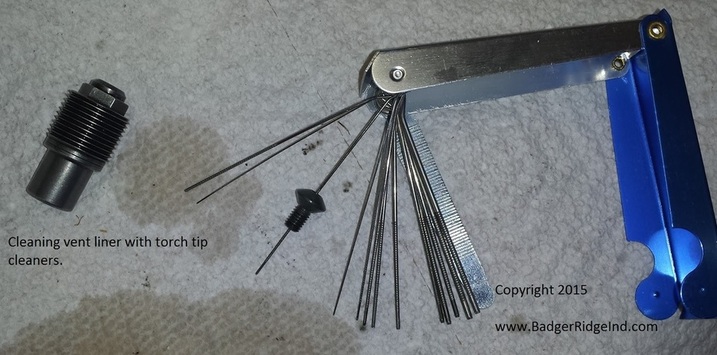 So that leaves the question: "When is it time to replace the vent liner?" The simple answer is when its interior has opened up to .036. Vent liners start at about .030 and open up oh so little with each shot. We sell .036 ZZ gauge pins to help you determine when its time to replace them. Alternatively when you use torch tip cleaners to clean the vent liner, you can measure the largest one that will pass through. When its .036 or larger, replace the vent liner. Or in other words, if the .036 ZZ pin gage passes through, replace the vent liner. If you don't replace the vent liner when it opens to .036 you can expect a drop in accuracy. If you keep shooting you'll continue to open it up, accuracy will degrade, and back pressure will start deforming primers. You can read more about this in the FAQ (Frequently Asked Questions)
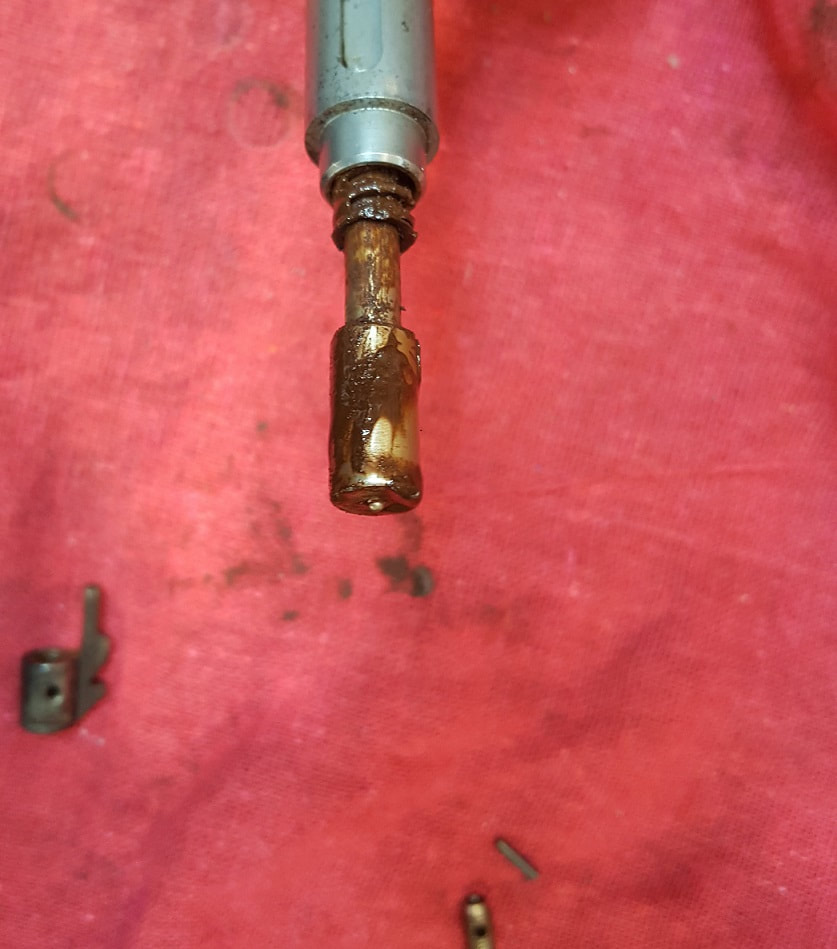
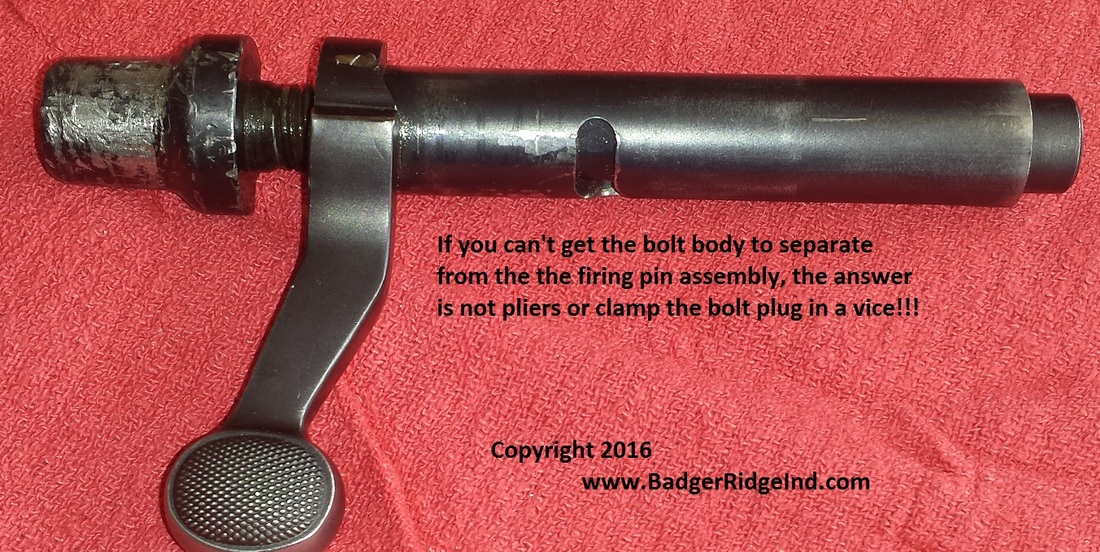
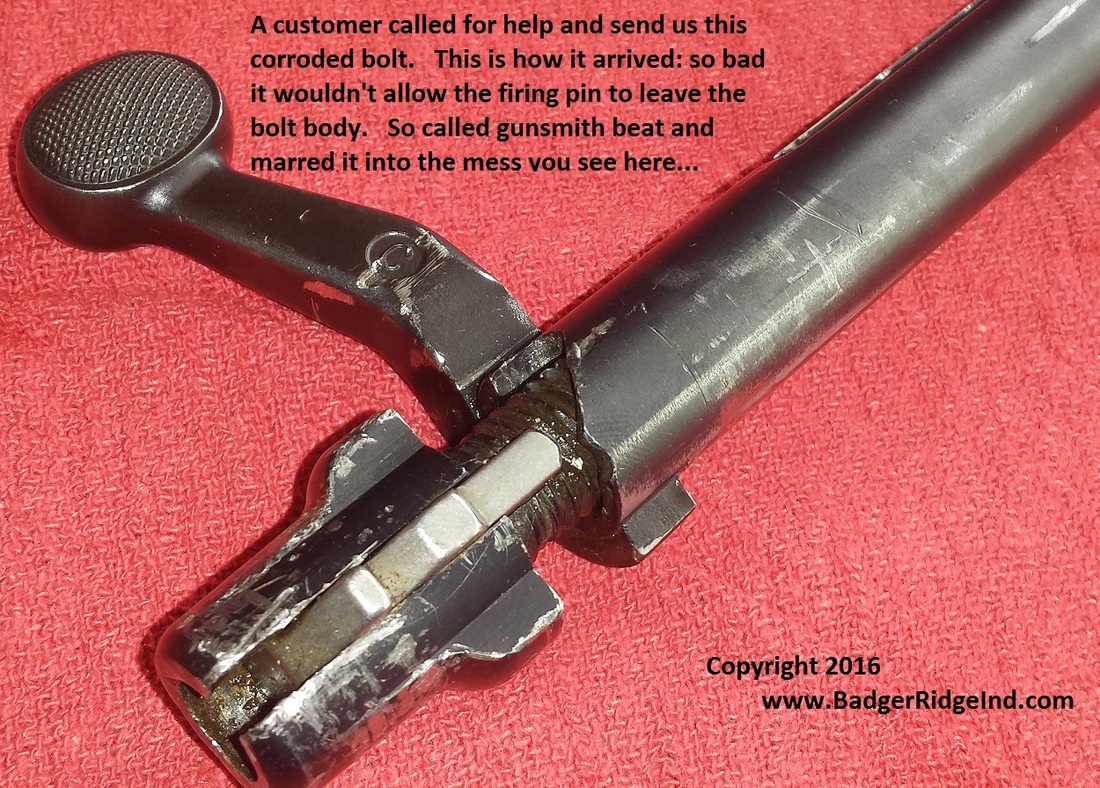
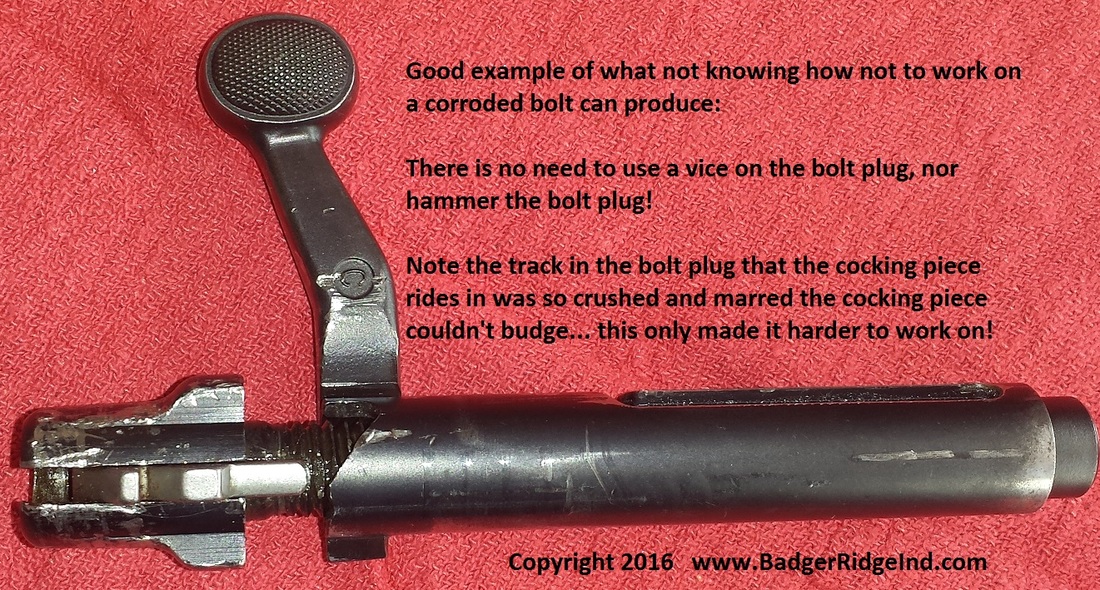
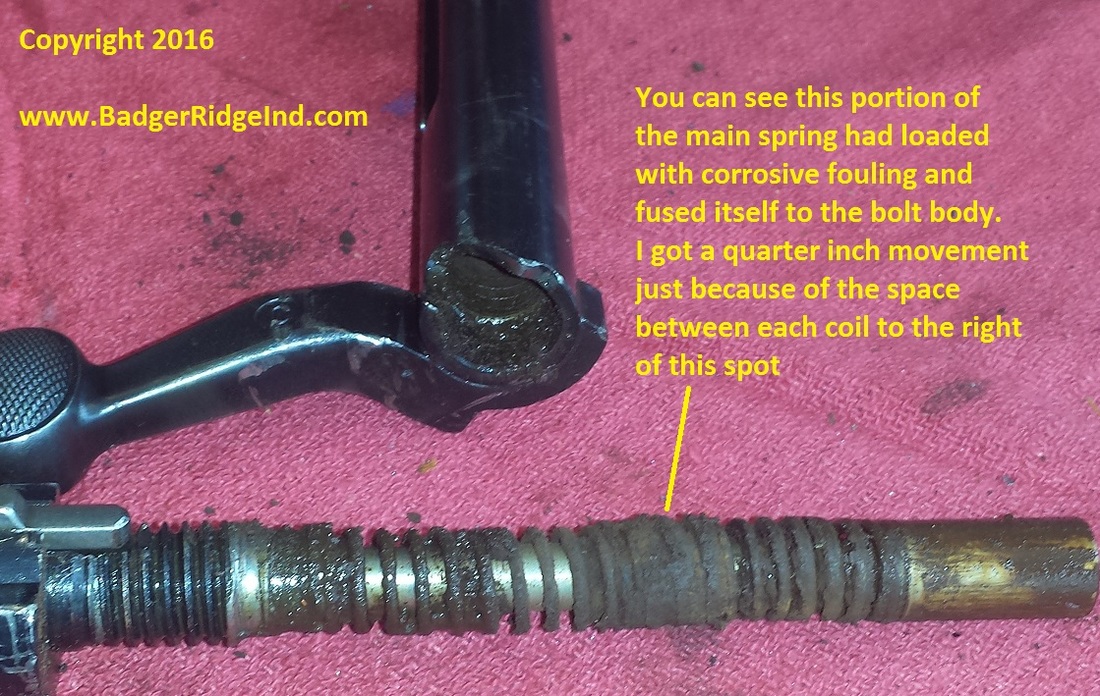
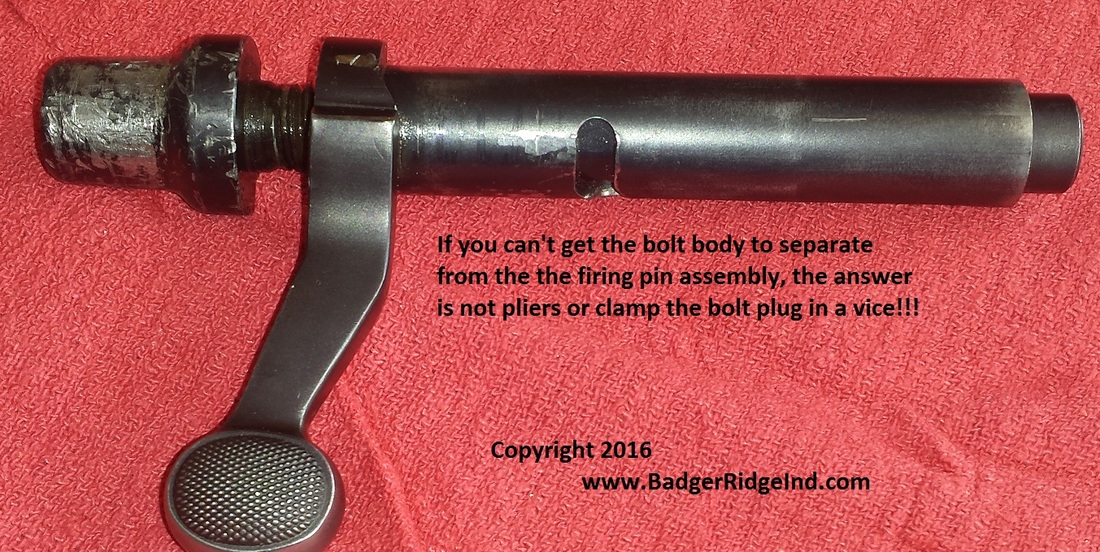
A few days ago I got a call from a very nice fella out west. He wanted me to send him an entire new bolt. Always wanting to help, I assured him I could build and send him a brand new bolt for his Remington 700ML, but I wasn't convinced he needed to spend that much. I inquired further. Seemed he was having some trouble because the bolt was frozen and wouldn't come apart. He said the worst part was that he let a "gunsmith" that promised to convert it to 209's take a crack at it, but he had failed, damaged it severely, and promised him there was no hope for it. After chatting more with him he decided to take my advice. Instead of purchasing a complete new bolt (much more expensive) he purchased a conversion kit with installation, sent me his bolt, and let me have a crack at it. I explained that If I couldn't use it, I'd refund his money per the terms of use, and then he could buy a new bolt being assured there was no hope. If I fixed it and it took a bit more of my time or replacement parts I stock, we'd work it out. He explained that the bolt plug was torn up and not serviceable and the cocking piece was frozen in it. I let him know that the standard 700 bolt plug would work, and I had them on hand. Once I saw the bolt and got into it I'd know what was usable and we'd talk about converting it or just sending an entire new bolt out. When the bolt arrived a few days later it was clear that the bolt plug was unscrewed from the body but the firing pin was stuck inside the body, and the body was packed solid with old fouling and years of corrosion. Seeing the firing pin would rotate but not move in nor out, it was free of the mainspring but the mainspring was bound to the bolt body. The customer was right: whoever clamped down on the bolt plug had squished it so much the cocking piece couldn't move. They also hammered on the back and deformed it. Getting the cocking piece to protrude enough to expose the cross pin was going to be a chore! But first things first, got to get the mainspring to move in the bolt body. It was corroded solid and wouldn't budge. So I started the over night soak in penetrating oil. And got on with other things. After having my coffee and breakfast the next morning I went out to the shop while it was still cool and got to work. I held the bolt in my vice with some rubber jaw pads so I wouldn't add to the marring. Then some persuasion was applied by a hammer directly to the face of the stuck firing pin. I used an old firing pin out of my junk bin as a punch. I got the firing pin to move along the axis of the bolt body and compress the mainspring just a bit. That was all I needed. Still firmly held in the vice with rubber jaw pads, the nose up, and the plug down, I tied on some wire onto the bolt plug. Then hung a very heavy weight on it to counter act the main spring and always have a 'firm hand' pulling the firing pin out of the body. Then I added some more penetrating oil and a few more taps. Followed by rapidly lifting and dropping the weight to create a pumping action via the mainspring. The movement increased ever so slightly as the crud pumped out. The penetrating oil filled the tip of the bolt with brown-orange corroded mess which I cleaned out and replaced with fresh penetrating oil, and repeated the love taps and lifting and dropping the heavy weight. Each tap sprayed a bit of penetrating oil, but who doesn't love the smell of penetrating oil in the morning?!?!?! I repeated pumping, cleaning the crud, and refilled with fresh oil. I continued until I could get about a 1/4" of movement on it, but then it just wouldn't go any more. So I went "nuclear" on it! I made up a jig out of scrap to hold the bolt body between the bolt plug and the body. Made sure it contacted the body, and not the handle (the OEM bolt body handles are only silver soldered on... if you put too much pressure on a handle it will pop clean off... if you break one off, don't worry we can TIG weld it back on for you!). Then I put it in my 12 ton hydraulic press, placed a tip of an old firing pin between the ram and the firing pin and pressed. It wouldn't budge pass the 1/4" of travel I had earlier. So I backed off and repeated applying pressure... by the third or fourth cycle it broke free! I had the firing pin loose!!! Some times you got to nuke 'em from orbit. Now that I had it apart it was clear that the bolt had a old "Canadian" 209 conversion. I wrote about how disappointed I was with the "Canadian" 209 conversion I purchased over 12 years ago in one of my first posts to this blog. It seems that someone used the rifle but didn't clean up afterwards, then eventually the corrosive blow back fused the mainspring to the bolt body. By putting the bolt in my vice nose up, and affixing a heavy weight to the bolt plug with some wire I was able to pump the crud out in front of the fused area and got some movement. But I needed the 12 ton press to finish it off.
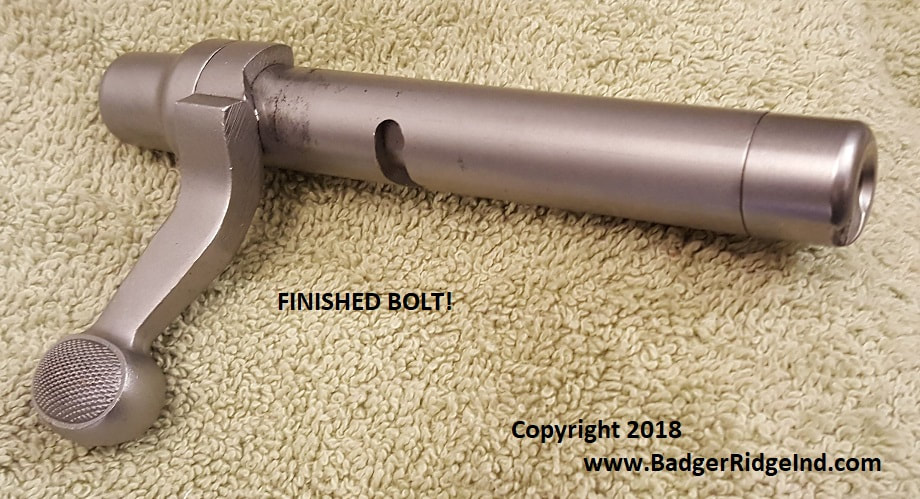
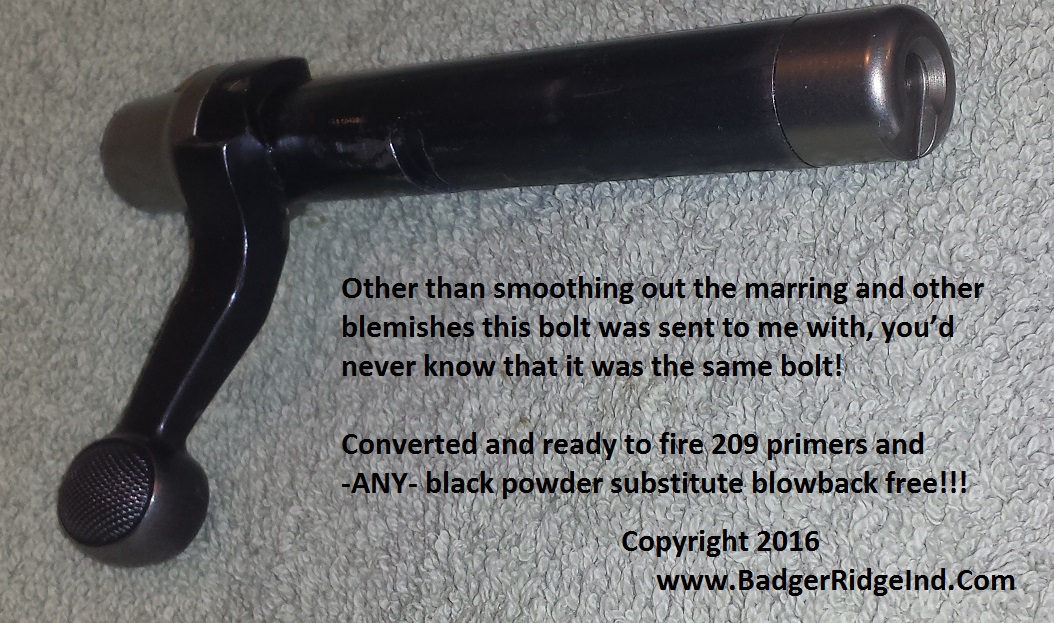
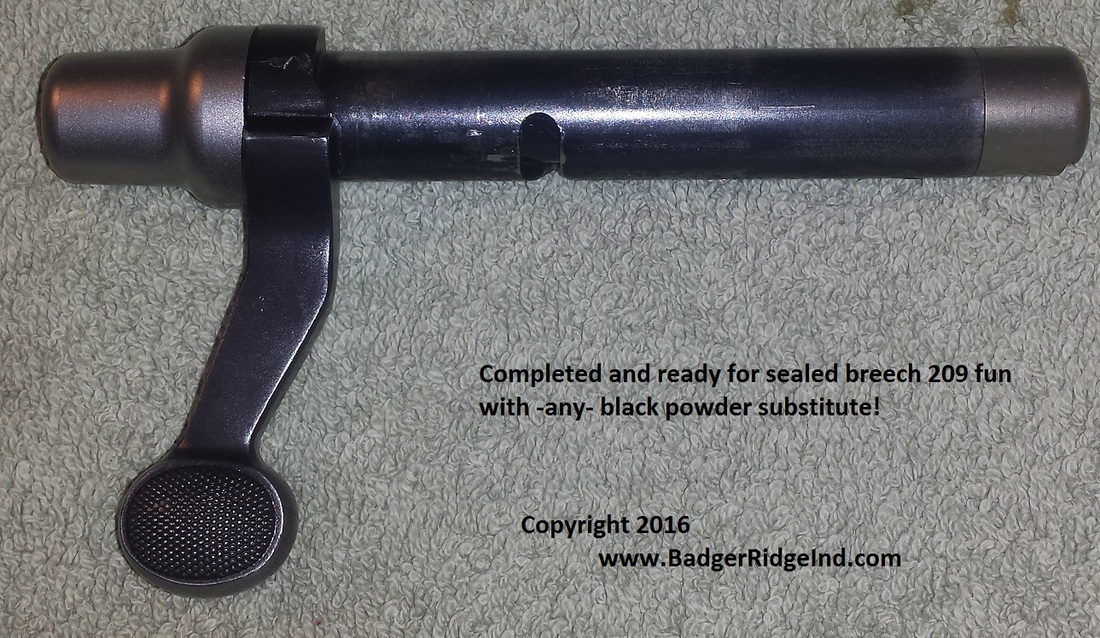
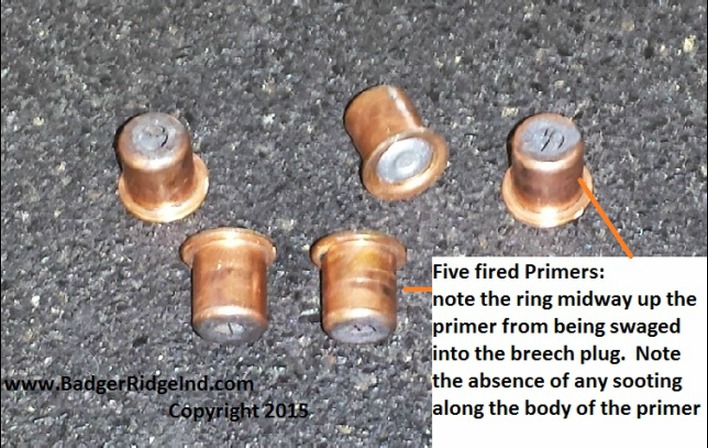
Remember our kit seals the blow back into the breech plug, so you don't get it inside the bolt body! Luckily once I got it all cleaned up, there was only some light pitting on the inside of the bolt body. I spent more time cleaning up all the marring and mashed bits on the body with a fine file than I spent cleaning up the massive amount of gunk. Oh, and I had to chase the 1/2x13 threads with tap to fix where all the pounding on the bolt plug previous to me had damaged them. But that also cleaned out all the gunk that had collected in them. Getting the cocking piece out of the damaged bolt plug was a minor challenge. First I just cut the firing pin's large end off and pulled off what was left of the main spring. Then opened the groove in the bolt plug that the cocking piece rides in with a wedge and some love taps. The cocking piece moved freely now, but was still captured in the bolt plug because the previous "gunsmith's" pounding on the rear peened over the back of it. So I reamed it out with some large drill bits until the cocking piece came out with the little bit of firing pin still connected to it. Then it was a simple placing of the firing pin in my vice and driving the cross pin out. The cocking piece was in really good shaped despite all the mayhem that had ensued around it. Seeing the customer had the forethought to include a new Remington 700 stainless bolt plug, the assembly from here was the same as any conversion. For details see our online conversion instructions. The completed bolt is below. With our Remington 700 ML 209 conversion kit, we get very few complaints or requests for assistance compaired to the number of kits sold and installed. The few instances usually are tied to not fully comprehending the kit's components and how to maintain them. Of these, most center around the Badger Ridge Hunter 209 Breech plug. There is a good section in our FAQ on the breech plug and how to maintain it. The other complaints center around not understanding the subtle differences when using Blackhorn209. TROUBLE SHOOTING AND COMMON MISTAKESYou must read and understand the Remington 700ML owners manual prior to using our conversion kit. Using our 209 conversion replaces the breech plug; so you have to apply what the Remington 700ML Owner's Manual says about nipples, flash holes, and caps to flash channels, vent liners, and 209 primers. Failure to Fire, Misfires, Hang-Fires, Bloopers, etc: Typically these sorts of malfunctions are caused by one or a combination of: -1. Using blackpowder primers with Blackhorn209 -2. Obstructions or contaminants in the flash chamber (improper maintenance) -3. Failure to seal and compact the charge when using Blackhorn 209. -4. Not replacing the mainspring during conversion/poorly installed conversion, improper firing pin protrusion, using oils/grease that gel when cold, etc. First and foremost: The mainspring should be replaced during conversion. The original configuration subjected the mainspring to lots of corrosive blow-back, heat, and extra cycles. All quickly reduce its effectiveness. If not replaced, light and inconsistent primer strikes are probable. Also if the firing pin protrusion was not set properly, or there is a bur, rust, or crud causing the firing pin to hang up, failures to fire are probable. We always replace the mainspring as part of our installation service. If you did it yourself and are having trouble with detonating the primer: Take the rifle to a competent gunsmith to remedy these or any other unsafe or abnormal condition. Use only standard shotshell, full powered 209 primers with Blackhorn209. I recommend and use standard CCI’s!!! Remedies for obstructions or contaminants in the flash chamber/improper maintenance: -- Clean the flash channel of the breech plug with a 7/32 drill bit (only use your fingers and light pressure... do not remove metal!!!) Use standard bore cleaning solvents to dissolve any remaining contaminates and remove. Clean the flash channel of the vent liner with torch tip cleaners. Break cleaner works well to remove oils and greases and any remnants. Remove any lubricants, greases, or oils in the flash channel prior to loading. -- Keep anti-seize only on the threads of the breech plug and vent liner; anti-seize or any other lubricant will reduce primer heat and cause ignition problems when in the flash chamber, or face of the breech plug. -- Swab out any excess oil left in the barrel with a dry patch before loading In cold climates avoid greases and oils that gel or congeal when cold -- We use and recommend only dry PTFE lubes on the firing pin assembly If you are using full powered primers and doing the above maintenance and still having issues only when using Blackhorn209 (typically diagnosed by successfully and repeatedly igniting a load of other easier to ignite black powder substitute), the cause is most likely a poor seal on the primer or projectile. Poor primer seal can also be diagnosed by having soot or blow back on the sides of the 209 primers; only the primer’s face should have soot on it: -- Seal Primer: full power 209 shot shell primer swaged and sealed properly into the breech plug; one should feel some resistance when closing the bolt with a primer in the nose. This is because the primer is being swaged into and sealing the breech plug. Failure for the primer to seal is commonly caused by over or excessive breech plug tuning, or poor primer fit. Correct by changing to a larger size brand of primers (some European manufactured tend to be bigger), or purchase a new breech plug & do not over tune. -- Change projectile: Powerbelts, Bore Locks, Minet, Lubed conicals, Minnie-balls, Hornady FPB etc do not fully seal (aka obturate) until the powder charge expands and presses them into the rifling grooves. Use snug fitting sabots with properly sized bullets with Blackhorn209. -- Change powder: Black Powder and its other substitutes will combust easily and work OK when not completely sealed, but Blackhorn209 needs a good seal for proper ignition. Changing powders when one has a a poor seal is circumventing the problem rather than fixing it. So in summary: 1> You need to make sure your 209 conversion kit is properly installed 2> You still have to clean the crud out of the flash channel like you would any muzzleloader, it just requires a few different tools. In many ways it is easier than taking care of a side lock. Dry PTFE lubes work great on the firing pin and action at all temperatures (hot and cold). 3> When you change to Blackhorn209 those weak 209 black powder primers aren't going to do it. 4> And the old school, easy load, seals with combustion, projectiles don't work well with Blackhorn209 neither. Keep it simple: Use our kit with modern sabots and properly sized bullets, standard 209 primers that swage and seal, and you'll nearly certainly be malfunction and blow back free. |
Welcome to the Badger's Den!
|
|
|
Written by:Tom, purveyor of fine products. |
Archives
March 2024
August 2023
June 2023
March 2022
December 2021
September 2021
February 2021
January 2021
September 2020
April 2020
January 2020
October 2019
September 2019
May 2019
January 2019
November 2018
July 2018
May 2018
April 2018
February 2018
January 2018
November 2017
October 2017
August 2017
July 2017
April 2017
February 2017
January 2017
November 2016
October 2016
September 2016
August 2016
July 2016
June 2016
May 2016
December 2015
November 2015
October 2015
September 2015
August 2015
May 2015
April 2015
Categories
All
AR Stuff
Blackhorn 209
Customer Feedback
Hunting Gear & Accessories
Maintenance
Organization
Remington 700 ML/MLS
Ruger 77/50
Savage Muzzleloader
Troubleshooting


 RSS Feed