|
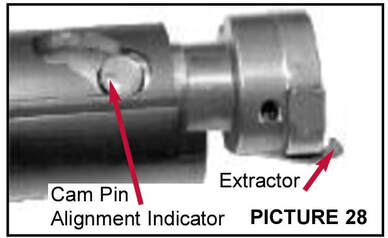
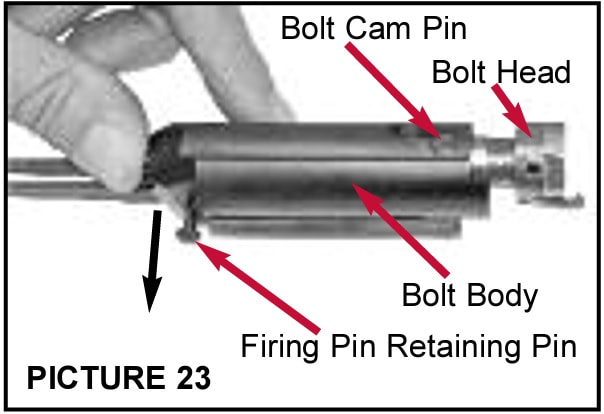
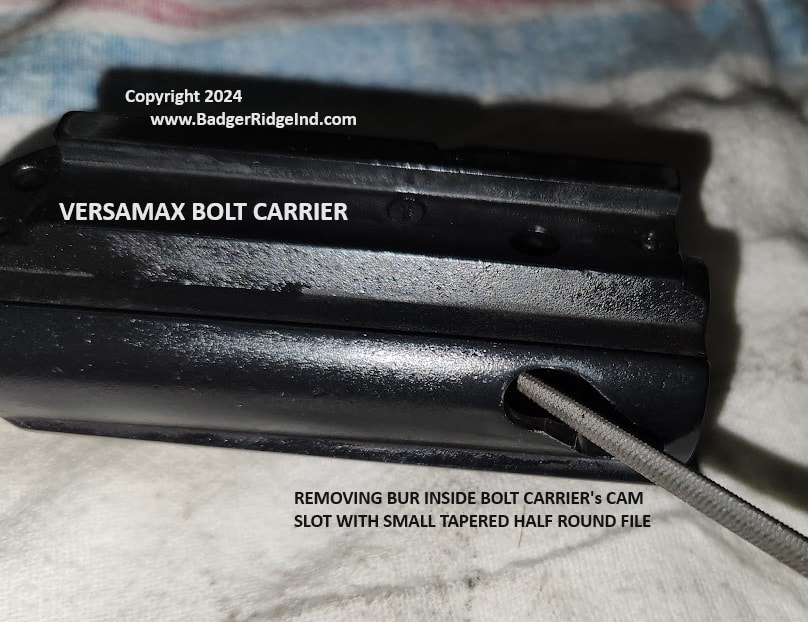
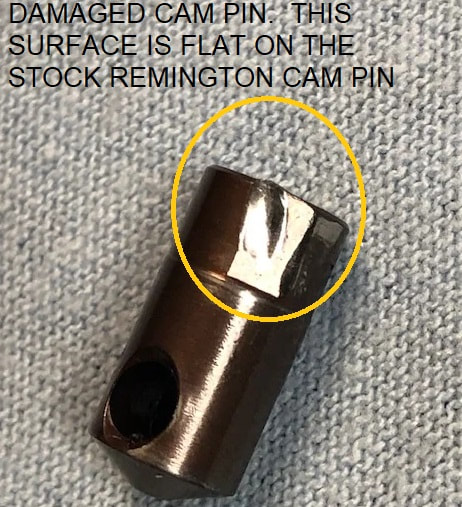
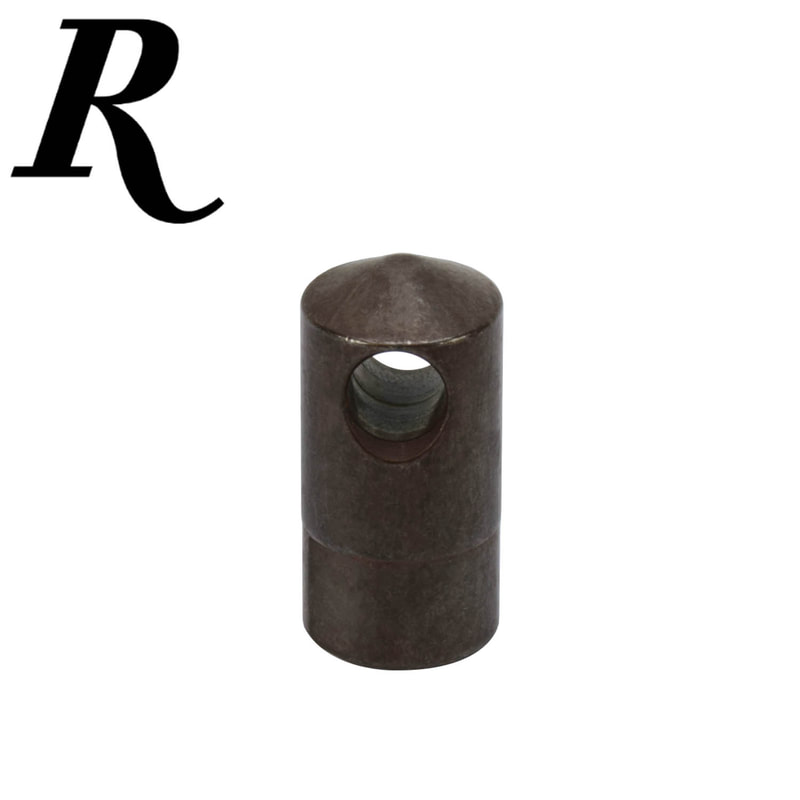
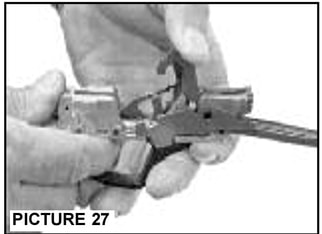
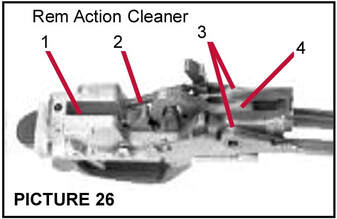
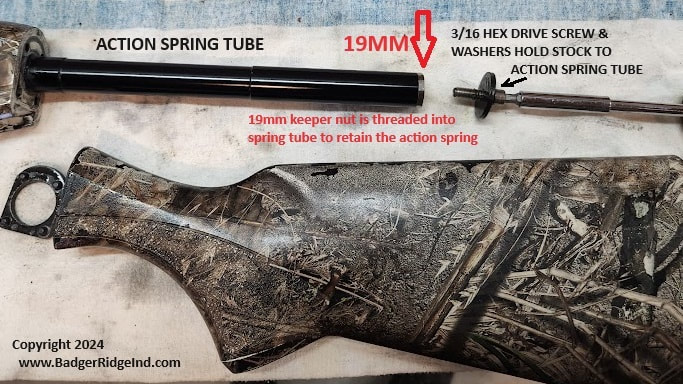
Thanks for visiting the The Badger's Den (the blog for Badger Ridge). If an internet search brought you here looking for muzzleloader solutions, please stick with us: we have the solution to your Remington 700 ML/MLS and Ruger 77/50 woes. I update this blog frequently and what you are looking for is probably one or two clicks away. This blog is sorted categorically and chronologically. So you can find what you want by looking in the appropriate category, or if you know when it was published, you can use the time line. Or just keep scrolling down! If you are new to our site: YES WE STILL SERVICE AND CONVERT THESE OLD MUZZLE LOADERS But for this installment I'd like to tell you about a new product service we offer: Remington VersaMax Cam Pin, Hammer, Spring, & Plunger Replacement Parts I purchased a VersaMax about 7 years ago and have been very happy hunting waterfowl with it. Its a bit on the heavy side to carry all day upland hunting, but its been my "go-to" gun for waterfowl. It recoils softly. It smoothly cycled everything from the lightest trap/skeet loads, to the heavy 3.5" magnum waterfowl loads with out a hitch (well almost... there was one time I wore a supper fluffy warm glove on my left hand that jammed up the loading port... but that was hardly the gun's fault). I bought mine due to the reviews I read, and was really exited to own a US made "Benelli clone." I couldn't ever come to believe I could afford a Benelli, and being able to own one made in the USA.... with an improved gas system was a great thing to me. If you didn't know: the VersaMax is a clone of a Benelli M4 (the only autoloading shotgun to pass US military trials) adopted by the USMC as the M1014. After USMC adoption I understand Remington cloned it secretly, improved the Benelli Argo gas system (and called that the VersaPort system) and then waited. They waited for the day the Benelli M4's patents expired to patent their improvement as the VersaMax and began selling it. Unlike the M4/M1014 Remington gave the Versa Max a standard sporting shotgun stock and barrel, and a few other changes. And I flat out love it. I've shot some of my best trap ever with it, and I've killed a lot of waterfowl with it too. And did I mention it's super soft recoil and reliable with every factory load I've fed it? I've also installed an extended magazine system on my VersaMax. I switch back and forth between the stock system and the extended system when I go on snow goose hunts. I really love my VersaMax. Well... I must say it 'cycled' perfectly (past tense) until one snow goose hunt I started getting lots of soft primer strikes. The gun would still cycle smoothly (feed and eject), but frequently when I swung on a goose, and hit the trigger I'd get a 'click'. I'd cycle a new shell in, and most of the time it would go off. Typically the first shell would go off, but the second one would not. Some times it didn't matter if it was the first or one of the subsequent shots. I looked at the shells that didn't fire and saw a slight primer indent. When I put the same shell in my back up gun, it went bang. These soft primer strikes occurred after I'd put over 1000 rounds through my VersaMax (probably closer to 1500, as I wasn't counting I can't be sure). So I hunted my back up gun to finish the day, and that evening cleaned the VersaMax. I didn't really find it too dirty to function. Especially considering how dirty I'd gotten the same gun before (and it had never had a hiccup with about 300-400 rounds per deep clean). Notably, my friend on the same hunt swung a VersaMax and he had the same issue start on the same day of the same hunt. His gun was pretty clean when we disassembled it as well. We both use lubes that deal well with the cold, and had hunted our guns in even colder weather. It was not lubes/greases gelling and causing the failure to fire. He can't be sure how many rounds total his VersaMax had through it (he had purchased his used, before I'd even met him), but he had shot less than 500 shells through it himself. When we both tried our VersaMax's the next day (after the thorough cleaning), we both had the same frequently intermittent "click... no bang" soft primer strikes. Again, when I fed the same shells with light indents into my backup gun, & again, they went bang. So it was clear the issue was the gun... not the lubes... not from failing to clean per the owner's manual... and strangely at that point both VersaMax's had the same issue. So while most malfunctions of well made firearms are related to poor service/cleaning/lubrication... or poor quality ammo, something else was wrong with both our VersaMax's. Obviously I had missed something during the tear down and cleaning. My mind raced about bad chambers (checked that: no finish issues, no burs, nor crud, nor corrosion) and everything else possible causing the issue. I'll save you the grief of all the posts online I read, and things I thought it could be, in my search for a solution. Once I knew what to look for it was pretty obvious (and was the same on both guns). So if you are getting soft primer strikes, and have been cleaning and lubing per the owner's manual with good cold weather lubes, here's what 3 things almost certainly are the issue and how to fix them: Problem #1: The original Bolt Cam Pins from Remington don't hold up and it seems Remington left burs in the bolt carriers cam pin slot. I'm convinced the original Remington cam pins are too soft to last. To determine the state of a cam pin: follow the Remington owners manual's procedures (only work on an unloaded firearm) to remove the barrel and remove the bolt assembly. Then use the manual's procedures to tear the bolt assembly down. Remember the firing pin is under spring tension and will shoot out! That is why Picture 23 shows a thumb holding the Firing Pin while the Retaining Pin is removed. Clean & inspect all parts. Inspect the cam pin and the slot it rides in the bolt carrier for deformation. (see pic of damaged cam pin) Look for burs on the slot machined into the bolt carrier (that the cam pin rides in). Again: while you got the bolt carrier apart, make sure there are not any burs in the bolt carrier's cam pin slot. Replace worn cam pins, and remove any burs in the carrier with some emery cloth or a fine round file. I, like most others, consider the Benelli Cam Pin to be a better solution in the VersaMax than buying the Remington part. Even if you don't find any deformation on an original Remington cam pin, I recommend replacing it with a Benelli cam pin... and lubing it well! 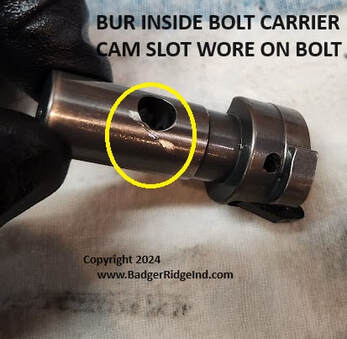 I found a wear mark on my bolt where a bur in the cam slot in the bolt carrier wore on it. I buffed the gouged area of the bolt smooth. Then I took a tapered round file and removed the bur with a file. REMEMBER: It doesn't take much filing or polishing with an emery cloth, sand paper, or fine stone to remove burs or to polish out gouges. You don't want to remove too much metal! You can check your progress with your finger nails. You may have to use your little finger inside the bolt carrier to check for burs. It must be emphasized that the owner's manual didn't tell you to lube the cam pin. This further accelerates the wear this area sees. Though I must acknowledge the new RemArms V3 shotguns come with an extra insert warning shooters to grease bolt carrier cam pins. We can only hope whenever the VersaMax2 comes out, RemArms will clarify the need to lubricate the cam pin. It is commonly held amongst competitive Benelli shooters that the Cam Pin's slot in the bolt carrier should be lubed with grease. Greasing cam pins works well in warm weather, but can be a bad idea for hunters who typically are out in the cold. The USMC M1014 service manual says to use "medium" lube on the cam pin every 500 rounds. USMC "medium" lube is putting BreakFree CLP on it such that "doesn't run down the side when turned vertical." Then the USMC M1014 service manual specifies even thinner oil in extreme cold. I'd suggest hunters omit the grease and lube the cam pin well with a good gun oil like BreakFree CLP, RemOil etc. The main thing is to lube the cam pin with something that will not gel in the weather you expect to shoot your VersaMax. 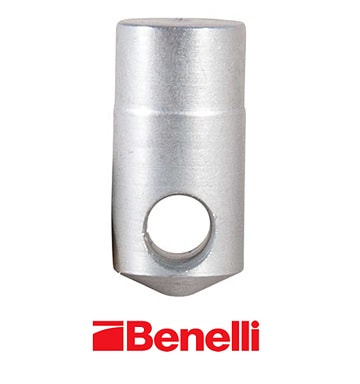 I replaced my cam pin with a new Benelli Cam Pin. The Benelli Cam pin was highly recommended on all the forums I visited, and has been working well for me. But you aren't done once you find and replace the bad cam pin. The new Benelli cam pin did reduce the frequency of light strikes, however my next hunt I still had a few light primer strikes. So it wasn't solved. From this I learned every VersaMax owner having light primer strikes needs to also deal with problem #2 below. No matter the condition of the cam pin. These pictures were excerpted from the VersaMax owner's manual. The numbers with red lines show where Remington directs one to use Rem Action Cleaner to clean the trigger assembly. Line 4 shows the hammer. In the other picture the left thumb is resting on the hammer to gently release it. 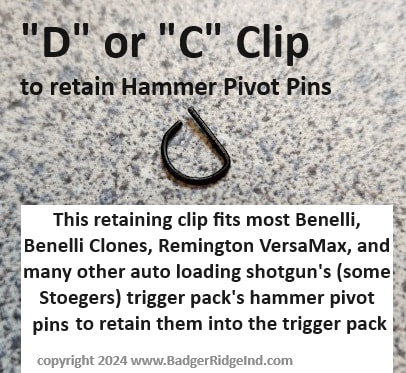 Problem #2: The original Remington hammer, hammer spring, and plunger are prone to fail. I have heard that some of the very first VersaMax's had some sort of recall issued because of poorly made hammers. But it seems that even the later Remington hammer version doesn't hold up. Both my shotgun's and my buddy's shot gun had peened hammers. To determine the condition of the usual suspects in the trigger pack, use the owner's manuals instructions to remove the trigger pack from the action, & clean. Then using gunsmith procedures (not in the owner's manual), remove the Hammer, Hammer Plunger, and Hammer spring from the trigger assembly. Be careful! There are lots of small parts in the trigger assembly that are easy to lose and the hammer plunger and spring will shoot in your face or all over the shop if you aren't careful. Also the "D" clip pin that holds the hammer assembly together isn't intuitively removed until you see how it's done... and it's easily damaged or lost. Some times you will see this clip described as a C clip... whatever you call it: we also offer replacement D or C clips for sale. 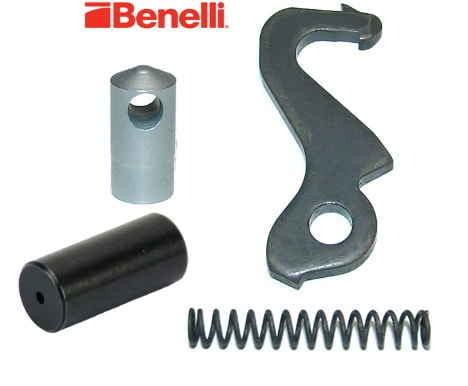 Once I got my Remington original hammer plunger out, I saw that it was chrome plated, but the plating was chipped off. This created a mess of abrasive hard chrome flaked crud that jammed up the plunger. You couldn't see this crud nor remove it when the hammer plunger and spring were in the housing. Moreover the edge of where the chrome was chipping off would bind, slowing plunger when the trigger was pulled. And that brings me back to items we sell: -Benelli Cam Pin -Benelli Hammer -Benelli Hammer Spring -Benelli Hammer Spring Plunger/Cap all the parts needed to fix this issue in a VersaMax are frequently called "Remelli" parts): You might think doing all four is over kill. I'm convinced it's not overkill. It's not wise to pick at any problem and wait for it to get worse when its understood and predictable. While you can see peening and deformation of the face of the hammer without disassembling the trigger assembly, you cannot tell if the chrome of the original Remington plunger is pealing without removing the plunger and spring. Nor can you clean the hard abrasive crud the chrome turns into from the assembly, unless the hammer spring & plunger are removed from the trigger pack. The best course is to tear it down once and fix it all while you are in there. Again, even if some of these parts are ok, experience shows that they will eventually fail as noted above. No matter the original parts' condition: I'm convinced the best fix is to, tear it all down, clean, replace the Cam Pin, Hammer, Hammer Plunger, and Hammer Spring with Benelli components, and lube. After that there typically isn't much more that needs to be done besides standard regular maintenance (that the owner's manual didn't tell you about... we'll get to those details later... keep reading). I realize that diving into problem #2 above is probably beyond most folks comfort levels and even the owner's manual lists it as something to have a gunsmith do. I figured it out by watching YouTube videos on how to work on Benelli trigger packs (the Remington is a clone). I've been working on my own guns since I was in elementary school, so this sort of stuff doesn't scare me. If tearing down a trigger pack is beyond your comfort level: you can purchase our new service and ship your shotgun's trigger pack to us: The service is simple: - Add our "Remelli Parts kit" to your cart - Add "send us your trigger pack - labor only" to your cart - Complete a check out (and get us paid) - We'll hold all the parts and other items that were purchased as part of the order whenever we see the install service purchased. All you have to do is pull the trigger assembly from your VersaMax, pad it well, & ship it to us. - We will send the trigger pack back with the new cam pin, and anything else you purchased. You put the cam pin in your bolt assembly yourself... the directions for tearing a bolt assembly down are in the owner's manual. REMEMBER: if you want your old parts back, let us know with a note accompanying the trigger pack (or they'll just end up in my recycling bin). Problem #3: Gummed up recoil spring &/or weak recoil spring On this one, the recoil spring may be gummed up... (or less likely, the spring may have weakened... or both). During my hunt I didn't have the tools to take the recoil spring assembly apart. As a matter of fact, I'd never cleaned the recoil spring/action tube. I had put good lube in there and cycled to bolt, but I regret that I never took the recoil spring and plunger out and cleaned them. Now I do it as part of my regular maintenance. I've learned that If I don't clean it, and it's cold, the crud in there will gel up and cause light primer strikes all on their own. Unfortunately the following procedures and the requirement to clean and lube the recoil spring were omitted from the Owner's Manual. So here's how I'd proceed to address issue #3: To clean the recoil spring: 1. On an unloaded gun, use the owner's manual procedures to remove the barrel, bolt assembly, and trigger assembly from the action. Warning failure to remove the bolt assembly from the action can make removing the recoil spring a very difficult and somewhat dangerous task! 2. Use a Phillips screw driver to remove the two screws holding the butt-pad to the buttstock. A little spit on the screw driver tip helps get it in the small rubber holes of the butt-pad. Then, use a 3/16 hex drive (commonly called an "Allen" drive) to remove the buttstock from the action/spring tube. 3. Use a 19mm (or 3/4") 6 point socket or wrench to remove the retaining cap keeping the recoil spring trapped inside the action spring tube. BE CAREFULL THE 19mm CAP IS UNDER SPRING TENSION. WARNING: ITS UNDER TONS MORE IF THE BOLT ASSEMBLY WAS NOT REMOVED IN STEP 1 ABOVE! 4. Remove the spring and action plunger from the tube. 5. Thoroughly clean the tube, spring, plunger, and the receiver. Apply gun oil that won't gel in the cold to the plunger and a few drops inside the tube (BreakFree CLP, RemOil etc). 6. Clean, lube, and fully reassemble the shotgun by following the procedures above in reverse. So, the action spring may be ok, or it may be worn out. If there was a bunch of crud in there, I'd probably try the original spring with the Remelli parts kit (to correct issue #1 and #2 above). I've seen where a 'gunked-up' action spring will work OK in warm temperatures, but cause light primer strikes in the cold (and the action spring was OK). If the spring was worn out, it probably wouldn't work in any temperature. Noting that the gun only has light strikes when cold soaked typically confirms that the recoil spring is probably gunked up but otherwise is ok. Cleaning the recoil spring regularly removes this probability. So, If I continued to get light strikes after fixing #1 & #2 with a "Remelli Kit", and thoroughly cleaning and lubing the action spring at every cleaning... that is when I'd replace the action spring. Remember: Light strikes can result from the bolt carrier not being pushed fully forward... and the action spring does that. But also, #1, #2, and a dirty action spring are the typical primary culprits, not the action spring being too weak. Some folks want to put more powerful springs in the action spring tube. I don't think that is wise as it can cause issues with low powered trap/skeet (low-brass) ammo. Putting a heavier recoil spring in jeopardizes function with light loads. Fiddling with stronger or lighter springs anywhere in the gun can cause issues. It's a well engineered delicate balance of forces. Replacing the old spring with a factory original action spring should bring the gun back to similar factory new performance, but replacement is only necessary when the action spring is cleaned and lubed and still generating light strikes. Thus, replacing the recoil spring may be warranted, or it may be over kill. We offer them as a separate item to meet your desire. Either way cleaning, evaluating, and perhaps replacing the action spring is something you will have to do yourself, as we aren't interested in shipping/receiving guns/receivers. Removing, cleaning. and lubing the action spring should be part of your regular maintenance. Swapping it while you are in there is easy. Bottom line to keep a VersaMax running: Some of the Remington original parts wear quickly & fail. Action springs get gunked up, and springs eventually will wear out. Do the maintenance, evaluate the parts, and replace the primary culprits as you see fit. Our recommendation is to start with fixing #1 & #2 with our "Remelli Parts kit", then cleaning the recoil spring and shoot it to see if the light primer strikes persist... then -if- after putting the "Remelli" parts in, you continue to get light strikes on a clean action spring, you need to fix #3 with a new action spring. But you could just replace the action spring right along with the other parts. It's up to you. FIXING #1, #2, & #3 FIX 99% OF THE VERSAMAX'S OUT THERE... IF YOU ARE CLEANING & LUBING PROPERLY AND RUNNING THESE NEW PARTS AND STILL HAVING LIGHT PRIMER STRIKES, THERE IS PROBABLY SOMETHING WRONG THAT REQUIRES A SKILLED GUNSMITH'S ATTENTION Got suggestions? Lessons learned? Think I'm full of it? Did our products help you? Post a comment below to let us know!
Or if you are shy & don't want to discuss stuff publicly call us at +1 989 795 2526 or use our contact form to initiate an email conversation.
0 Comments
|
Welcome to the Badger's Den!
|
|
|
Written by:Tom, purveyor of fine products. |
Archives
March 2024
August 2023
June 2023
March 2022
December 2021
September 2021
February 2021
January 2021
September 2020
April 2020
January 2020
October 2019
September 2019
May 2019
January 2019
November 2018
July 2018
May 2018
April 2018
February 2018
January 2018
November 2017
October 2017
August 2017
July 2017
April 2017
February 2017
January 2017
November 2016
October 2016
September 2016
August 2016
July 2016
June 2016
May 2016
December 2015
November 2015
October 2015
September 2015
August 2015
May 2015
April 2015
Categories
All
AR Stuff
Blackhorn 209
Customer Feedback
Hunting Gear & Accessories
Maintenance
Organization
Remington 700 ML/MLS
Ruger 77/50
Savage Muzzleloader
Troubleshooting




 RSS Feed