
 Our Remington 700 ML 209 kit in action Our Remington 700 ML 209 kit in action Welcome to the blog of the company that has the best fix for your Ruger 77/50 and Remington 700 ML/MLS. Our kits are the fix for blow-back, miss fires, etc. Our kits are Blackhorn209 compatible and seal up the breech with 209 primers. If an internet search brought you here, your search is over. This blog has lots of articles about those two rifles and our products for them. You can click on the links in them or in the banner at the top of the screen to find the items you may be interested in. The Remington 700 ML and Ruger 77/50 are our specialty. They both came from the factory with the same fatal flaw: blow-back coursing backwards through the bolt from each firing. The Remington and Canadian 209 mods didn't improve this. If anything they only made blow-back worse. If not quickly and properly cleaned after firing, the bolt will corrode and freeze up. Our kits correct this fatal flaw by sealing up the breech. But not everyone has our kit yet, and seeing these rifles are all 10 to 20 years old, it's all to common for some one to have shot and then put it away without a proper cleaning. Be thankful if the bolt was at least removed! Getting a frozen bolt out of a rifle is a nightmare! So beyond installing our 209 system on bolts that have been well to decently cared for, we frequently get challenged when folks send us neglected froze up bolts. Sometimes we get them before they get beat on, other times we get to see if we can pick up the pieces and make it work. You can read more about some of the crazier ones we get here in the "Badger's Den" by clicking the "Maintenance" subcategory on the menu bar. If you have a tough Remington or Ruger bolt, please reach out to us via our contact form. We'll get back to you with a cell phone number and email address so we can start the process! 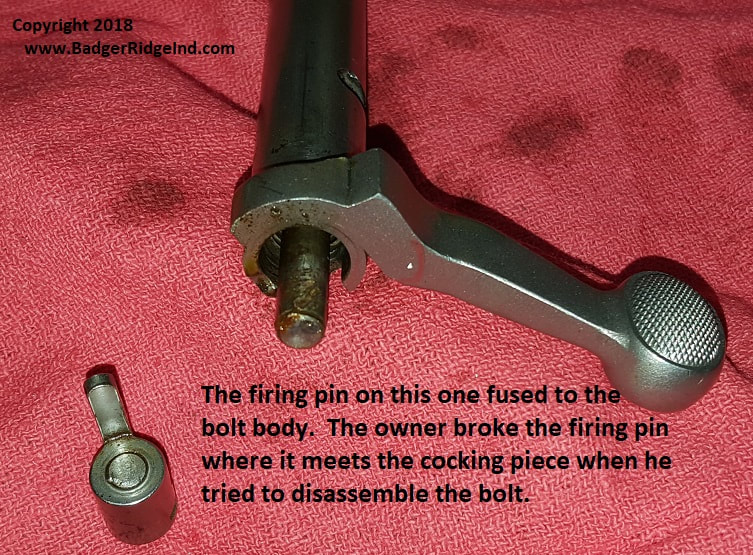 This bolt was sent to us after the owner attempted to fix it, and broke the firing pin where it attached to the cocking piece. When the owner of the bolt seen here contacted me asking if I could help, once I replied to him, he was thoughtful enough to text me pics. After looking at his pictures, I was pretty sure I could fix it: But I wasn't certain what parts of his I could salvage and what parts I would need to replace. The bolt plug looked good, which was surprising... usually when folks try to take these apart and break them they mangle something. So I counseled him that I was confident I could fix it, but couldn't be sure of the price until I had it in my hands, tore it down, and scrubbed it all clean. I commonly have to sell new components in cases like this, or have to ask for some more money beyond the basic install fee for my time and tools/materials I put into fixing these. But I told him to start by buying our standard kit and installation, then send me the all the pieces he had from the bolt, and we'd take it from there. 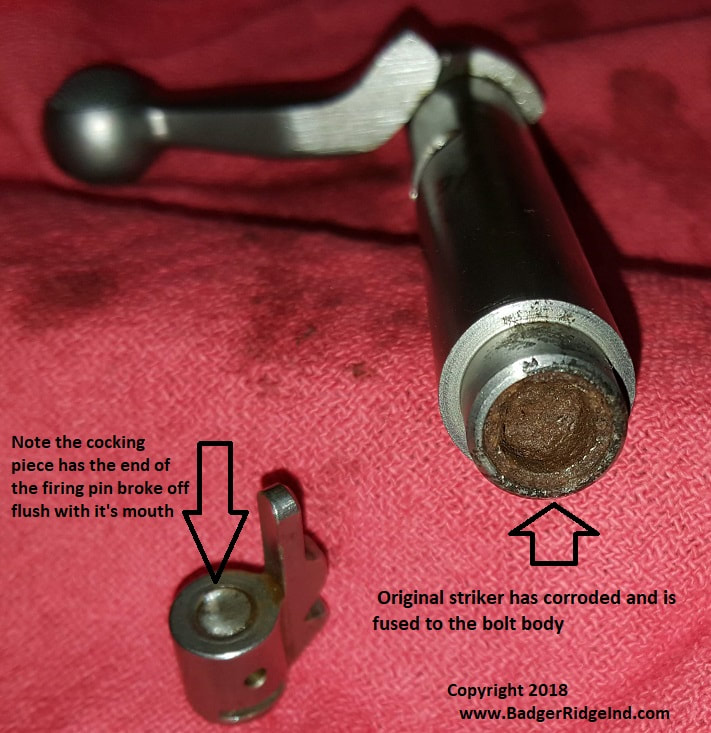 View of the front of the bolt. Note the firing pin is wedged in and solidly corroded to the body When the parts came, it was very clear that the striker/firing pin was fused to the body pretty solid. I tried my normal tricks to get it loose, and even tried to press it out with my jig and 12 ton press. It wouldn't budge. So I began flushing the gunk I could out of it from the back end of the bolt, and tried the jig and the press again. No luck. It actually kept breaking the sacrificial pin I built into the jig to keep from over stressing stuff: This bolt wouldn't break free. Frustrated: I filled the back end of it up with Kroil penetrating oil to sit over night. Worst case, I'd have to sell the customer a new bolt body (we make and sell them). I then turned my attention to the cocking piece. I chucked it up in my lathe and tried drilling it out left handed, that normally does the trick but it didn't budge. So I tried small holes with screw removers wedged in, and every other trick I knew, but it wouldn't budge. So I ended up just drilling it out and leaving the little spiral of the V from the thread in it and then picking that out. It was a bit tougher than removing a screw from a blind hole as it all kept fracturing where the cross pin was drilled through, and it's a deep hole proportionally to its diameter. But eventually I got the parts deep towards the bottome out with a bottoming tap and a small dental pick. I'm glad I could save the customer from having to buy a new one (but we do stock them). 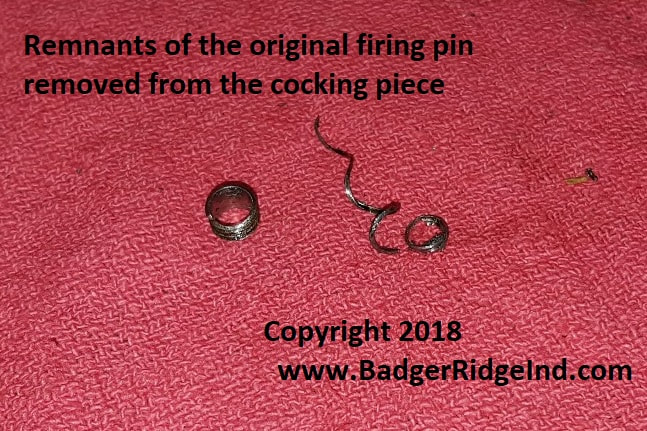 What remained after I drilled most of the firing pin out of the cocking piece I left the bolt body to sit for the evening so that the penetrating oil could do its work. When I came back the next morning none of the Kroil had seeped through to the nose. That wasn't a good sign, as it meant that pin was wedged in there and sealed. I tried the jig and the press again. I sheared the breakaway pin (I was really frustrated having to fab more break away pins!). So I made a new jig that didn't have a shear pin. Either I was going to break the pin free of the bolt body, or I'd break the bolt in the press. At this point I had nothing to lose. Luckily for the customer the 12 ton press and the new jig (and probably the Kroil) did the trick, the pin busted free of the bolt body, but bent the old firing pin the the process, which made it super tricky to get out, but I managed to get creative and work that one out. 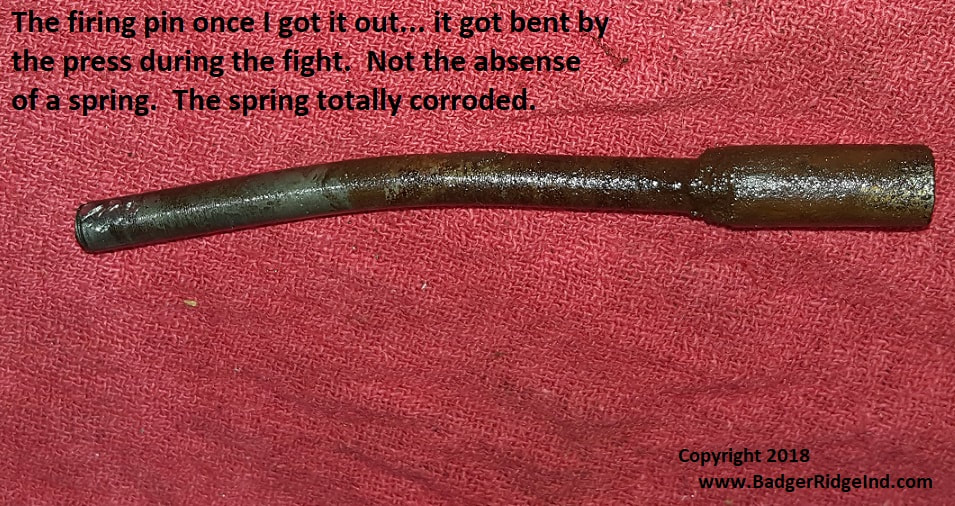 I was amazed. Typically when I break these apart there are sections of mainspring that come out. In this case the mainspring had completely corroded. It must have been all that corroded mess that I had flushed out the first evening! Anyways from here it was just cleaning up all the crud, and removing any pitting that would interfere with the new firing pin. Now that I had the parts all apart and cleaned up: it was just a normal installation. I asked the client for a little more money and sent his bolt back to him: Crisis corrected. If you have a tough Remington or Ruger bolt, please reach out to us via our contact form. We'll get back to you with a cell phone number and email address so we can start the process! 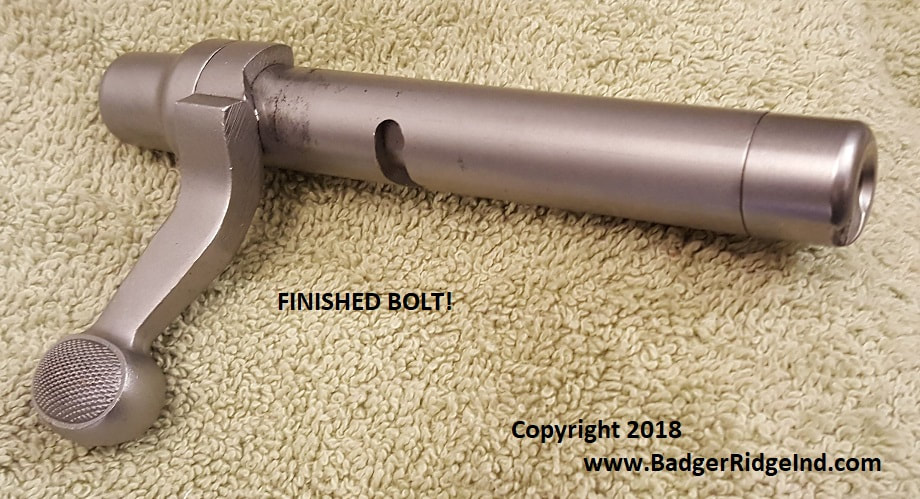 The completed bolt back together with our 209 Conversion kit
2 Comments
 If an internet search brought you here looking for a solution to your woes with a Remington 700 ML or Ruger 77/50 muzzle loader: Don't worry, you are in the right spot and we have the fix you are looking for. Just keep scrolling down or click here for our wonderful 209 sealed breech fixes for those rifles. We are a dynamic business and constantly adding to this blog. In this installment, I figured it was time to discuss breech plugs: what works, why it is probably different than most think, and why I think it works. I'll also showcase our service of retrofitting vent liners into breech plugs (to help them work more reliably, accurately, and better with Blackhorn209 powder). Yes: we can help with more muzzle loaders than the Ruger 77/50 and Remington 700 ML. One of the first things most folks realize when they examine our kits, is that the Badger Ridge breech plug, is unique and different from the rifle's original. Our kits won't work with the original breech plug! Our system just plain works. Because our design works, folks frustrated with igniting BH209 in other rifles send us their breech plug for modification. BOTTOM LINE UP FRONT: A good breech plug is a compromise of many different features. Our design works with any muzzle loader safe powder (we can make other rifles' breech plugs work with any muzzle loader safe powder... like Blackhorn209). I'll try not to delve too deeply into chemistry, physics, and thermodynamics both because most won't care about the details, but also I'd probably rapidly reveal the limits of my understanding. But some basic understanding is required. First, heat flows from hot to cold. There is truly no such thing as cold... cold is a relative lack of heat. Heat can be thought of as a form of energy... thus a hot piece of metal just has more energy than a cold piece of the same metal. So heat from discharging a primer will flow into the metal around it, and into the powder charge we want to start burning. 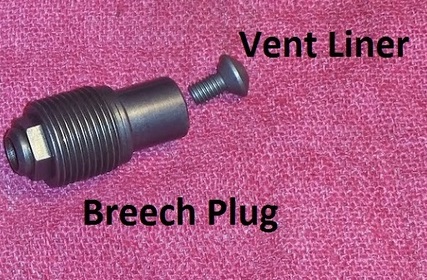 Badger Ridge breech plug with vent liner Badger Ridge breech plug with vent liner So you might be thinking "What does that have to do with muzzle loading and breech plugs?" Well every time we discharge a primer we convert the chemical energy of the primer into heat and expanding gasses. Seeing our real goal is to get the powder burning, the primer's flash needs to be directed into the powder charge, and it has to stay hot to get the powder charge burning. It is the powder charge that turns into more heat and more expanding gasses that push the projectile down the barrel. 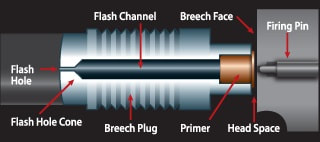 Generic breech plug from BH209.com Generic breech plug from BH209.com So at first it seems to get reliable ignition, you just need to get the primer close to the powder, and minimize the metal in between. And many of the first generation of inline muzzle loaders followed that design idea. But if you have seen any of the more modern breech plugs, especially those that use 209 primers, and are reliable with Blackhorn209: there is a large expansion chamber in front of the primer, creating a big air gap, and has a small hole at the end that abuts the powder charge. Just thinking about heat flow, all the metal that makes up the wall of that expansion chamber, and that super cold winter hunt you might take your muzzle loader on, it seems stupid to lose some primer heat to it. So why does a good breech plug have that chamber? And why would it have a metal constriction on the end of it (ie a vent liner or small flash hole)? Before I answer that, let's consider another reason the flash chamber doesn't make sense at first glance... as the primer's burning gasses expand they would cool just through the act of expanding into the flash channel. Fact: pressure, volume, and energy are all connected. For a steady state, ideal reaction I learned in High-School Chemistry: PV = nRT (or Pressure * Volume = number of molecules * their constant value * Temperature) Or in simpler terms if you don't change the temperature but you increase the volume the pressure will decrease to keep it all in balance. But in real life you get both: as the hot gas expands into the chamber it loses heat just from the expansion, even before we take into account the heat that flows into the cold walls of the breech plug! "OMG" you exclaim, "I knew that primer should be right up against that powder to be 100% reliable!" But, I'd say practice has proven that to be wrong, our breech plugs have expansion chambers for good reason: to keep the powder charge from blowing up the primer and venting gas all over the shooter and dropping accuracy! Remember, after we get that powder ignited and burning, it produces a whole lot more pressure and heat than that tiny, thin walled primer could ever contain. We want all that heat and energy to push that projectile down the barrel, but because there is that small flash hole right next to it, the gas shoots backwards into the expansion chamber that is being sealed by the primer. The trick here is that the flash hole is so small it greatly restricts the rearward flow, and what flow makes it through, finds itself rapidly expanding, dropping pressure, and cooling as it flows into the primer's flash chamber. And that is why the flash hole and flash channel (chamber) are there. They work together to keep the pressure from burning powder from blowing up the sealed primer. Keeping that primer sealed and intact keeps the mess in the breech plug, and tends to increase accuracy as the pressure seen at the back of the projectile is consistent shot to shot. 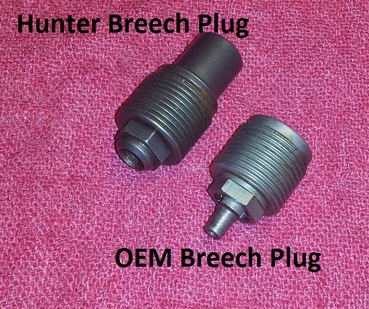 Badger Ridge's Hunter Breech plug versus OEM Badger Ridge's Hunter Breech plug versus OEM Our sealed breech systems have the expansion chamber with a 209 primer sealing one end of it, and a removable vent liner so that we avoid the bad things that happened without an expansion chamber (and I say happened because many of the first 209 designs lacked the expansion chamber and vent liner design, but beware: they are still out there!) Lets over simplify and say that there are four basic ideas on how to make a breech plug. Two are bad ideas, and two work well with the back pressure burning powder generates: 1. Don't even try to seal the primer and vent the back pressure (ie Blow-Back) into the action; let it leak out. This makes a horrible mess, and tends to shorten the life of the system as sticky corrosive goo covers everything. This also tends to send flying fragment primers and percussion caps into things, like the shooter. Also these systems won't work with Blackhorn209 as it has to be sealed up. (BAD IDEA) 2. Seal up the 209 without an expansion chamber and vent liner: Direct all the heat into the powder charge but blow up the primer/cap due to blow back, and then have blow back escape where ever it goes. This tends to drop accuracy as you don't control the time nor pressure when the rupture occurs. Plus just like #1 above, it makes a mess and sends pieces of primer all over the place. And just like #1 above, Blackhorn209 does't like this will yield unreliable performance at best. Again: Flying primer fragments are dangerous! (BAD IDEA) 3. Seal the 209 up with an expansion chamber that has a small orifice at the end to deal with the back pressure the powder charge generates. 4. Use large primer holders/brass cartridge cases that are strong enough to hold the pressure in. 209 primers in and of themselves are not strong enough for #4. Most systems that use #4 use primer carriers and magnum rifle primers, also break actions enclose the 209 primer in steel. -The original #11 percussion cap systems on the Remington 700 and Ruger 77/50 followed 2 mostly. -The Remington 209 modification followed #1 (note the big slits on the side). -The Canadian 209 mods for both rifles did a bit of #1 and #2 in my book (sealed until back pressure unseated the primer, also tended to blow up primers). -The Remington Ultimate Muzzle loader uses #4, but is very expensive and requires reloading gear to re-prime the cases. -Our 209 kits use #3. And we can modify other rifle's breech plugs to do the same. The down side is that the chamber must be sized right: it is "Goldilocks" work. Not too big (lose too much primer heat) not too small (blows up primers). The other down side is that the orifice/flash hole slowly erodes with each shot. 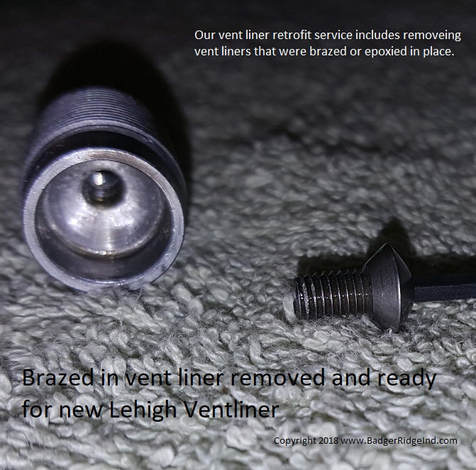 A knight BP that had its vent liner soldered in (removed and ready for a new vent liner) A knight BP that had its vent liner soldered in (removed and ready for a new vent liner) Remember that back and forth flow of hot burning gasses (primer residue and combustion gasses) erodes the flash hole with each shot. When breech plugs that don't have vent liners open up, they loose accuracy. Most folks don't realize this, and just know that their rifle doesn't shoot like it used to. They typically look for loose scope mounts, bad scopes, loose action screws, etc. I get calls from them and they are frustrated as they can't seem to figure out why the rifle isn't shooting well now. For some, the light bulb comes on when I start asking about the size of their breech plug's flash hole. And do they have a gage pin to measure it? I'm confident, that manufacturers know that flash holes have a limited life. Some just go with a cheaper breech plug, or even solder in vent liners! Seems they just want to sell entire new breech plugs. But we usually can offer a different solution: modifying the breech plug to take a vent liner. Most of the time we can convert those breech plugs to take inexpensive vent liners and also put an expansion chamber between them and the 209 primer to keep the primer from seeing excessive pressure. 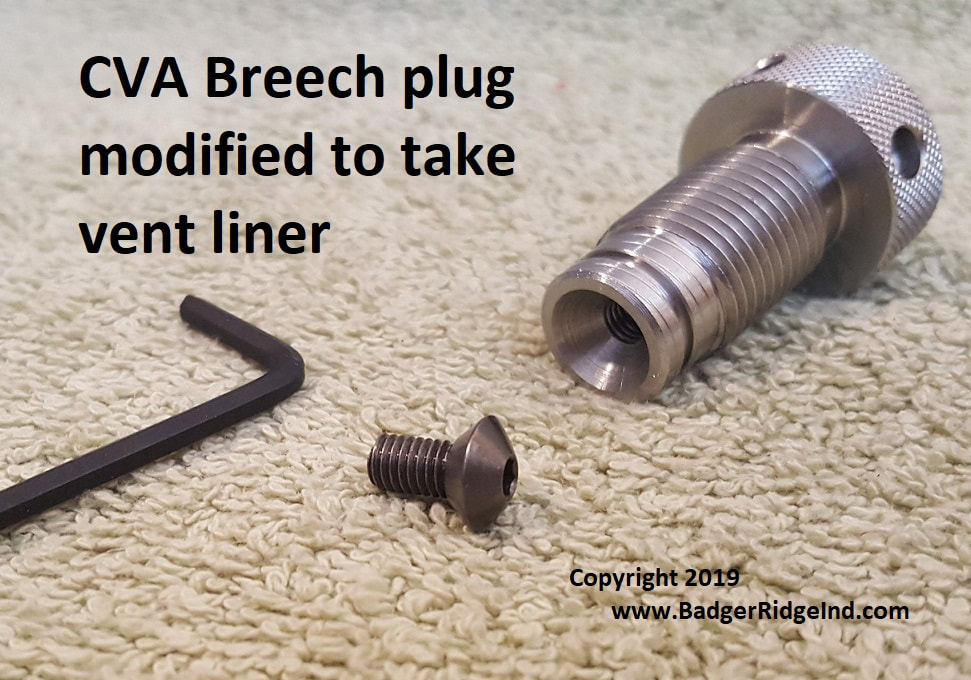 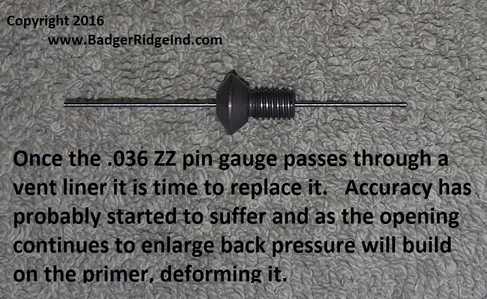 The vent liner is the removable flash hole our breech plugs use The vent liner is the removable flash hole our breech plugs use So there you have it, a good 209 breech plug is a compromise between directing the energy of the primer into the powder, and keeping the pressure from the burning powder from blowing up the primer. To use Blackhorn209 powder, it must be sealed up. To use 209 primers the breech plug needs an expansion chamber that is sized to allow expansion but not rob too much heat, and it needs a small orifice in the end that abuts the powder charge.
At Badger Ridge, we go a step further by using inexpensive replaceable vent liners. Our breech plugs are designed for longevity: we use vent liners to cheaply replace the flash hole instead of forcing shooters to buy new breech plugs. And we sell pin gauges so that you know when to replace the vent liner: if it goes through its time to replace. |
Welcome to the Badger's Den!
|
|
|
Written by:Tom, purveyor of fine products. |

Archives
March 2024
August 2023
June 2023
March 2022
December 2021
September 2021
February 2021
January 2021
September 2020
April 2020
January 2020
October 2019
September 2019
May 2019
January 2019
November 2018
July 2018
May 2018
April 2018
February 2018
January 2018
November 2017
October 2017
August 2017
July 2017
April 2017
February 2017
January 2017
November 2016
October 2016
September 2016
August 2016
July 2016
June 2016
May 2016
December 2015
November 2015
October 2015
September 2015
August 2015
May 2015
April 2015
Categories
All
AR Stuff
Blackhorn 209
Customer Feedback
Hunting Gear & Accessories
Maintenance
Organization
Remington 700 ML/MLS
Ruger 77/50
Savage Muzzleloader
Troubleshooting
 RSS Feed