
Badger Ridge Industries Remington 700 ML 209 Conversion
breech plug Installation and tuning
WARNING: It is our recommendation that you pay Badger Ridge to install, or have a competent gunsmith install our 209 conversion kit. If you chose to do the work yourself, you do so at your own risk. During or after installation, you could be hurt, killed, or your property damaged. Modifying and inspecting firearms requires the ability to recognize an unsafe component and determine proper effective repairs. Failure to do so may cause death, injury, or damage or loss of property.
ALWAYS PLACE THE SAFETY ON AND UNLOAD YOUR FIREARMS BEFORE WORKING ON THEM
ALWAYS PLACE THE SAFETY ON AND UNLOAD YOUR FIREARMS BEFORE WORKING ON THEM
Excerpted from the Ruger 77/50 manual, never work on a loaded, primed, or charged firearm!
As shipped, the breech plug might be a bit undersized for some brands of primers in order to guarantee a tight fit on 209 primers and provide a blow back free sealed breech. 209 Primers vary widely in their exact dimensions between manufactures, and even within the same box! So to make a rifle feed and extract primers properly the flash channel may have to be tuned or lightly reamed with a letter "C" drill bit.
A letter C drill bit measures .242 inches. There is no substitute; using any other size bit to tune your breech plug to your primers will not be effective and will probably ruin your breech plug. We sell letter C bits and they come with our complete kits.
STEP 1: Make sure the safety is on, and the gun is unloaded. Remember that even just a primer alone has enough power to hurt or blind, deafen, or maim someone! Always keep the muzzle pointed in a safe direction and maintain control of the weapon. Always keep the safety on through the tuning process. Remember that smashing or hitting primers can detonate them as well. Use caution whenever handling primers. Subjecting primers to solvents or oils can also cause hang or miss fires. Keep your primers dry.
STEP 2: With an empty bolt nose, and the breech plug and bolt assembled into the rifle per the Owner's Manual, close the bolt on an empty Badger Ridge breech plug. Again, this is without any primers. It should close easily and without binding or pressure. If the bolt binds anywhere as it is moved forward, backward, or camming down and into the fully locked position, investigate and fix before continuing on with any primers. Frequently the bolt screw is tightened while misaligned and then makes a bur on the bolt. In that case remove the bolt, de-horn the bolt, and perhaps even smooth and round the nose of the bolt stop screw.
If the bolt feeds fully forward, but won't close without binding on an empty breech plug, it is frequently because the plug is not fully seated into the breech, or the bolt nose was not fully pressed onto the bolt body. Ensure the bolt nose is fully pressed onto the bolt body.
An improperly seated breech plug frequently happens when the plug's or the breech's threads are contaminated with foreign matter or corroded. Clean the breech's and breech plug's threads and examine for damage. Just because the breech plug snugs up it does not mean the plug is fully and properly seated! Review the owner's manual for proper maintenance and cleaning of the breech. The bolt must close on an empty breech without any binding or touching between the bolt nose and the breech plug! I find a 20 Gauge bore brush works well for cleaning breech threads.
DO NOT PROCEED WITH PRIMING A RIFLE THAT HAS A BOLT THAT DOES NOT WORK SMOOTHLY NOR CLOSE PROPERLY WITHOUT A PRIMER IN THE BOLT NOSE!!! NEVER LOAD A RIFLE WITH A SUSPECT OR FOULED BREECH PLUG!!!
STEP 3: Once the bolt feeds properly and closes on an empty breech without binding, ensure the safety is on, then attempt to feed primers one at a time into the breech via the bolt. Note if any will enter the breech plug. It is not uncommon for a brand new, un-tuned breech plug to not feed any or most primers. This depends on the primers selected and their tapers and profiles. Typically CCI's need reaming/tuning, some brands (like Winchester) may have smaller noses and feed without any tuning. After finding about five to ten primers that won't feed, set the non-feeders aside and use them for the rest of the tuning process.
NOTE: Typically Winchester 209 primers tend to have small noses and thinner primer cups. Thus they may feed without any tuning. Beware: when discharged it is common to have Winchesters balloon the primer cup out and stick in the bolt nose. You may need the dry fire on discharged primers to remove them.
STEP 4: If you have primers that won't feed, remove the bolt and the breech plug. Gently and slowly ream the inside of the breech plug to a depth of no more than approximately 1/8" with the letter "C" drill bit by hand. Only remove the smallest possible amount of metal then try feeding primer. The least you can take off and have primers feed; the better. Less is more here.
WARNING: If you ream too much the primers may move forward when discharging, then blow back will push the primer cup rearward and you will have difficult to extract primers! To remove them, dry fire to push the primer cup back forward and they should come out with finger pressure. You may find if you tune for one brand of primer to feed and extract without any trouble, another brand will balloon when discharged. Exact primer dimensions vary by manufacturer. Over reaming may also allow blow back to seep past the primer. DO NOT USE A DRILL OR POWER TOOLS!!! FINGER PRESSURE ONLY!
Go slow, and see if the primer will stick into the nose with gentle finger pressure, then reassemble the rifle and attempt to feed with the bolt. If your primer doesn't feed read more info below then repeat step 4.
MORE INFO, TIPS, TROUBLE SHOOTING, AND HARD LEARNED LESSONS:
I have a letter C bit that I stuck a small file handle on with epoxy to make it easier to handle and turn in the breech plug, but finger pressure to turn the bit is really all it needs. It may help to hold onto the breech plug with 7/16 box end wrench to keep it from spinning in your fingers. It doesn't take much reaming with a letter C bit. It is very easy to over do it! Go slow, take a little off and reassemble and try it! See the warning above about going too deep! Ensure you keep the drill bit concentric and parallel to the flash chamber.

Remember less reaming/tuning is better. Over tuning can let blow back by the primer! Never need more than 1/8"
With gentle finger pressure try to place one of your non feeding primers into the breech plug. If it goes in and stays there with gentle finger pressure, re-install the breech plug and bolt and attempt to feed your non feeders.
Once a primer is fed into the breech plug they get swaged ever so slightly to the tighter diameter of the breech plug past the part reamed with the letter "C" bit, so once one feeds, set it aside an know that you have a good feeder. Continue to go through your primers. All should feed just fine now. If you have some that still wont, you may need to remove the breech plug and ream it just ever so slightly deeper. Repeat reaming and checking until your primers feed and the bolt closes with just just a bit of pressure. 1/8" has always been plenty deep for my CCI's; do not ream any deeper! Having primers swage just a little seals the breech, so be cautious to not over ream or you may suffer blow by or hard to remove primers!
Once a primer is fed into the breech plug they get swaged ever so slightly to the tighter diameter of the breech plug past the part reamed with the letter "C" bit, so once one feeds, set it aside an know that you have a good feeder. Continue to go through your primers. All should feed just fine now. If you have some that still wont, you may need to remove the breech plug and ream it just ever so slightly deeper. Repeat reaming and checking until your primers feed and the bolt closes with just just a bit of pressure. 1/8" has always been plenty deep for my CCI's; do not ream any deeper! Having primers swage just a little seals the breech, so be cautious to not over ream or you may suffer blow by or hard to remove primers!
I keep my old 209 primer trays so that I can confirm feeding and populate one with primers that fed and swaged down just fine. I write a note on the outside of the tray to know that they have checked good and take that one to the range and field. But I'm just super thorough like that. Most are OK using primers straight from the box once the breech plug is tuned to their brand. Some have troubles switching between brands; especially if they reamed deep.
When you go to the range to shoot your newly converted rifle, bring your breech plug wrench and letter "C" bit. If you run into feeding or trouble you may need to remove the plug and barely ream a bit more. At this point I think of it a burnishing more than reaming.
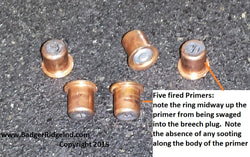
Examine your fired primers they should be free of soot and should have light rings where you can see that they were swaged into the breech plug after about 1/8" of easy feeding.
Reaming too deep can give problems removing primers from the bolt nose with fingers; dry fire the reset the primer cup and then the primer should come out with just fingers.
When you go to the range to shoot your newly converted rifle, bring your breech plug wrench and letter "C" bit. If you run into feeding or trouble you may need to remove the plug and barely ream a bit more. At this point I think of it a burnishing more than reaming.
Examine your fired primers they should be free of soot and should have light rings where you can see that they were swaged into the breech plug after about 1/8" of easy feeding.
Reaming too deep can give problems removing primers from the bolt nose with fingers; dry fire the reset the primer cup and then the primer should come out with just fingers.
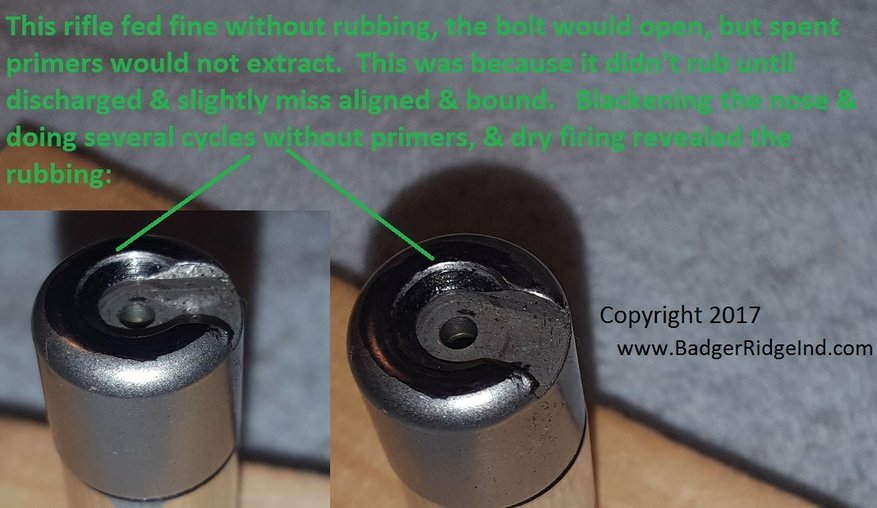
Diagnosing the nose of a bolt just barely touching the breech plug. This one was nearly impossible to remove spent primers due to this little bit of rubbing.
If you have problems extracting fired primers from the breech plug it is usually because the nose is binding on the breech plug. This can be evident from it being very difficult to open or retract the bolt. A fired primer adding that little a little extra friction and binding makes extraction very difficult. Remember primers are made of light gauge metals and the bolt has plenty of mechanical advantage to extract them so long as there is no binding or other engagement on the nose.
Also sometimes when the firing pin is discharged it slightly changes the alignment, orientation, and head space of the bolt nose in relation to the breech plug and allows contact, and movement which binds the bolt or primer. So sometimes it won't make contact until discharged; this is usually when there is very little head space.
So, If you are having a hard time opening the bolt, or extracting spent primers, its almost certainly not the primers: It is a bolt face binding on the breech plug due to in sufficient head space. To diagnose on an unloaded, de-primed, not charged rifle: blacken the nose of the bolt with a sharpie, and without a primer in the nose, do multiple open and closings with a dry fire, then remove the bolt and inspect the nose for missing sharpie. (see picture). See Step 1 and 2 above to remedy (typically the breech threads are fouled or damaged and the breech plug was not fully seated into the breech, and eliminated proper head space).
We suggest you take the time to watch our 4 minute (approximately) video on the process below: