
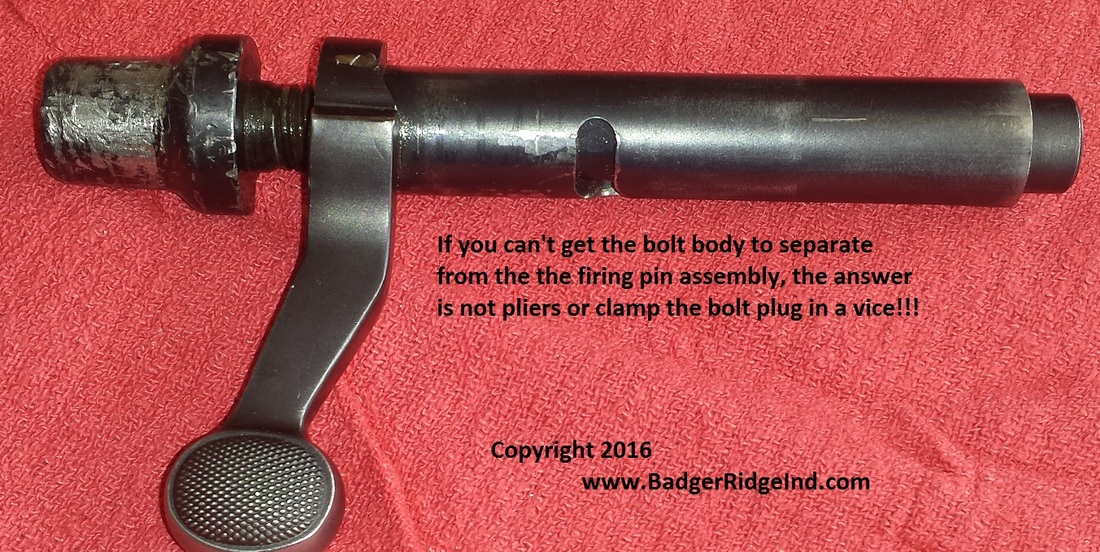
 How a bolt in need of some serious TLC arrived A few days ago I got a call from a very nice fella out west. He wanted me to send him an entire new bolt. Always wanting to help, I assured him I could build and send him a brand new bolt for his Remington 700ML, but I wasn't convinced he needed to spend that much. I inquired further. Seemed he was having some trouble because the bolt was frozen and wouldn't come apart. He said the worst part was that he let a "gunsmith" that promised to convert it to 209's take a crack at it, but he had failed, damaged it severely, and promised him there was no hope for it. After chatting more with him he decided to take my advice. Instead of purchasing a complete new bolt (much more expensive) he purchased a conversion kit with installation, sent me his bolt, and let me have a crack at it. I explained that If I couldn't use it, I'd refund his money per the terms of use, and then he could buy a new bolt being assured there was no hope. If I fixed it and it took a bit more of my time or replacement parts I stock, we'd work it out. He explained that the bolt plug was torn up and not serviceable and the cocking piece was frozen in it. I let him know that the standard 700 bolt plug would work, and I had them on hand. Once I saw the bolt and got into it I'd know what was usable and we'd talk about converting it or just sending an entire new bolt out. 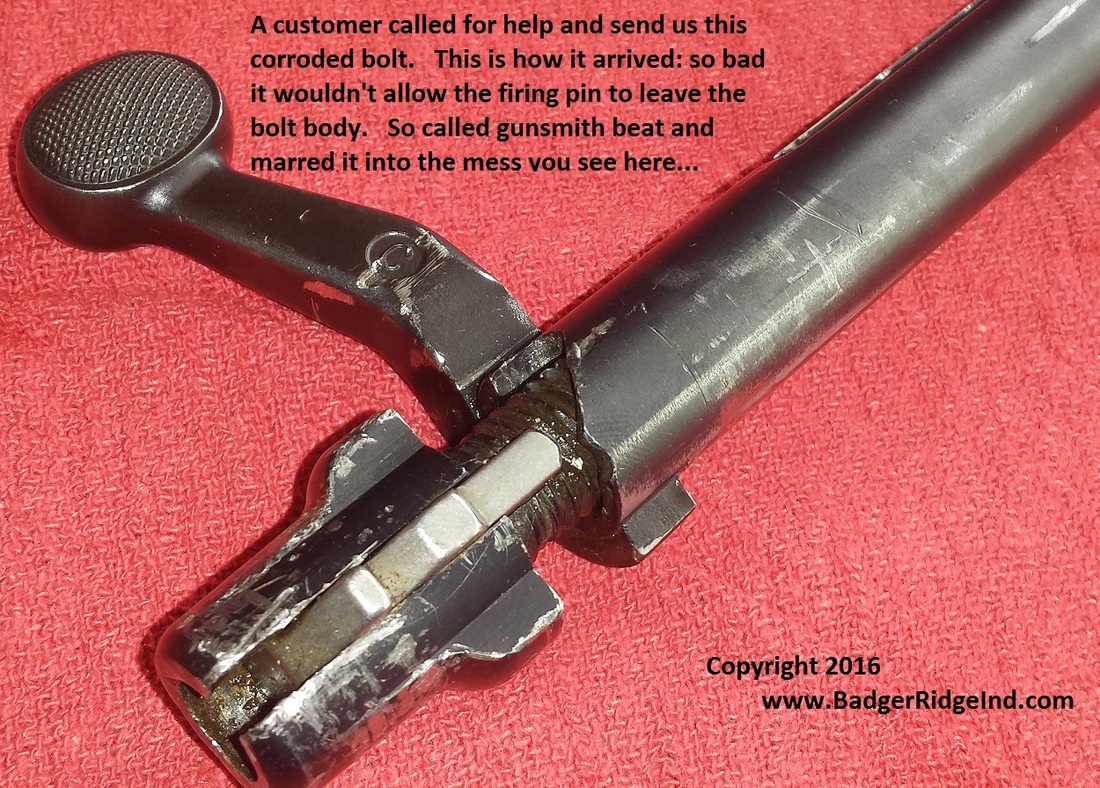 View of underside. Note that the cocking piece is frozen in the damaged bolt plug When the bolt arrived a few days later it was clear that the bolt plug was unscrewed from the body but the firing pin was stuck inside the body, and the body was packed solid with old fouling and years of corrosion. Seeing the firing pin would rotate but not move in nor out, it was free of the mainspring but the mainspring was bound to the bolt body. The customer was right: whoever clamped down on the bolt plug had squished it so much the cocking piece couldn't move. They also hammered on the back and deformed it. Getting the cocking piece to protrude enough to expose the cross pin was going to be a chore! But first things first, got to get the mainspring to move in the bolt body. It was corroded solid and wouldn't budge. So I started the over night soak in penetrating oil. And got on with other things. 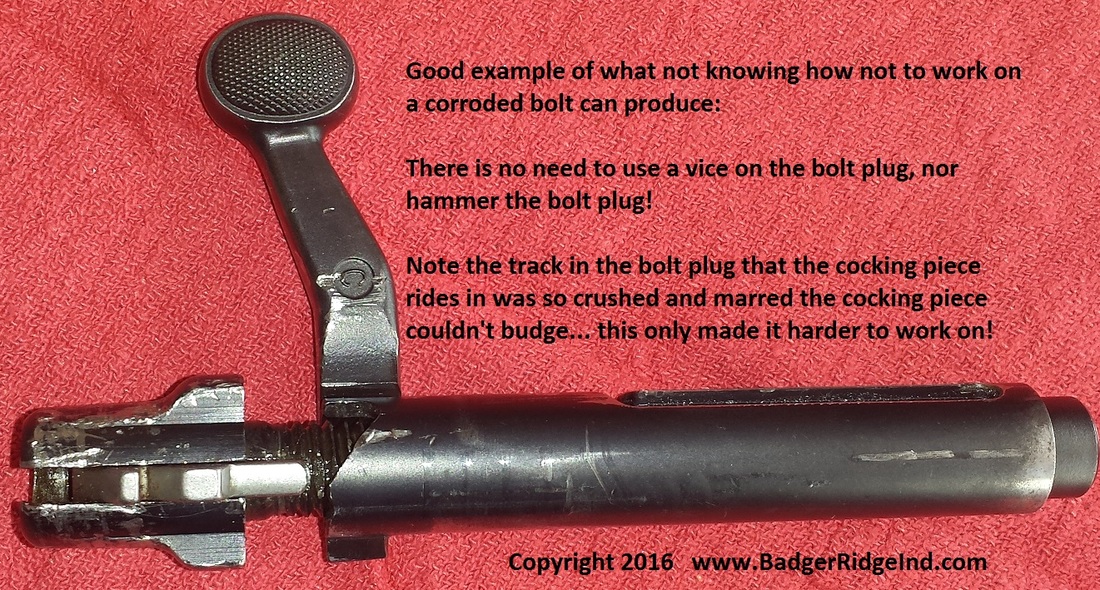 Can we save it? We sure will try! After having my coffee and breakfast the next morning I went out to the shop while it was still cool and got to work. I held the bolt in my vice with some rubber jaw pads so I wouldn't add to the marring. Then some persuasion was applied by a hammer directly to the face of the stuck firing pin. I used an old firing pin out of my junk bin as a punch. I got the firing pin to move along the axis of the bolt body and compress the mainspring just a bit. That was all I needed. Still firmly held in the vice with rubber jaw pads, the nose up, and the plug down, I tied on some wire onto the bolt plug. Then hung a very heavy weight on it to counter act the main spring and always have a 'firm hand' pulling the firing pin out of the body. Then I added some more penetrating oil and a few more taps. Followed by rapidly lifting and dropping the weight to create a pumping action via the mainspring. The movement increased ever so slightly as the crud pumped out. The penetrating oil filled the tip of the bolt with brown-orange corroded mess which I cleaned out and replaced with fresh penetrating oil, and repeated the love taps and lifting and dropping the heavy weight. Each tap sprayed a bit of penetrating oil, but who doesn't love the smell of penetrating oil in the morning?!?!?! I repeated pumping, cleaning the crud, and refilled with fresh oil. I continued until I could get about a 1/4" of movement on it, but then it just wouldn't go any more. So I went "nuclear" on it! I made up a jig out of scrap to hold the bolt body between the bolt plug and the body. Made sure it contacted the body, and not the handle (the OEM bolt body handles are only silver soldered on... if you put too much pressure on a handle it will pop clean off... if you break one off, don't worry we can TIG weld it back on for you!). Then I put it in my 12 ton hydraulic press, placed a tip of an old firing pin between the ram and the firing pin and pressed. It wouldn't budge pass the 1/4" of travel I had earlier. So I backed off and repeated applying pressure... by the third or fourth cycle it broke free! I had the firing pin loose!!! Some times you got to nuke 'em from orbit. 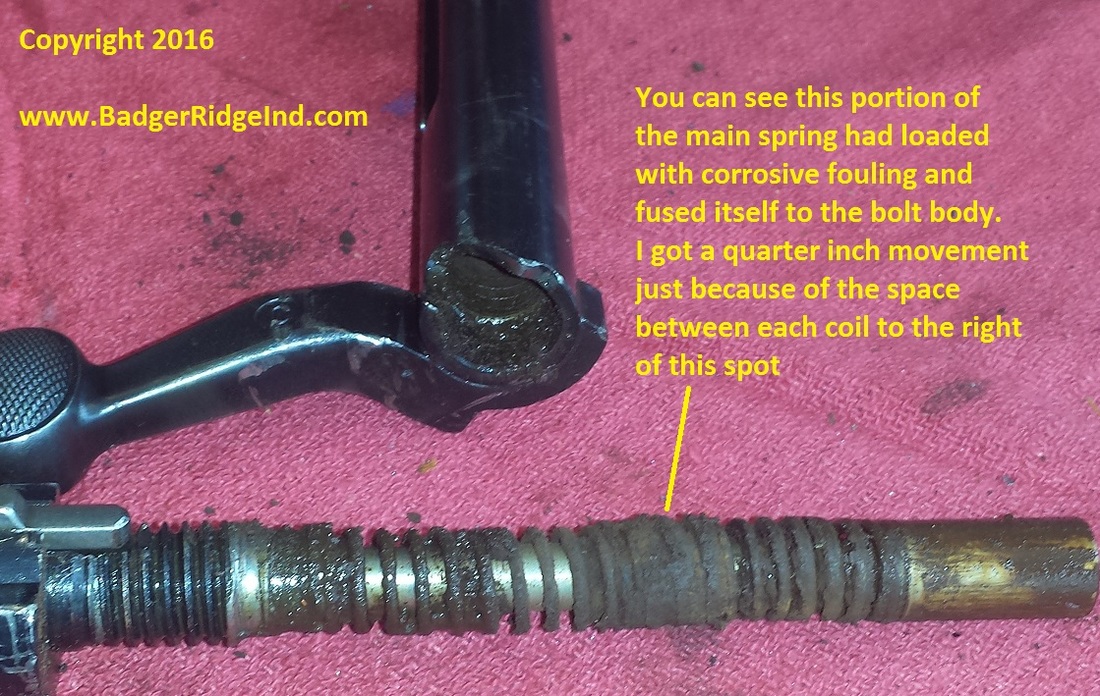 Once broken apart, it was clear the mainspring had fused itself to the bolt body. Now that I had it apart it was clear that the bolt had a old "Canadian" 209 conversion. I wrote about how disappointed I was with the "Canadian" 209 conversion I purchased over 12 years ago in one of my first posts to this blog. It seems that someone used the rifle but didn't clean up afterwards, then eventually the corrosive blow back fused the mainspring to the bolt body. By putting the bolt in my vice nose up, and affixing a heavy weight to the bolt plug with some wire I was able to pump the crud out in front of the fused area and got some movement. But I needed the 12 ton press to finish it off. Remember our kit seals the blow back into the breech plug, so you don't get it inside the bolt body! Luckily once I got it all cleaned up, there was only some light pitting on the inside of the bolt body. I spent more time cleaning up all the marring and mashed bits on the body with a fine file than I spent cleaning up the massive amount of gunk. Oh, and I had to chase the 1/2x13 threads with tap to fix where all the pounding on the bolt plug previous to me had damaged them. But that also cleaned out all the gunk that had collected in them. Getting the cocking piece out of the damaged bolt plug was a minor challenge. First I just cut the firing pin's large end off and pulled off what was left of the main spring. Then opened the groove in the bolt plug that the cocking piece rides in with a wedge and some love taps. The cocking piece moved freely now, but was still captured in the bolt plug because the previous "gunsmith's" pounding on the rear peened over the back of it. So I reamed it out with some large drill bits until the cocking piece came out with the little bit of firing pin still connected to it. Then it was a simple placing of the firing pin in my vice and driving the cross pin out. The cocking piece was in really good shaped despite all the mayhem that had ensued around it. Seeing the customer had the forethought to include a new Remington 700 stainless bolt plug, the assembly from here was the same as any conversion. For details see our online conversion instructions. The completed bolt is below. 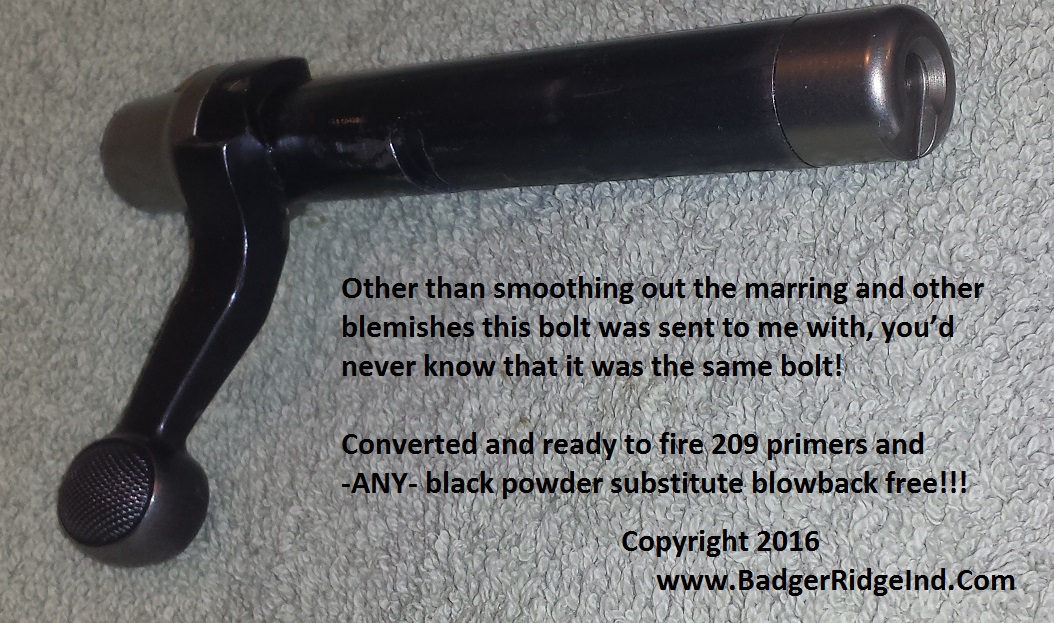 Done and ready for Fun with -any- black powder substitute! 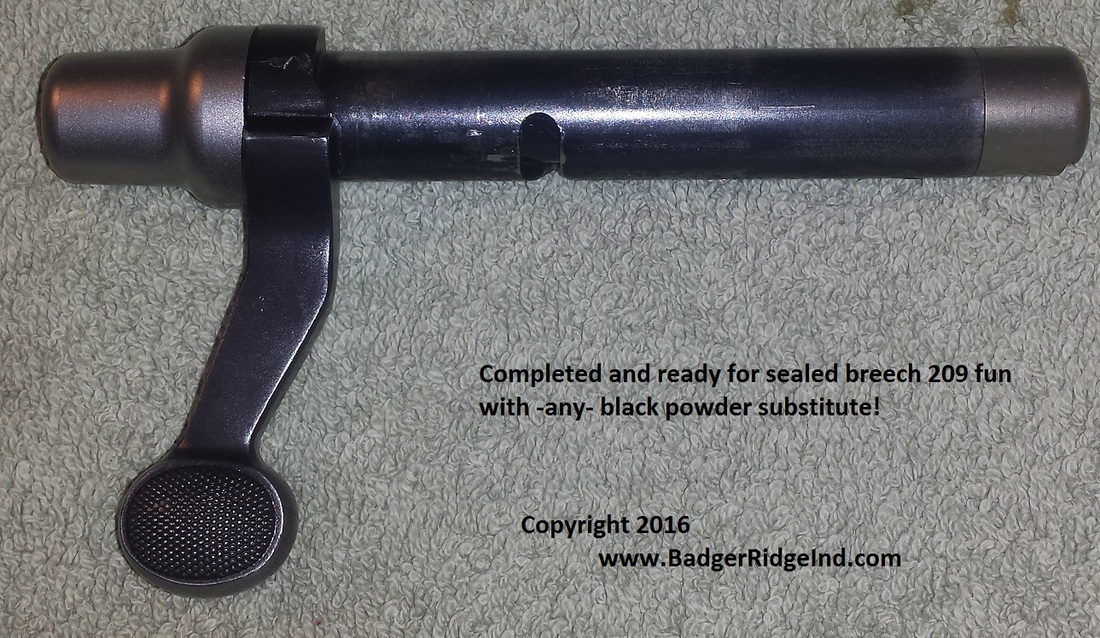 Two images above are "After" see "Before" below for easy comparison 
10 Comments
3/23/2017 14:02:31
I have one that want rotate to remove from gun, Customer brought in to see if I could free the bolt. does not seem possible without damage. Any hopes Contact me through the email above or the contact form, and we can see if we can work this together... I'd probably start by standing the rifle muzzle up and filling the bolt assembly with penetrating oil. The firing pin probably is fused to the bolt body via corrosion and is preventing the firing pin to be cammed rearward when lifting the bolt handle...
ray
12/12/2017 15:36:31
I have a frozen 700ml stainless bolt. Can anyone recommend someone that can fix it?
Doug Barnes
9/14/2022 15:04:31
I have a 700m firing pin cycles but won't strike 209 primer when I open and close bolt it cycles but won't strike primer can you help with this parts are no where to be found?
Trevor Kettles
1/18/2023 10:09:48
A few years ago I had my Remington 700 bolt machined through Badger. They did a really nice job and I asked them if I needed to break the bolt down and clean it like I used to do with the pre-machined bolt and they told me no. So, over the past several years I never had a problem until January 9. I had a nice buck broadside at 70 yards and I pulled the trigger and all I heard was “click”. The firing pin never hit the primer. The primer was brand new out of the box that morning prior to the hunt and I had just shot a doe 2 days prior with a primer from the same box. After the misfire, I broke the bolt down and it looked pretty clean. I’m still dumbfounded why the firing pin didn’t hit the primer. The only thing I can think of is there was just enough build-up on the spring that didn’t allow it to push the firing pin forward into the primer. Any thoughts would be appreciated. Thanks! That just sounds wrong on a lot of levels... if it went click, and its all our system, the firing pin hit the primer to make the 'click'... you sure you didn't mix and match parts from another system with ours? If its all our system the only way it went click and didn't hit the primer is if the firing pin is broken/sheared off.
Donald Kinder
9/29/2023 10:03:32
Please see what you can do Leave a Reply. |
Welcome to the Badger's Den!
|
|
|
Written by:Tom, purveyor of fine products. |

Archives
March 2024
August 2023
June 2023
March 2022
December 2021
September 2021
February 2021
January 2021
September 2020
April 2020
January 2020
October 2019
September 2019
May 2019
January 2019
November 2018
July 2018
May 2018
April 2018
February 2018
January 2018
November 2017
October 2017
August 2017
July 2017
April 2017
February 2017
January 2017
November 2016
October 2016
September 2016
August 2016
July 2016
June 2016
May 2016
December 2015
November 2015
October 2015
September 2015
August 2015
May 2015
April 2015
Categories
All
AR Stuff
Blackhorn 209
Customer Feedback
Hunting Gear & Accessories
Maintenance
Organization
Remington 700 ML/MLS
Ruger 77/50
Savage Muzzleloader
Troubleshooting
 RSS Feed