
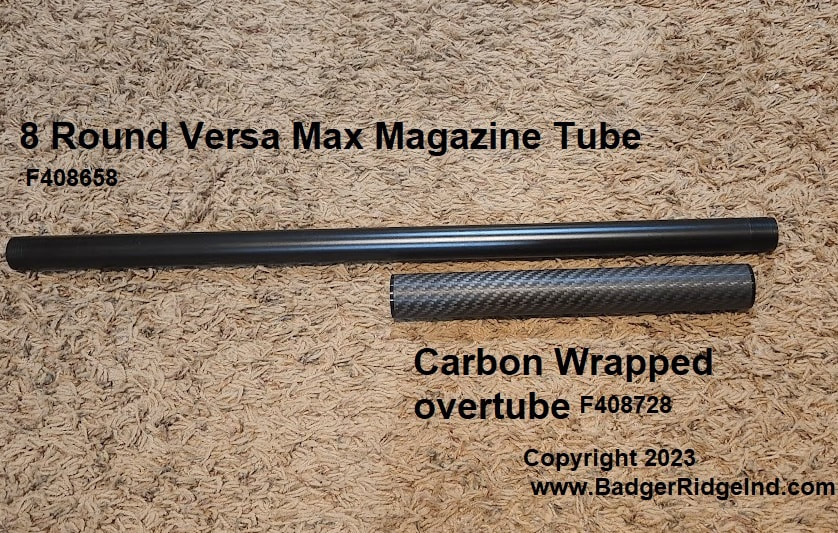
Remington Versa Max - 8 Round magazine tube and carbon wrapped over tube shroud
For Sale - Limited Quantity - F408658 8 Round magazine tube for Versa Max (may fit other Remington shotguns) & F408728 Carbon wrapped over tube shroud. These are New - Old Stock. May have a couple small handling dings, but are in excellent condition. Same items Remington put on their Versa-Max Competition Tactcal guns years ago. I believe these were made by Carbon Arms.
I use these parts on my Versa Max for Conservation Season Snow Goose hunting. I researched a lot of options, and am convinced that it is the best most reliable mag extension system. Beware other systems out there will typically reuse the existing mag tube: that requires swaging out the dimples in the original magazine tube. This system replaces the original magazine tube with a longer one, thus no need to swage out dimples, plus this one holds more ammo. When done right, this one is also more reliable (which is why I believe Remington went with it on their Competition Tactical guns)
The setup show below will hold 10 rounds in the mag tube, float one on the carrier plus one in the chamber for a total of 12 3" rounds. I put a 1 round plug in to prevent me from taking the magazine spring to full stack... or I could put 11 in the mag tube. Reliability is more important than magazine capacity. Can typically get one more round if you use mostly 2 3/4" ammo.
Be sure to consult your state's magazine capacity laws before purchasing the needed parts to finish this system. Not all states will allow configuration shown below; you may need just a 1 or 2 round extension instead.
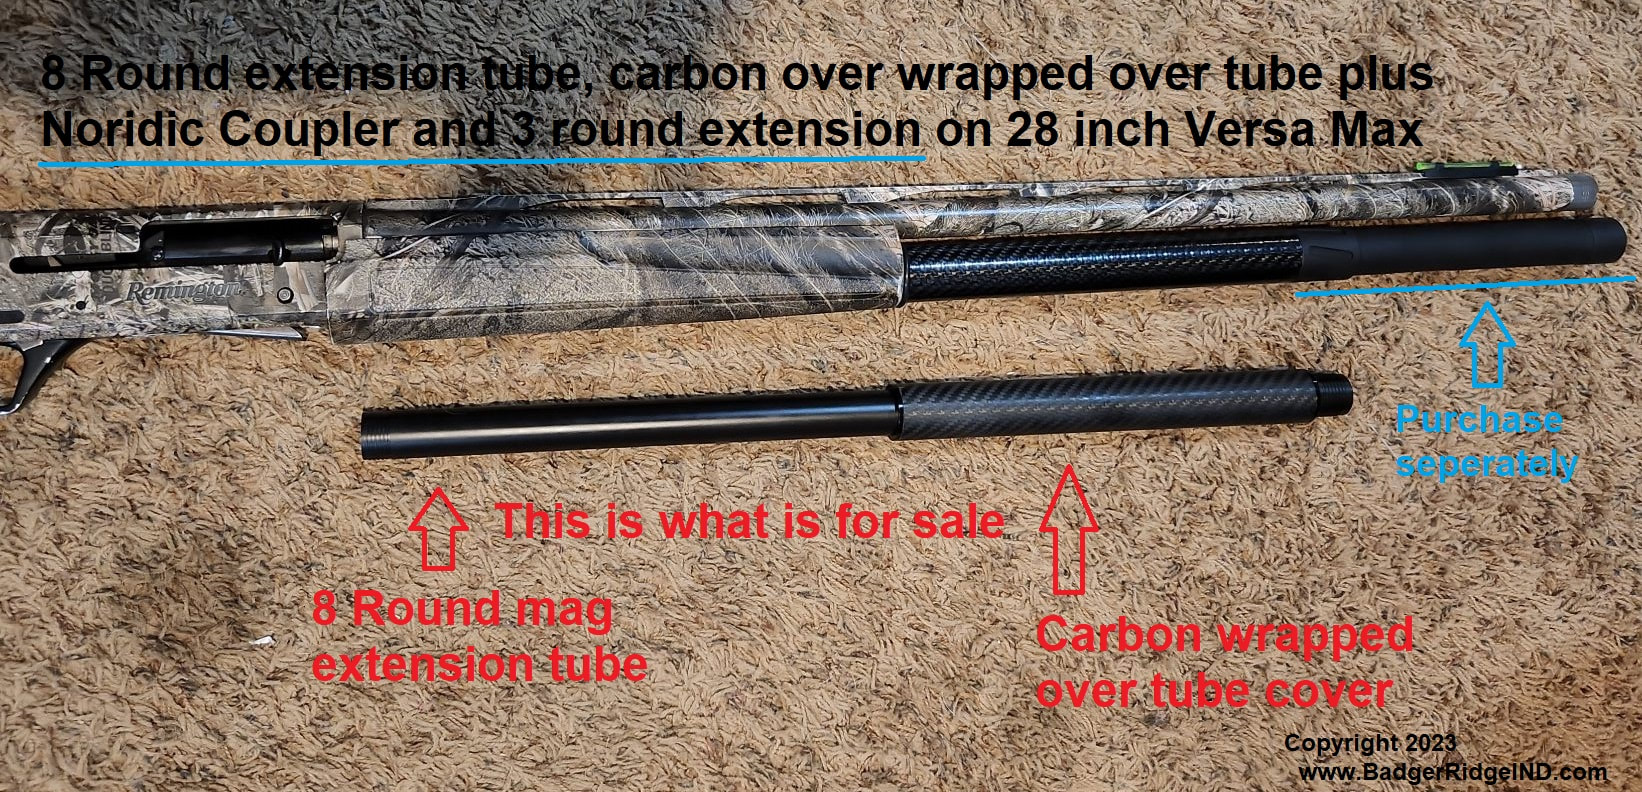
Shown installed (above the two items for sale). A complete installation will require more parts (shown in blue). The shotgun is not part of this sale.
 Needed/recommended to complete install on a Vers-Max
To get a complete magazine extension, purchase the 8 Round tube & Carbon overwrapped shroud here, then couple them with a magazine extension nut & tube (sold separately). The 8 round Versa-max tube has two different thread patterns. One end will fit the Versa-Max receiver the other will take Mossberg nuts/extension tubes (don't ask me why they used Mossberg thread, and not Remington on both ends... I didn't make it, Remington did).
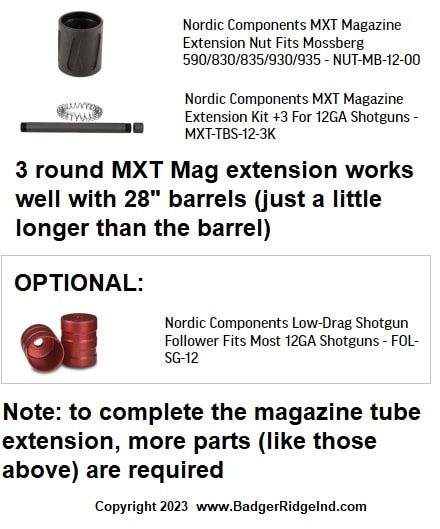
On top of what is pictured, we'll include a 1 round plug (so that you don't over compress the new magazine spring you will have to purchase separately). Also we'll put in a large O ring. You probably wont need it, but if you get a loose fit between the carbon wrapped over-tube shroud and the fore end, the O-ring can help fill the gap.
I used the following components on my 28" barrel to finish the install, and get a 10 round magazine (cause I use a 1 round plug to save the magazine spring from going to full stack):
Nordic Components:
NUT-MB-12-00
MXT-TBS-12-3K
FOL-SG-12
You may want to change the Mag extension size depending on your barrel length or your state's laws (to ensure you don't violate their magazine requirements... its usually safe to stay at 10 or fewer rounds in the USA).
NOTE: the FOL-SG-12 follower isn't needed if you reuse the plastic one that comes in the gun, but the Nordic follower is nice (and I recommend it). I understand the 8 round tube will thread into 870's and V3's as well, but the carbon over wrapped coupler is not the proper length to secure their fore ends. So you will need to fabricate additional parts, swap fore-ends, or something else creative, if you were to adapt this to those guns.
Note: a clamp between the barrel and the extension is not needed (nor desired) with this system.
INSTALLATION
This video from Carbon Arms may be helpful, as I'm pretty sure they made these for Remington... the system certainly works like this.
This work should only be performed by a gunsmith. Do-it-yourselfers should thoroughly familiarize themselves with common gunsmith practices and understand they are assuming risks that have potentially fatal outcomes when working on firearms. Proceed with caution and at your own risk if you implement these procedures:
1. Consult the shotgun's owner's manual to learn how to place it on "SAFE" and ensure it is unloaded.
WARNING: ALWAYS DOUBLE CHECK AND ENSURE FIREARMS ARE UNLOADED & ON SAFE BEFORE HANDLING AND WORKING ON THEM
2. Utilize the owner's manual's procedures to remove the magazine nut, fore-end, barrel, magazine spring, etc. Place one hand on the bolt handle and then gently release the bolt and guide to the forward position (this prevents accidental release in further work).
Note: the factory magazine tube has dimples near the forward end to prevent the magazine follower from escaping. It's recommended to mark the factory magazine tube with a marker to ensure it can be properly oriented when placed back into the fire arm. Thoroughly marking it now will facilitate that future work.
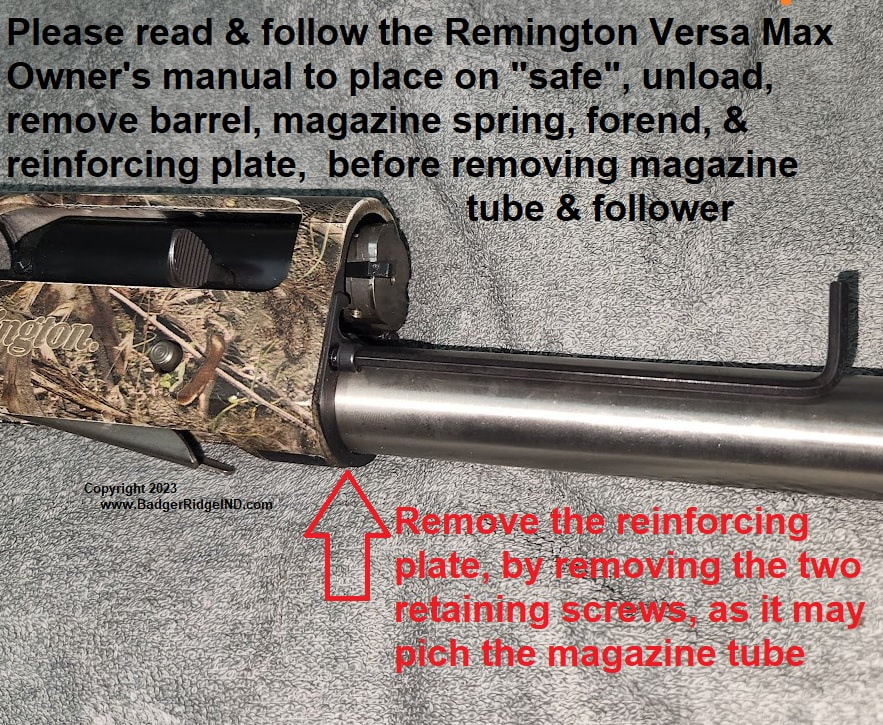
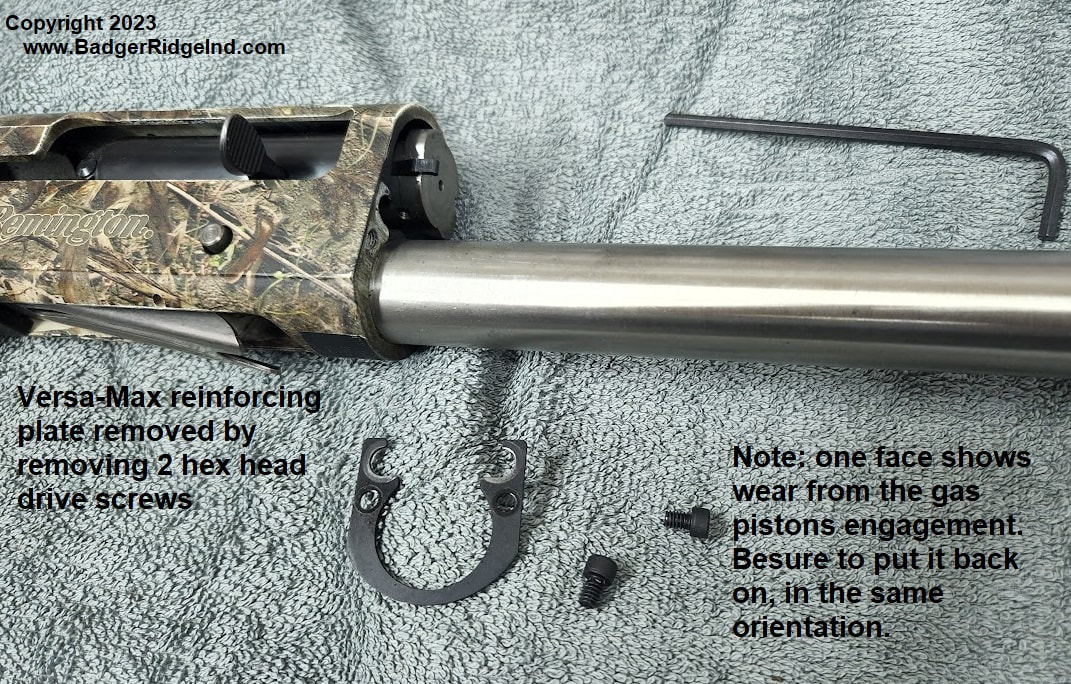
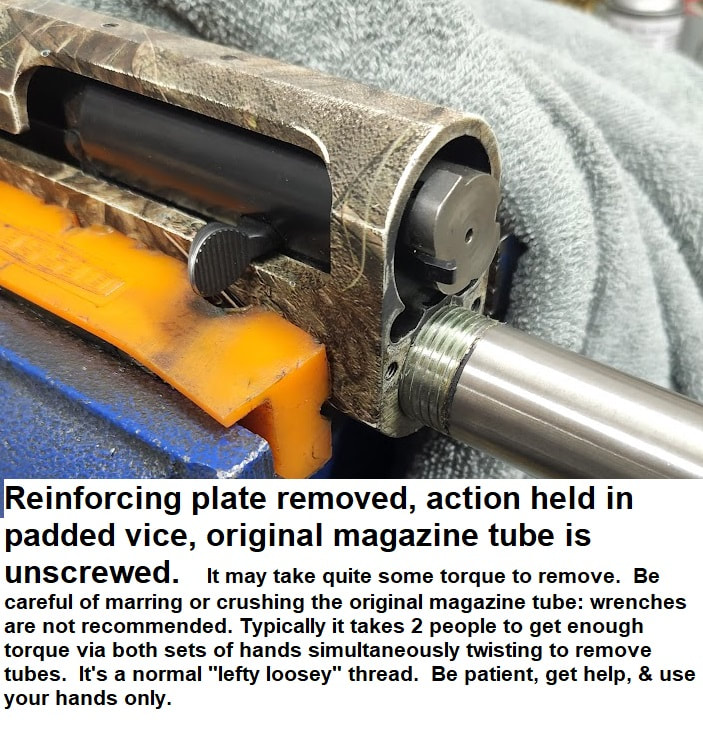
3. Remove the receiver reinforcing plate that prevents the gas pistons from impinging on the aluminum receiver.
4. With firm hang grip, grasp magazine tube and unscrew it from the receiver.
It helps to place the receiver into a vice with padded jaws. Avoid using tools like pliers and wrenches that can crush, deform, or mar the magazine tube.
--> You may need the assistance of a second person to generate enough torque to break the magazine tube free from the receiver.
BEWARE THE MAGAZINE FOLLOWER IS UNDER SPRING TENSION UNTIL YOU REMOVE THE SPRING! USE CAUTION WHEN UNSCREWING THE MAG TUBE OR THE FOLLOWER MAY FALL OUT.
These tubes are typically in there very solidly and may have Blue or other thread locker on them. It is a standard 'lefty loosey' thread!
5: Clean any thread locker residue or other crud from the receiver's magazine tube threads.
6: Gently thread the new 8 round magazine tube into the receiver, being careful not to cross thread it. The 8 round tube only has one end that fits the receiver threads: try the end that lacks much of a lead first. Beware that you will damage the threads if you force them together: especially if you have the Mossberg threads going into the receiver! Once threaded in smoothly, use only your hands to fully snug the tube into the receiver. Do not use any thread locker nor tools on the magazine tube!
7: Reinstall the reinforcing plate removed in step 3 back onto the receiver. Be sure to orient it properly.
8: Lock the bolt open and place the barrel back into the action. Slide the fore-end back on to the magazine tube to trap the barrel. Then slide the carbon overwrap tube over the magazine tube and snug it down to the fore-end. Gently release the bolt into the barrel to prevent a future inadvertent bolt release and hold the barrel to the receiver.
8: Consult the magazine coupler manufacture's instructions on how to finish the installation from here (Click here to down load the MXT instructions).
Completion will typically involve firmly tightening the extension nut to the magazine tube in order to trap the hand guard via the carbon over wrap tube (be careful one end of the coupling nut will have Mossberg threads, the other will have a different thread pattern). Then placing the magazine follower into the tube. Typically the magazine spring that comes with these kits is placed in the tube next (after bending the end of it so that it bears well inside the follower). Often the magazine springs are too long and require trimming to about 12- 16 inches past where the extension will end. Then the magazine extension is fully threaded into the coupler trapping and compressing the magazine spring. Make sure the mag extension buts up to the magazine tube inside the coupler nut to prevent a gap forming that can catch shell's rims and cause misfeeds. Expect to take the gun to the range and test fire and tune the spring length to ensure a balance between loading pressure and feed pressure.
NOTE: It is recommended that at least a 1 round plug be placed into the magazine spring to prevent overloading of ammo taking the spring to full compression and over stressing & weakening it. Reliability is more important than magazine capacity.
WARNING: Only firm hand tightening is required of the magazine tube components. More force will deform things making the system unreliable. Also too much force (or using thread locker) can lock components together so tight you won't be able to take them apart (and run the standard magazine tube for typical hunting scenarios where 3 or 4 round magazine capacity is required).