
 Excerpted from Remington 700 Manual Can you make it shine? YES! BUT FIRST YOU NEED TO UNDERSTAND THE PROBLEM AND YOUR OPTIONS 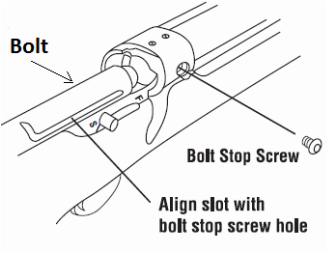 Excerpted from Remington 700 Manual Excerpted from Remington 700 Manual In 2002 I returned from a 3 year overseas tour. I started my new job as a flight instructor and I started back into my old ways of hunting, fishing, and tinkering with guns. My dad, ever so generous, gave me a muzzle-loader he picked up on the cheap. Remington made a muzzle-loader based off of their bolt action center-fire model 700. The blued steel version was called the 700ML. The stainless version, sometimes called the magnum, was the 700MLS. The benefits of converting a center-fire design to a muzzle-loader were obvious to me:
Before I ever fired it, I read the owners manual, scoured the internet, read forums, and consumed every bit of information I could find. I poured over ChuckHawks article after ChuckHawks article. They were not very kind to the 700ML. I found most who had used the 700ML/MLS had high hopes going in but found it had less than desirable attributes as a muzzle-loader. Hence why my dad was able to pick one up at such a low price. The biggest problems I noted during my research:
(note #3 happens on side locks too, but the orientation of the lock and simplicity of the hammer make it less significant) Black powder residue is corrosive. Blow back throughout the action caused the shooter to have to remove the bolt, disassemble and clean it after shooting the rifle. Failure to clean would certainly result in corroding the striker, spring, and inside of the bolt. Blow back got all over a scope, and some of the blow back could get into the trigger as well. To clean that, one had to remove the barreled action from the stock. This meant that one could possibly shift the zero after every cleaning. I had doubts as to how much, and made sure I used a torque wrench on each action screw. I then scribed a mark on each screw so that I could put them back with in the same tension after a field cleaning without a torque wrench. I didn't know what more I could do. I wasn't to concerned: I'd know if that was going to be a problem after a few range sessions. The Savage design was taking over the market in the center-fire modified to muzzle-loader rifle. It had all the benefits and addressed some of the problems I had read about. But I had a free 700MLS in my hand and a desire to tinker. I knew I could and had to modify it. I took the burs off of the tip of my Bolt Stop Screw with a file, and used a stone to work away the burs and abrasions on the bolt that I made when i misaligned and tightened up the screw. I lubed bolt and the slot the bolt stop screw rides in with anti-seize grease. No problems now, check off #2. I also knew I had 'better' options than black powder. My dad had always used Pyrodex in his traditional side locks. I further researched and decided on Hodgdon Triple Seven. It was available in pellets and granular powder. It also was reported to be 'less' corrosive than black powder and Pyrodex, but still corrosive. I was suspicious of the claim of being "less corrosive" as a possible sales pitch. But when I realized Hodgdon made both Pyrodex and Triple Seven I wasn't as worried; they had a solid reputation. I chose the granular powder because it was cheaper and allowed me to work up a load in smaller increments and see what my rifle would shoot best. For bullets, my research pointed me to MMP sabots and jacketed 45 caliber handgun bullets. I bought rings and put on a solid 4x32 scope. 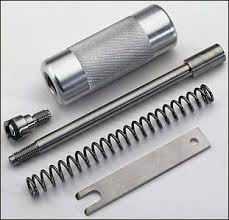 "Canadian" 209 Kit that I found to be a fail "Canadian" 209 Kit that I found to be a fail The thing that really needed to go was the #11 percussion cap system. So off I went on my internet search to find a 209 modification for it. And at that time the pickings were slim on conversions (and still are). I found and purchased online what I'll call a "Canadian" 209 kit. There really wasn't any other 209 options. The kit came with a special tool to remove and replace the firing pin/striker with the included striker. It also had a new main spring, a 209 nipple to replace the #11 percussion cap nipple, and a fork to install the nipple and remove fired primers. Once I got the kit, I followed the instructions and I thought I had it whipped... but I really didn't. I went to the range and followed the Remington 700 ML/MLS Owners Manual as I worked up loads. I found that my rifle shot the best at 80 grains. Also there was still a bunch of blow back even at low charges, that worsened as I stepped up the load. As charges increased I started to find fragments of primers in the cavity around the primer holder. So, for many years I used 80 grains of Triple Seven, black MMP sabots, and .45 cal 250gr Hornady XTP bullets. I deformed primers and had blow back, but the rifle was accurate at 80 grains. It was the best I could make of it; hotter loads weren't an option. I killed deer, cleaned the rifle, set the screws back to their scribe indexes and had no problems with point of impact shifts. MY FIRST ATTEMPT (Canadian kit) WAS LESS THAN I HAD HOPED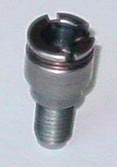 Leaky Canadian 209 nipple: Fail Leaky Canadian 209 nipple: Fail I was disappointed with the amount of blow back I was getting, and the labor it took to take the rifle apart and clean it. I was always a bit worried I missed something in the bolt and would have a failure to fire at a critical moment... say when the shoulder of a Boone and Crockett trophy was in the cross hairs. Also, after shooting a deer, gutting it, and hauling it out of the woods, I was beat. The last thing I wanted to do was tear down a rifle and clean it. But I did. I had to understand what was happening with the 'Canadian' 209 modification if I was going to do better. The replacement firing pin ended with a large cylinder that had a nipple that fired the primer. The 'Canadian' kit used the original OEM breach plug, but had the replacement 209 nipple threaded into it. It was a bit tricky to get a primer in and the kit came with a fork to remove the spent primer that was also the wrench to snug up the nipple into the breech plug. Extra tools to carry in the field didn't sit well with me, but I put them in my possibles bag. 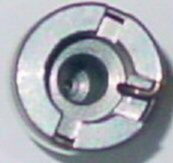 Leaky Canadian 209 nipple: Fail Leaky Canadian 209 nipple: Fail There was a small slot across the face for the fork to engage and a large cut out in the side for a spring to hold the primer in place. When cocked to fire, there was a gap between the striker face and the 209 primer. Nothing held the primer in place besides the spring on the nipple. Also the primer was exposed to the weather unless I used the OEM plastic cover. I had read that the weather shroud was not to be used with 209 primers somewhere, and had entered the land of operating outside the manual. When the rifle fired, the striker sprung forward and struck the primer. With ignition came large pressures that blew the primer out and back against the face of the firing pin. With the firing pin being only held against the primer by spring pressure, the primer could move aft, unseat, and spray blow back. Not to mention the nipple holding it was slotted so that pressure could blow the primer out that way too. It was obvious why I was getting blow back, deformed and blown up primers. This explained why it worsened as I worked up powder charges. So the Canadian 209 modification worked... but was messy, and the primer was exposed unless I took a perceived risk of adding the plastic weather shroud. I also lost the shroud on a hunting trip and had to purchase another. I knew that my rifle returned to zero after I cleaned it. I killed deer, and never had a hang or a miss fire. I loved the trigger, and the feel. But I still wasn't happy with the blow back. I had to find a better way, so I again searched high and low. Eventually I found the best Remington 700ML 209 modification! And that is the subject of my next Badger's Den. Copyright BadgerRidgeInd.com 2015
1 Comment
|
Welcome to the Badger's Den!
|
|
|
Written by:Tom, purveyor of fine products. |

Archives
March 2024
August 2023
June 2023
March 2022
December 2021
September 2021
February 2021
January 2021
September 2020
April 2020
January 2020
October 2019
September 2019
May 2019
January 2019
November 2018
July 2018
May 2018
April 2018
February 2018
January 2018
November 2017
October 2017
August 2017
July 2017
April 2017
February 2017
January 2017
November 2016
October 2016
September 2016
August 2016
July 2016
June 2016
May 2016
December 2015
November 2015
October 2015
September 2015
August 2015
May 2015
April 2015
Categories
All
AR Stuff
Blackhorn 209
Customer Feedback
Hunting Gear & Accessories
Maintenance
Organization
Remington 700 ML/MLS
Ruger 77/50
Savage Muzzleloader
Troubleshooting
 RSS Feed