Badger Ridge Industries
  • Our Products
  • The Badger's Den
  • FAQ
  • 700 ML Resources
    • Installation guide for Remington 700 ML/MLS 209 Primer Conversion Kit
    • Remington 209 Conversion Kit Installation Service
    • Breech plug tuning
    • Firing Pin Tool
  • Ruger 77/50 Resources
  • Contact
  • About
  • Terms of Use
  • Austin & Halleck Inline
  • EULA

Now offering sealed breech Ruger 77/50 conversions!

2/25/2017

20 Comments

 
Before we only offered a 209 conversion for the Remington 700 ML.   But now I'm happy to announce that we now offer a similar sealed breech 209 system for the Ruger 77/50!
Picture
Excerpted from the Ruger 77/50 manual
Much like the Remington 700 ML and 700ADL, Ruger sold a muzzle loader that looks a lot like the Ruger 77/44: the Ruger 77/50.    According to the Ruger website, it was in production from 1997-2004.   Judging by serial number data no where near as many were made as the 700ML.   The Ruger functioned very similar to the Remington, and even had a breech thread that allowed use of 700ML breech plugs.  (Not that we nor the manufacturer are endorsing that. It's just so similar it's possible). Thus these rifles had many of the same problems as the Remington 700 ML:  Blow-back, frequent misfires, and factory setups that didn't have 209 options.  

​So when Ruger owners find the Badger Ridge Industries 209 kit for the Remington 700ML, they often contact us and ask if we can make a similar "seal up the breech, BlackHorn209 compatible, finger simple prime de-prime system" for the Ruger 77/50.   Now, I'm proud to say "YES WE CAN!"

In order to develop and prove out our sealed breech 77/50 209 conversion a few 77/50's were purchased and converted by Fred and myself.   Having a couple of centerfire  Ruger 77 MKII's that I've hunted with for years, in many ways the 77/50 didn't feel like a totally new rifle to me, even though it was a 'totally new' rifle to me.   And while on the surface it works similar to the Remington, and the breech plug threads of both are essentially identical, the 77/50 is a very different rifle to convert.
Picture
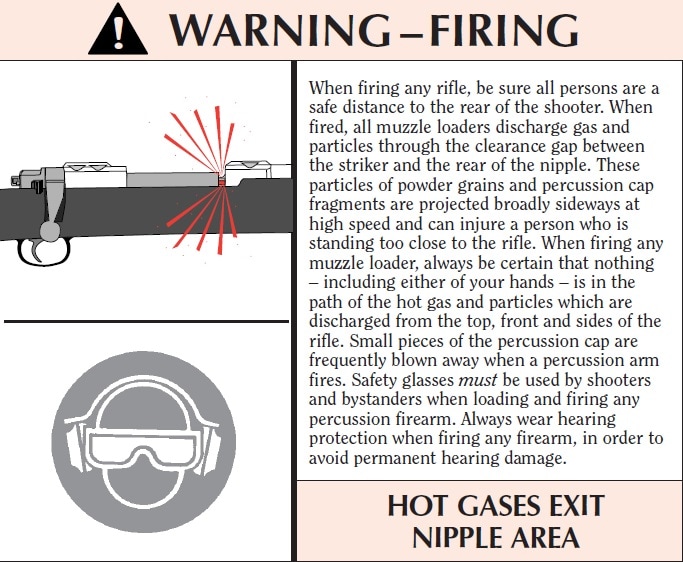
Ruger Manual's warning about blow-back
As the rifle came from the factory, or even when modified with a Canadian 209 system, the warning about "Hot Gases Exit Nipple Area" excerpted from the 77/50 manual rings true and must be heeded.   Hot gasses and pieces of primers/caps being blown back and around the nipple and the associated fouling are some time referred to as "blow by".  However I find it seems more accurate to call it "Blow Back".   The later version of the 77/50 used a protrusion on the bolt itself to try and direct the blow back to the side of the rifle.   And while it does accomplish this, it also directs blow-back into the bolt.  The bolt has a vent in the bolt body that directs the blow back that enters it down and into the stock!   So as delivered from Ruger, blow back gets in the bolt, and is even directed down and into the inner recesses of the rifle!  

This complicates cleaning and over the long term reduces the reliability of the system.   So compared to the Remington we had to modify the Ruger's bolt much more to get a 209 system that seals the breech and is more reliable.  
Picture
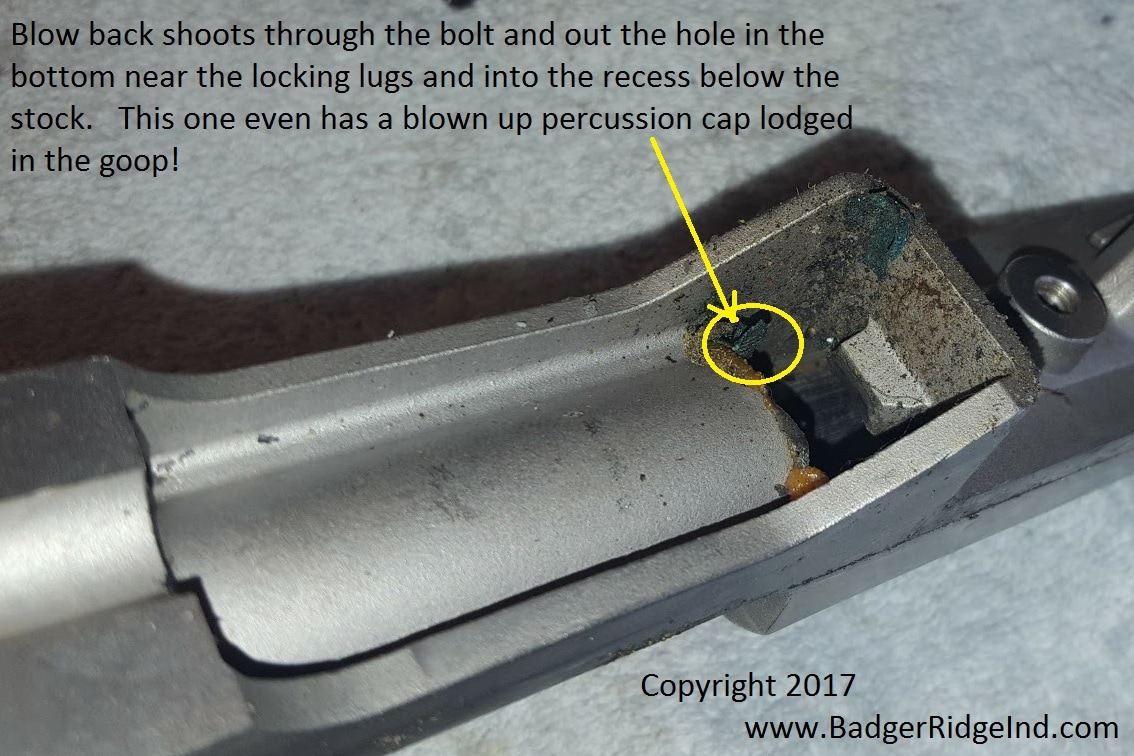
Blow back directed through the bolt and down into the action and stock (note the blown up cap I found in this mess on the R&D rifle I purchased)
The main reason to switch to our system is not only to use 209 primers, but to seal up the breech area and essentially eliminate all of the blow back issues.   209 primers are hotter and more reliable source of ignition.   Using them to seal blow back into the breech plug vastly simplifies cleaning and makes the rifle safer and more reliable.   Our conversion seals out the elements and allows one to shoot Blackhorn 209 powder.   Which in my opinion is the best black powder substitute available.  The Canadian 209 system and the original cap system are not Blackhorn 209 compatible, and they allow blow back into all those nooks and crannies.

Remember, blow-back not only can injure a shooter or by stander, but it can burn the optics mounted above the breech, project corrosive fouling throughout the bolt and action,  and wear out a mainspring prematurely.
   Even worse, the Ruger 77/50 is known to have an additional deficiency:  Blow back launches the firing pin rearward and occasionally shears the trigger's sear!

​Our conversion for the Ruger 77/50 
fixes all of these woes by sealing the blow back into the breech plug with the 209 primer!
Picture
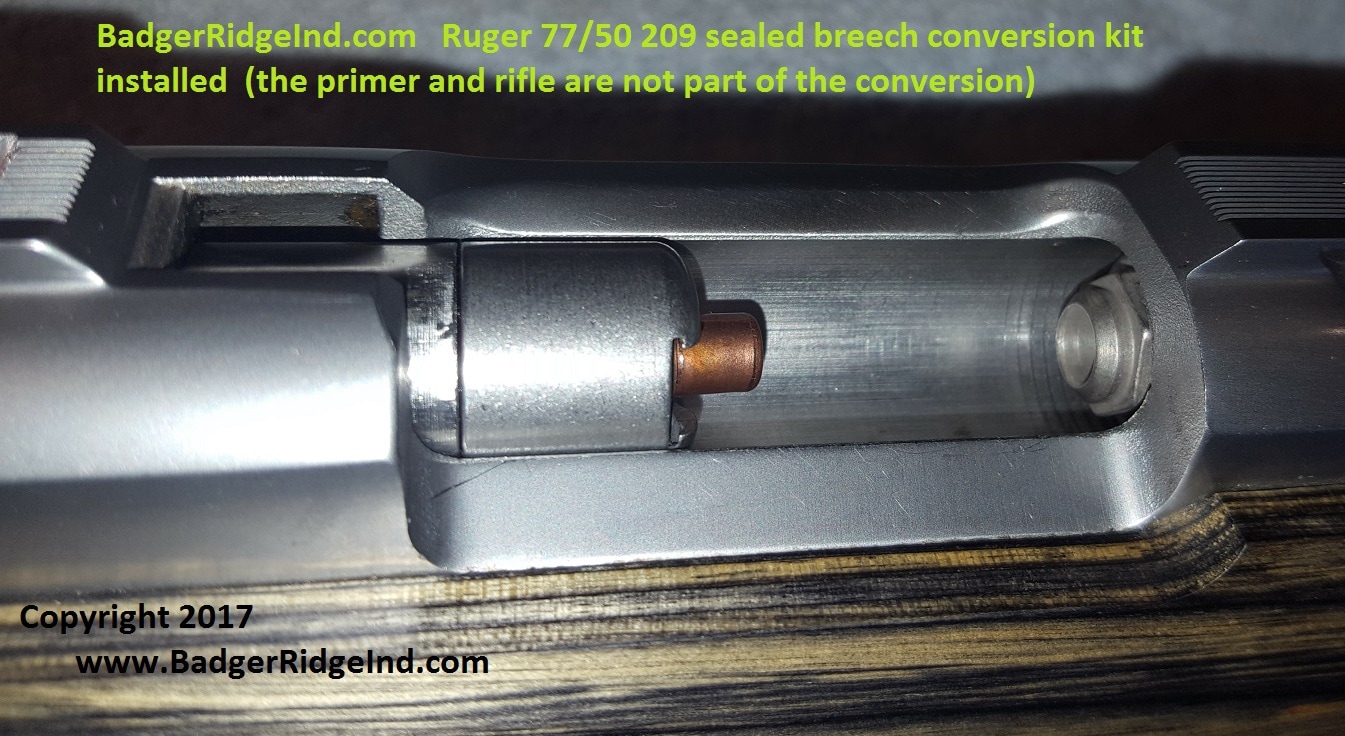
Badger Ridge Converted bolt feeding primers and sealing them into the breech plug
Picture
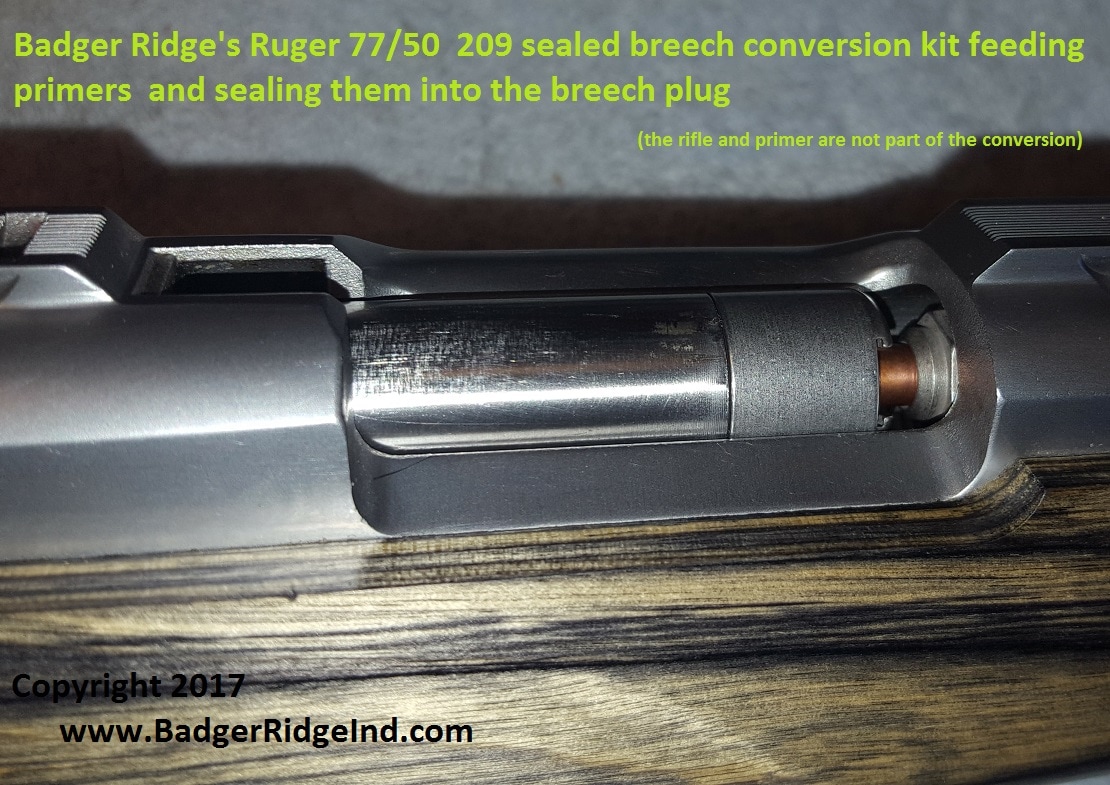
The conversion process requires the bolt to be completely stripped, our new firing pin to be installed, the extended shroud to be cut off, and the nose of the bolt dressed.  Then the 209 nose is timed to align it for loading and unloading,  pressed on, and firing pin protrusion set.  So once complete there really isn't any going back.  But once the converted rifle is shot, I'm sure no one will ever want to go back to the leaky original set up!
Picture
Picture
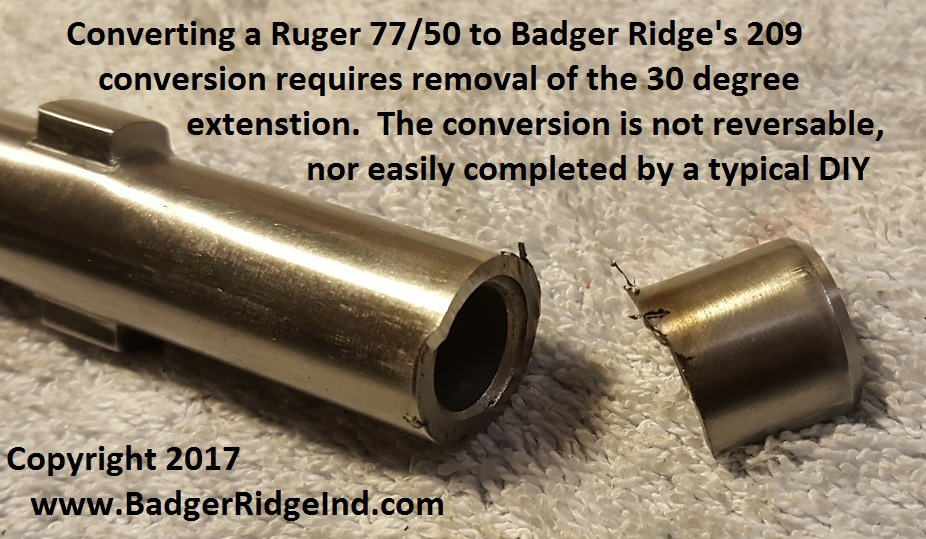
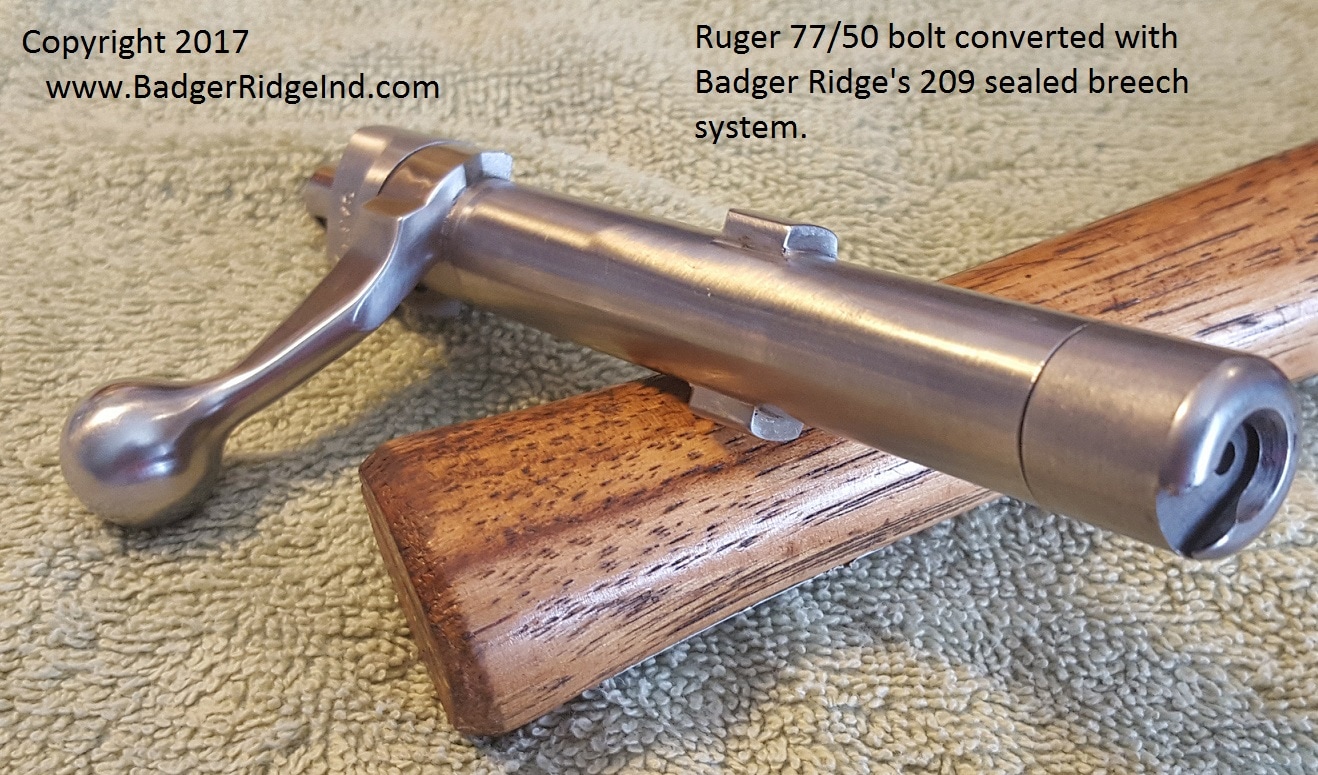
Our Ruger 77/50 conversion is through its first rounds of testing but is still in what the DoD would call LRIP (low rate initial production).   I'm not comfortable sending this one out for just anyone to install, and for now, will only offer it as a full conversion service.   Or in other words, I'm not willing to sell this one as a kit; you will have to pay me to install it.

​The Ruger conversion uses a very similiar breech plug to the one used in our Remington system:

Picture
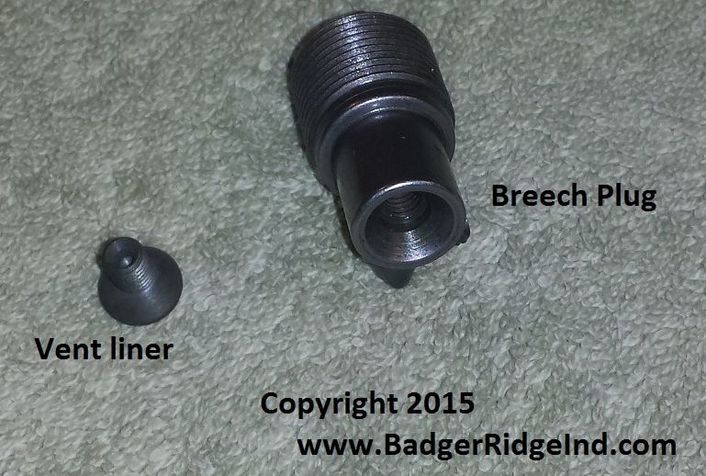
Badger Ridge's Hunter 209 Breech plug with vent liner
If you are interested in making your rifle work the way you always wanted it to, and Blackhorn 209 compatible, you can purchase Ruger 77/50 conversion as a service (very similar to our Remington 700ML conversion service).   Mail us your bolt, we'll convert, and send it back with the breech plug, vent liner, and other accessories.   The details are all in the listing for this service! 

We also can ship an entire new 209 converted bolt to you if you want to keep the original leaky system, or are missing a bolt etc.    That is more expensive than converting an existing bolt.  We do not recommend this unless you hunt out west where leaky non 209 systems are required for special hunts, but on others you can use our sealed breech 209 system.

And as always feel free to use the Contact form to send me your info.  I'll call or email back promptly.
Picture
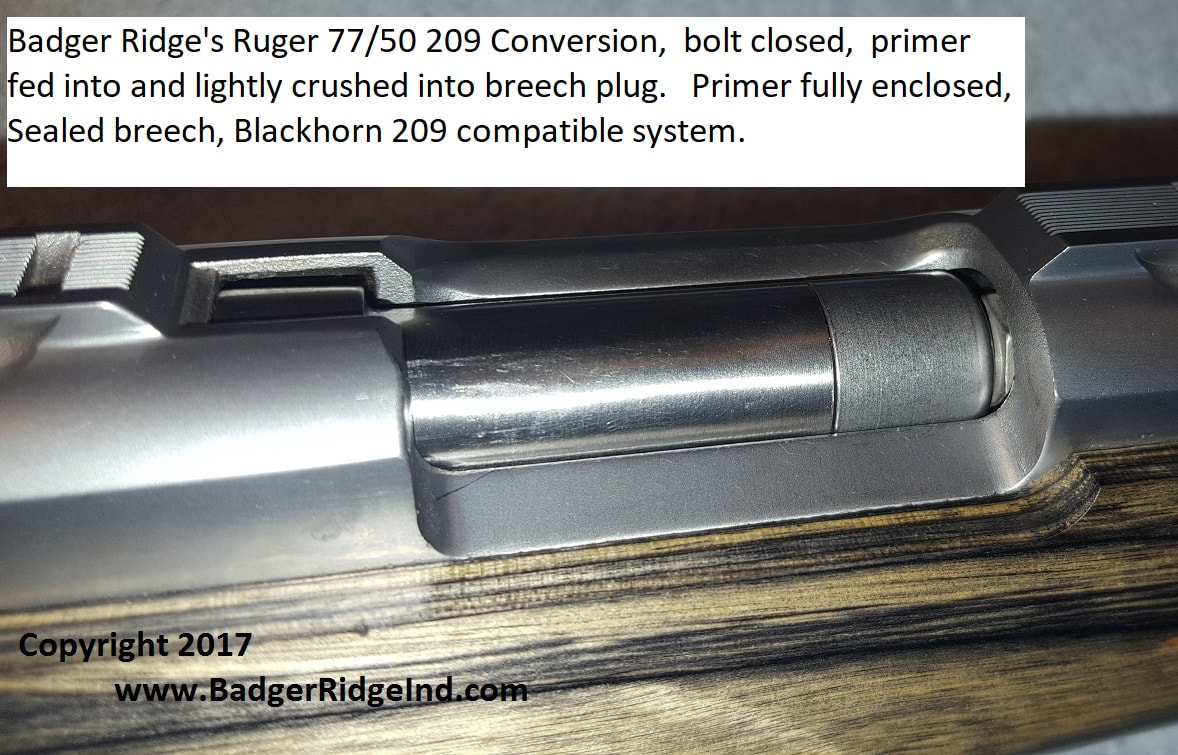
Bolt fully closed on Ruger 77/50 with 209 conversion installed. Primer is fed into breech plug with a slight crush seal
20 Comments
Riley
9/25/2017 00:37:44

What's the cost of a full assembly for the Ruger m77?

Reply
Tom link
9/25/2017 06:52:45

You can price out and purchase installation here:
http://www.badgerridgeind.com/store/p53/Ruger209install

Reply
Robert Harne
10/21/2017 13:21:11

What is the price for this conversion

Reply
Tom link
10/21/2017 16:17:46

The cost depends on if you send in a bolt to be converted or if you buy a fully converted bolt from us. The details are here:
https://www.badgerridgeind.com/store/p53/Ruger209install

Reply
Jim Brown
11/14/2017 11:11:42

How easy is it to remove spent primers? Are there issues with primer misalignment with the 209 recess in the breech plug? I am considering this conversion for my Ruger.

Reply
Tom link
11/14/2017 12:44:40

Typically you pull the spent primer with your fingers. No misalignment issues. The nose feeds the primer into the breech plug. It seals by getting a .003 to .005" crush. So when extracting the primer it comes right out of the breech plug.

If there is any issue, its only with the primer 'ballooning' and sticking in the nose, but every time that has happened to me a dry fire was all that was required to remove the spent primer. I made a youtube video to show it and how simple it is to fix.

Reply
Tom link
11/14/2017 12:58:28

You tube here of our very similar Remington 700 ML conversion showing the few times a primer may stick and how to fix it (dry fire):

https://www.youtube.com/watch?v=_Z2TCFXc088

Jim Brown
12/7/2017 08:45:49

Tom, I am curious. What does the vent liner screw do?

Tom link
12/7/2017 10:04:51

Short answer: The vent liner is a removable flash hole... so that when the flash hole (small hole down the middle of it) enlarges, you just replace the vent liner.

Long answer: The vent liner focuses the fire from the primer, and acts as a constriction of back pressure from the burning powder charge... by having its constriction and the large area between it and the primer, back pressure seen at the primer is reduced and keeps from deforming or blowing up the primer. This action tends to produce consistent pressures, which tends to increase accuracy as well. So over all the Vent liner is a key component to keeping blow back in check, making a reliable ignition system, and aides in getting consistent pressures as well. It performs best when it's orifice is between .030 and .036... it should be replaced when it hits .036 or accuracy will degrade and pressures seen at the primer will build.

There is a bunch more in the FAQ: https://www.badgerridgeind.com/faq.html

Reply
B Qunn
1/6/2018 21:17:11

I'm very interested for two Ruger 77-50s that I have (and some Remington ML700s as well). I understand that you do the work on the Ruger bolt(s) but will send the complete works to fix the Remingtons. Here's my question: if you aim for a crush on the primers as indicated between the bolt face and the breech plug face, and I install the breech plug, how can you ensure that, or put differently, how will I know I've achieved the correct 'crush', neither too much nor too little? I suppose the breech plug could be marked and backed out a quarter or one-third turn or so if too much gap, but how about too little? Re the latter, will that be apparent with too forced a closing of the bolt, but what would that be like or feel like? Would there be any telltale marks on the primer in either instance (after firing), either too much gap or too little? And finally, you imply (or indeed state) that the breech plug will, over time and use, open up, such that more than .036 it's time for a fresh one; in other forums, Chuck Hawks' for instance, he talks of carbonization in the breech plug hole for black powder rifles generally and drilling out the carbon occasionally, without any numbers for reference, but nonetheless. These two views seem inconsistent, can you enlighten? Thanks, looking forward to hearing from you.

Reply
Tom link
1/7/2018 20:52:24

Mr. Quin,

Some good questions. They are essentially answered in the instructions that come with the kit.

First and foremost, never ever back out a breech plug from its fully seated position. Always fully seat the breech plug into clean breech threads. An unseated breech plug is not safe!

The crush is mostly a feel, ie you feel how the bolt closes without any primer in the nose, then you try a primer and can feel the difference. If its so hard to close the bolt that you’d have to strike the handle with your hand or some sort of hammer: DON’T. Or in other words a light crush is all that is needed, and it can be done with gentle but firm hand pressure. Again, nothing more than light hand pressure is needed to get a light crush: pounding and hammers are bad!

If you have ever just neck sized your brass, its the same feel you get after a few reloads. There isn’t any gaps to be measured, either the primer will feed without any crush, will feed with some crush, or it will be very difficult to close the bolt because the primer is too long.

Primers from different manufacturers will have slightly different dimensions. And they will even vary slightly between each other when they come out of the box. If you have precision measuring tools like calipers or a micrometer you can see what the primers dimensions are before you try and feed it, and then measure it after its been crushed to see the variation. This is not exact either, because the primer will spring back some. If you can do this, then you’d be looking for about .003 to .005” of crush.

But remember the goal her isn’t to crush primers; it is to seal them so that blow-back stays in the breech plug. So in effect if you are not crushing primers so much that you detonate them, you don’t have to strike or use extreme force get the bolt handle down, and you are sealing the blow back in when you shoot: you have been successful.

I’ve got a couple rifles, and Fred has had a few too. In developing the kit we tried a few different lengths to set the bolts length to and tried these bolts in multiple rifles… that gave us a good range to set them too (and there is only a few thousandths of an inch window here). So when I convert a bolt, I set it to that tolerance and try it in my rifles. Just from the length its set to, I’ll have a good idea what primer will work in my rifles, I try it in my rifles, and I’ll make a suggestion on the installation instructions sent with the bolt on what primer I’d try first. So far that has worked well for my clients, but I can’t tell 100% you what primer will work best in your rifle. That is because of the rifle’s we’ve bought and tried this on, we have a decent range of headspace figured out.

The issues is I can’t know exactly what your rifle’s headspace will be. But I really don’t need to know it exactly. When you get your bolt back, start by trying the primes I suggest. If they crush, good. If not, you can try another brand (longer or shorter): Seeing the primers length will vary depending on the brand, and Winchester are pretty much the longest, CCI’s are next (Federal and Remington are close to CCI)... it will either be Winchester that crush well, or CCI/Federal/Remington… probably one of the two.

So there is some trial that still must be done by the client. Just clean those breech threads, fully seat the breech plug, and don’t beat on things.

In the past I’ve sent some small washers so that if a client is not getting a crush, say with CCI, they could add washers to get a crush. But it’s worked better to just switch up to Winchester and not use the washers…. Keep it simple and less complicated and it will work better in the field. I'm probably going to stop sending washers, but offer them for purchase for those who want to play.

So essentially we’ve got it down to where the bolt we send will either have a good crush with Winchester or CCI primers… and our suggestion is to use the primers that crush with just some gentle downward pressure on the bolt handle.

And with our breech plugs, the breech plug doesn’t open up or wear... The breech plug is gently reamed with drill bits that are undersized so that the carbon/fouling can be removed but cleaning should not remove metal from the breech plug!

The hole through the center of the vent liner will open up due to the fire from the primer passing through it from each shot. Remember the vent liner is like a screw with a hole down the center and is screwed into the end of the breech plug. When its orifice (inside hole) opens to .036, replace it with a new vent liner. The vent liner are only $5.20 each, and the gage pin to know if its .036 or larger are ~$5 (if you add them you kit order). So using vent liners makes the breech plug last much, much, longer.
The

Reply
B Qunn
1/8/2018 01:14:43

Hello again, thanks for the answers, some more questions. First, the "209 nose" piece which, once the overhang deflecting piece on the original bolt is cut off, is pressed on, 1) is this piece stainless steel?, 2) how deep into the bolt is it pressed?, 3) how do you set the firing pin protrusion? Do you start out with an overlong pin and install it into the various bolts you get and then cut any excess off? Also, I see from your setup that if there is backward movement from the primer firing, it bucks against the new bolt face (inside the 209 nose) much more than against the protruding firing pin, which is more like a usual firing pin in size unlike the original which is basically a big flat cylinder end-on, and thus would greatly reduce the reported 'sear shearing' over time (unlike the Canadian kit which, although it replaces the original firing pin cylinder with another with a bump on it, to make the primer fire, it's still a relatively big cylinder end-on, an only held in place by the mainspring, so any rearward thrust could push the firing pin back and may over time deform the sear (maybe)); I like yours. FWIW the hole in the Ruger bolt is as I see it a gas escape hole, just like the same in the bolt action Mauser/Springfield/Winchester 70, etc. It may have the unintended effect if there is blowback of fouling the works under the bolt or on the trigger mechanism, but its main purpose is safe gas management I would assume; having said that, not having any blowback at all is best, still leaving the hole for unfortunate extraordinary rearward escapes of gas like from punctured primers. I do find it odd that, once the bolt is locked, the gas hole points horizontally to the left into a channel which would allow the gas to go down; I would have preferred it pointed straight down from the bolt , but perhaps that would have exposed the hole even more to day-to-day dirt, etc., directly into the bolt where the firing pin and spring reside, so not good. But I'm glad it's there, the Remington 700ML doesn't have one.
I also see that there is a chamfered recess in the 209 nose piece and a corresponding chamfer on the breech plug surrounding where the primer will sit; are these designed to mate up? And finally, elsewhere above or on your site you mention routinely replacing the bolt/striker mainspring with a fresh OEM one on the Remingtons, but on the Rugers you use the original spring having cleaned it - can you explain? Thanks again.

Reply
Tom link
1/8/2018 14:32:56

Mr. Qunn,

Some good questions. Most of them are a bit of ‘trade secrets’ and design decisions.... but here we go:

Our Ruger 77/50 kit (just like the Remington 700 ML kit) is manufactured in the US on CNC machines from 416 stainless steel. The nose and the breech plug are heat treated. The vent liner is “mil spec” alloy, heat treated and fabricated by Lehigh, in Pennsylvania.

The problem with the 77/50 that I haven’t been able to find a ‘fix’ for is the main spring. I just can’t find them. So we are forced to reuse the original springs. Luckily the new bolts we sell have brand new springs with them, but I cannot find the spring alone. If you know a source please share. For the Remington I buy springs direct from Remington in bulk. If someone was to send in a Ruger bolt with a spring that was totally shot, I’d probably end up cutting another spring, or seeing if a 700ML spring would work.

On the Ruger, after cutting the bolt protrusion off, and machining it square and to the proper length, the bolt nose is pressed approximately ½” into the original bolt with designed interference fit. Trust me, the nose is not going anywhere.

The firing pin is purposely manufactured too long: I have to file it to set the protrusion on it similar to the way our Remington Kit works. (see the Remington 700 instructions for the details there).

As for fit between the nose and the breech plug, both the Ruger Kit and Remington have the same profiles. The nose and breech plug have the same very carefully designed tapers that allow them to come very close together to enclose the primer fully, but not allow them to touch and still allow pressure a path for gas to escape if there was some sort of rupture.

Like you said, no blowback is best, and we have a design that should seal it into the breech plug. But the vent in the Ruger bolt body is not modified by our kit, and there is still a route for gas to escape if a primer was to ruptured (say by the firing pin). So in the Ruger, gas from a ruptured primer could still travel through the hole in the bolt nose, along the firing pin, then down through the bolt body, and into the lower recesses of the receiver: The gas safety route as designed by Ruger is preserved. And like you said, the Remington doesn’t have this vent hole in the bolt body, so if it has a rupture it relies on the carefully designed gap between the breech plug and bolt nose to give a relief path.

Unlike the Remington, the Ruger Kit crushes the primer, and the Ruger has locking lugs on the bolt that hold the crush. So before firing there is already bolt thrust from the primer crush: when the primer is discharged it cannot move forward or rearward due to this crush.

On the Remington kit the swaging of the primer into the breech plug seals well. But swaging into a tapered hole also allows for some movement forward, deeper into the breech plug, when the firing pin protrudes and ignites the primer. The movement is more notable with lose primers or brands with more taper to them, such as Winchesters. This movement of the primer forward allows the primer cup to bulge in the the bolt face, which is one reason the Remington kit can suffer stuck primers (but not the only reason). The Ruger Kit seems to fare better here. I haven’t had a stuck primer yet, even with Winchester primers (which are notorious in our Remington kit).


Yours,

Tom

Reply
Tom link
1/8/2018 14:47:51

Oh, and I'm 100% sure that the sears in the Ruger 77/50 were stressed and broken by the original design driving the firing pin rearward into them. The Canadian mod worsened this, and the Bager Ridge Conversion completely eliminates blow back driving the firing pin rear-ward.

Reply
B Qunn
1/8/2018 01:38:19

Further to my point on handling rearward escaping gas, obviously the main outlet would be the substantial hole (if that's the right word, it's basically the right side length of the action between the 'chamber' (if you will) and the rear bridge of the action) to the right of the bolt where the action dips down to facilitate primer loading (in a cartridge rifle, to load the cartridges); the escape hole in the Ruger bolt is just to handle whatever gas enters the bolt, if any, since most will blow up and out to the right which, as far as I can see, cannot be stopped or managed on inline muzzleloaders (on cartridge rifles, the bolt locks up about 1" deep inside a big hole in the end of the action or barrel and so if gas escapes rearwards there into that chamber from a ruptured case or punctured primer, to manage it, they usually have an escape hole drilled into the right side of this overhang, sometimes both sides; they also have escape holes in the bolt for whatever gas gets inside the bolt). One additional question: could you comment on whether the likelihood of escaping gas with an inline muzzleloader with a breechplug is significantly more or less than with a cartridge rifle; I assume much less, as with a cartridge rifle you can get either a punctured primer (here too) but you can also get a ruptured case side or bottom, whereas here you have the breech plug between you or the action and the powder burn, and surely a threaded breechplug is many times stronger than brass cartridge cases, so you only really have to worry about a punctured primer, and your system limits that, as well as reducing the likelihood of over-time sear shear. Agree?

Reply
Tom link
1/8/2018 14:46:03

There is a lot to this question.

I think simply: center fire rifles are designed to operate at higher pressures, and achieve those pressures faster (ie they have a faster pressure curve and higher peak pressures). They typically have smaller bores that don't have the same volume as your standard 50cal muzzle loaders, this tends to not reduce pressure as the projectile moves down the bore, and tends to drive the compubustion of their powders to higher pressures.

Your muzzle loader contains its lower pressures, and builds them more slowly by having a larger bore, using different propellants, and containing the combustion gases to the rear with a stainless steel breech plug. The breech plug is much stronger than brass center fire rifle cases, but does have holes machined into it. Those holes always allow some pressure to seap through rearwards.

All that said they are two different systems with differing ways to handle the pressure.

What I know is

1. The original leaky system blew that pressure all over you
2. Tje Savage 10ML2 did a great job of keeping the muzzle loader back pressure in cased.
3. Our kits work a lot like the Savage 10 ML2 (but are not smokeless!!!!)

If you follow the rules (ie no smokeless powder, use witness marks, only load with known good components, etc) you will be as safe as you can. Its when folks start trying to 'get more' out of their rifles by breaking the rules, that they only "get more... danger."

Reply
B QUINN
2/1/2019 16:09:02

Thanks for all these comprehensive answers to my comprehensive questions (yes, I show up once a year bidden or not). Re your last paragraph, what are "witness marks"? Are these the markings you make on your ramrod to show when you've seated a bullet, etc.? Or something else? Thanks, and I still have the Rugers and the Rems, and hope soon to proceed with the upgrade kits. Life has a way of getting in the way, as you know.

Tom link
2/1/2019 17:16:35

Witness marks are marks on ram rods. When the ram rod is placed all the way into the barrel and abuts the breech plug: if the witness mark aligns with the end of the muzzle it will indicate if the rifle is charged or not (depending on where you put the witness mark). I personally make marks that indicate where the barrel aligns when empty. Any other alignment means the rifle is loaded.

Bill Walden
12/1/2018 19:08:24

Hey Tom, I'm very interested in your ruger 77/50 conversion.
My muzzleloader season starts in a few days, and when it's over, I'm going to send you my bolt. could you please let me know the cost as well as other products I might need. Thank You much!

Bill Walden from CT

Reply
Tom link
12/1/2018 20:47:59

Our Ruger kit costs $245.95 installed for US customers (Canadian customers will have to pay an additional $10.00 Canadian shipping fee). To have me convert the rifle, all I'll need is your rifle’s bolt. From when your bolt hits my hands to when it’s back in the mail is typically under 2 weeks. These prices include shipping from me to you.

You could instead elect to buy a complete converted bolt . As they are more expensive, they are not recommended unless you plan on hunting in a state that requires exposed percussion caps (Oregon/Idaho). That way you can keep the original leaky exposed cap system, and also have our sealed breech system.

To make whatever you choose happen, please go to our website. https://www.badgerridgeind.com/store/p53/Ruger209install

Add your choice to your cart clicking the bubble next to it, and then clicking “add to cart”.

I suggest that you also add a couple extra vent liners ($5.20 ea) to your cart.. https://www.badgerridgeind.com/store/p11/LehighVentLiner

You won’t find them cheaper anywhere else. The vent liner is the part of the kit that will wear first and require replacement. See the FAQ for the details: http://www.badgerridgeind.com/faq.html

It would be useful to have a .036 gage pin to know when the vent liner has worn out as well: http://www.badgerridgeind.com/store/p48/036ZZpin ($5.39) Also made in America.

Once your cart is complete with every item you wish to purchase, check out. Be sure to put accurate email, shipping, and contact information. After checking out a receipt will be emailed with the address you put in your cart during checkout. If you don’t receive it, check your spam/junk mail folder.


Reply


Leave a Reply.

    Welcome to the Badger's Den!
    Where Badger Ridge Products are discussed.

    I constantly add to and update this blog's content.

    Not finding what you wanted?
    ​-Check out the "Archives", "Categories", or the menu bar.

    ​

    Written by:

    Tom, purveyor of fine products.

    Badger Ridge Industries Logo
    TM

    Archives

    October 2024
    August 2024
    March 2024
    August 2023
    June 2023
    March 2022
    December 2021
    September 2021
    February 2021
    January 2021
    September 2020
    April 2020
    January 2020
    October 2019
    September 2019
    May 2019
    January 2019
    November 2018
    July 2018
    May 2018
    April 2018
    February 2018
    January 2018
    November 2017
    October 2017
    August 2017
    July 2017
    April 2017
    February 2017
    January 2017
    November 2016
    October 2016
    September 2016
    August 2016
    July 2016
    June 2016
    May 2016
    December 2015
    November 2015
    October 2015
    September 2015
    August 2015
    May 2015
    April 2015

    Categories

    All
    AR Stuff
    Blackhorn 209
    Customer Feedback
    Hunting Gear & Accessories
    Maintenance
    Organization
    Remington 700 ML/MLS
    Ruger 77/50
    Savage Muzzleloader
    Troubleshooting

    RSS Feed


Orders over $100 ship free.   Low flat rate shipping to USA (US, AK, HI, PR)  starting at $7.49 for orders under $100 & 1lb.  $10.99 flat rate for orders over 1lb & under 2.5lb, bulky or over 2.5lb to 5lb are $15.99, 5 lb and over are $21.99 (mailed USPS to the US, AK, HI, PR).   Only specific items will be shipped to Canada (shipping to Canada calculated at check out).  No other international shipping.    See our Terms of Use for more details.


  Badger Ridge Industries
PO BOX 223
Fostoria, MI 48435

​(989) 795-2526
OUR SERVICE PROVIDER (TDS TELECOM) IS CONTINUALLY MESSING UP OUR PHONE!   If you have trouble getting through, please leave a voicemail letting us know and then use the CONTACT FORM  or EMAIL US.

Outside of the hours of 8am-9pm Eastern our phone system will only offer you automated assistance or to leave a voicemail

Feel free to use the contact form to get a hold of us!
Se Habla Español
  • Our Products
  • The Badger's Den
  • FAQ
  • 700 ML Resources
    • Installation guide for Remington 700 ML/MLS 209 Primer Conversion Kit
    • Remington 209 Conversion Kit Installation Service
    • Breech plug tuning
    • Firing Pin Tool
  • Ruger 77/50 Resources
  • Contact
  • About
  • Terms of Use
  • Austin & Halleck Inline
  • EULA