
|
We've been selling and installing our great 209 conversions for years now. And I've noticed my questions and sales following trends influenced by the various hunting seasons and their associated rules. This time of year many folks are getting ready for Colorado's muzzle loader season, typically focusing on harvesting an elk. So annually, I edit and re-post this one. The commentary here was also added the to the FAQ (Frequently Asked Questions).  The FAQ entry: Q: I hunt in Colorado, sabots are not allowed for hunting during muzzle loader season. I want to use your awesome 209 conversion, but you say you recommend sabots with jacketed handgun bullets. What are my options? A: Short answer is our kit will work great with any projectile. I've found Pyrodex, Triple Se7en, and black powder work best with non sabot projectiles. So I suggest that you use our kit and any muzzle loader safe powder (besides BlackHorn209) for your Colorado hunts with Colorado legal projectiles. Long answer: I realize not all 50 state have the same rules. And some state’s rules are just plain silly. I wrote a blog post about that. The main thing to remember here: the powder you chose must be compatible with the projectiles you use. Our kit will seal the breech, which keeps the crud out of the bolt and action no matter what muzzle loader safe propellant you chose. Our kit is compatible with all muzzle loader safe propellants: pellets, loose powder, etc. Also using 209’s will give you more ignition heat and thus more reliable ignition over caps. And seeing our system keeps the crud sealed into the breech plug, the 209 is ignited reliably too. But the powder and projectile choice is up to the shooter. Read the manuals/instructions and follow them when developing loads. Blackhorn209 powder is different from Pyrodex & Triple7even: To be reliable BlackHorn209 needs to be fully sealed; i.e. sealed at the breech (which our kit does), and sealed at the projectile. Minnie balls, minet, power belts, B.O.R. Lock MZ and other easy loading projectiles that are legal for Colorado muzzle loading, don’t usually seal until the powder combusts and forces them into the grooves. This deformation sealing the bore after combustion is called obturation. The problem is BlackHorn209 doesn’t burn well until it’s sealed and can build pressure. So it’s likely to have bloopers, miss fires, and hang fires with obturating projectiles. Sabots seal well to start, thus if you are using BlackHorn209, it’s recommended to use sabots. Though the new Hornady Bore Driver bullets are reported to seal well and work with BlackHorn209, I haven't tried them myself. Never use smokeless powder in your Remington/Ruger! It says it right on the barrel! Because Colorado doesn’t allow sabots during the muzzle loader seasons I would stay away from Blackhorn209. (or with a lot of trial, I may try the Hornady Bore Drivers) Otherwise, If I was hunting in Colorado, I’d use our kit, choose a heavy projectile (250gr or more) that seals on ignition: Hornady BoreDriver, Thor, minie ball, lead conical, etc. But without a lot of testing, I wouldn’t use BlackHorn209; I’d try Triple7even, or Pyrodex. Although they are not as easy to clean, and will foul the barrel, they are very easy to ignite even when not sealed, and will obturate the projectile. Black powder will work just fine with these sorts of projectiles too. I do have a few clients that report success with Blackhorn209 and magnum primers (CCI 209M or Federal 209A) using Hornady FPB’s or its aformentioned replacement Bore Driver... and also with Thor bullets. I also had one that said tthe Thors worked well at the range, but didn’t fire when he had a nice bull in his sights. He said it was extremely chilly that morning, his rifle was cold soaked, and the Blackhorn209 wouldn’t go bang. He was very frustrated. I suspect it was because the projectile shrunk with the cold, and the copper jacket wasn't quite as malleable. Also cold powder is just a bit harder to get burning, and thus that setup was unable to obturate the looser projectile and keep the BlackHorn209 burning. Thus without a lot of testing (like putting a loaded rifle in a freezer, pulling it out and shooting the combo... repeatedly). I would stick with Pyrodex or TripleSeven for Colorado muzzle loader hunting: they will go bang with an obturating bore riding projectile when you need it, even when it is very cold. Just about everywhere else, I recommend sabots because they have been accurate, easy to load, and jacketed hand gun bullets have always been very effective for me. Whatever powder you chose, the velocities your muzzle loader will produce are essentially the same that good jacketed hand gun bullets are designed for. They tend to kill quickly and bring home game. Sabots are allowed in most states, so that's what I usually recommend. Long-term: If I voted in Colorado, I’d pressure my legislature to change the muzzle loader rules. Removing the most effective projectiles (jacketed hand gun bullets are great in muzzle loaders), and the most modern muzzle loading propellant (Black Horn 209) from use is bad for the game receiving the projectile. I believe the no sabots rule promotes wounded/lost animals.
0 Comments
 The Remington 700 ML/MLS & Ruger 77/50 muzzle loaders have been out of production for years now. These rifles now vary in condition. Some have hardly been used. Others used, but well cared for. Some have been neglected. So their condition truly runs the full gambit. This is further complicated due to the original design and other 209 modifications sending fouling corrosive gasses throughout the bolt and the receiver. New owners can be further confused by the various kits that may have been fitted over the years. Our kits fix blow back issues, don't rely on most of the parts people tinker with, and base line the rifle to a solid known good state. Many folks find their way to this blog from a simple internet search. Frequently because they are having trouble like misfires, failure-to-fire, are tired of blow back, etc. Some just want to use Blackhorn 209 powder (which will misfire or blooper if not sealed up). Other's have a friend that fixed his woes with our system, or saw a modified rifle at the range using our awesome 209 conversion for Remington 700 ML's and Ruger 77/50 rifles. Some just know that there has to be a better way, and there is: you found it in our kits. However you got here, and whatever shape your rifle is in, welcome to the best, last conversion you'll ever want on your rifle, and a great source for other hard to find Remington 700 ML parts. Seeing the guns are so old, most folks first question is: Does this guy really still sell kits & fix these old rifles? YES WE DO! (Click here to purchase one) You may wonder how it works. You can think of having three basic options:  Badger Ridge's 209 Conversion kit for Remington 700 ML/MLS Option 1: Buy a Remington kit and Do It Yourself (DIY). The is your least expensive option. To decide if you want to pay us to convert the bolt, have your gunsmith do it, or try it yourself, I recommend you study the online installation instructions and see the tools and skills needed. The most common thing people mess up up during the conversion process and need to replace is the firing pin, and a new one costs more than our install service. So I always recommend you purchase our install service and send me the bolt (I'm getting ahead of myself as that is option two below). Note, there is not an "Option 1" for a Ruger (the Ruger's conversion is too complicated). Option 2: Send us the bolt and pay us to convert it You can purchase the kit for a Remington and add installation, or purchase an installed kit for the Ruger. Then ship us the bolt. Let's call this option 2. It's in the middle of cost, but very simple as you just have to ship us the bolt, we convert it and send it back. While the costs differ, this option is basically the same between the Remington 700 ML and the Ruger 77/50. When it comes to option 2: you send us the bolt, it's converted, then shipped back with the new breech plug/vent liner and other small tools. Again, with the Ruger 77/50, there is no option one. 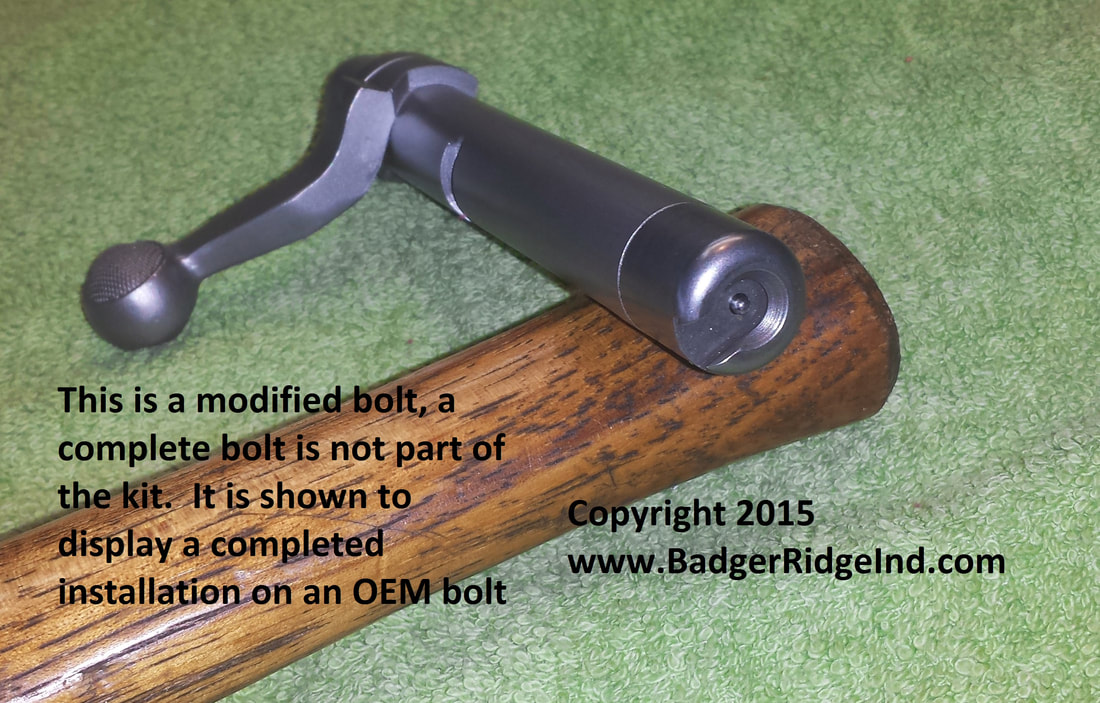 Converted Remington Bolt 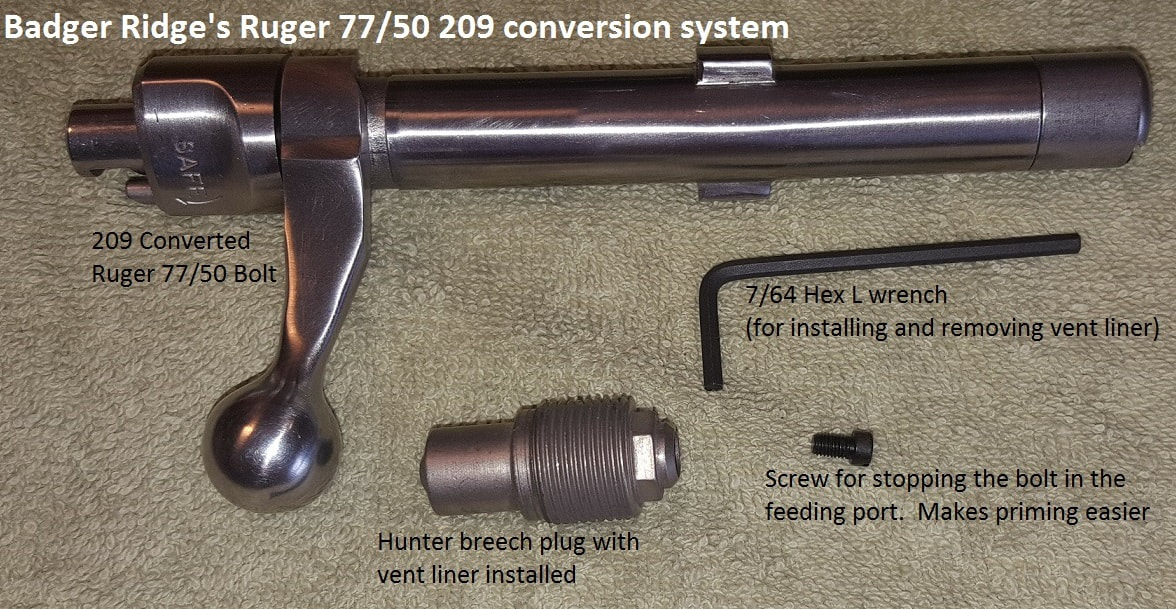 Converted Ruger 77/50 bolt, with all the included extras Option 3: Buy a new bolt we build from scratch Option 3 is the most expensive option: buy an already converted bolt with a breech plug. I only recommend option 3 when people hunt in Idaho, or Oregon (for some hunts in those states they have to use exposed caps, but have other hunts where they can seal the breech and use 209's). This option is also viable for folks who have rifles that are missing bolts. We used to build bolts for both rifles, but right now we only offer this for the Ruger 77/50.  Completely new 209 converted Remington 700 ML bolt: This item is on hold & unavailable for the foreseeable future If you have a bolt for your rifle, even if its frozen or broken, our recommendation is for you to purchase a kit with our conversion service (Option 2) and send it to me. I'll look it over and let you know what, if anything, is needed to convert it. I have a pretty good track record on salvaging frozen/broken bolts and keeping it cheaper than buying an entire new bolt. If you still have questions, you probably can find an answer in our FAQ, or within the archives along the right side of these Badger's Den posts. Please take a look at the FAQ (Frequently Asked Questions) before you call or use the contact form: the answers you want are probably there (and you will probably get them quicker via the FAQ. If you aren't finding what you need, you can call us (our number is on the bottom of every web page: 989 795 2526) or use the Contact page by clicking here (or under "More" in the banner above) to initiate a conversation. We'll call you back or reply with an email. Remember you can always add what you want to your chart, and complete an online check out. Hope this helps!  Welcome to the Badger's Den! If an internet search brought you here searching for Savage, Remington or Ruger muzzle loader solutions, don't worry you found the right place! Stay with us! Keep scrolling, Click here, or Look at the banners at the of the page or the right side etc for what you are looking for! Yes we still sell items for these old muzzle loaders! For this installment I'd like to discuss the different types of 209 primers you can use in your muzzle loader and how we got to the point where you have to understand what is compatible with what in order to have a reliable shooter. I'll also be adding this to our FAQ (Frequently Asked Questions). Q: Why do you recommend I don't use muzzle loader primers in my muzzle loader? Why did the "muzzle loader 209 primer" I tried with Blackhorn209 fail but the standard or magnum 209 primer worked? Why does Western Powders (makers of Blackhorn209) say to use magnum primers, but you say I can use standard primers or magnum primers, but not "inline muzzle loading" 209 primers? Why does the primer say it's non corrosive, but you say I need to clean my muzzle loader soon after shooting because it will corrode? I've got a stainless muzzle loader, do I really need to clean it after shooting? A: These are all Good questions with seemingly contradictory information. If you want the short answer, and you have a Remington 700 ML/MLS or a Ruger 77/50, the short answer is: buy our conversion kit, use full powered standard or magnum 209 shotgun primers and pair them with Sabots and Blackhorn209. Clean your muzzle loader thoroughly after shooting. The short answer also can be summarized as: not all muzzle loader and gun cleaning stuff is compatible with all other muzzle loader and gun cleaning stuff. Read and follow each item's directions. Our kits seal the breech, so our kits are compatible with any muzzle loader powder. Using our kit helps simplify much of the compatibility issues. If you want the long answer, please keep reading: 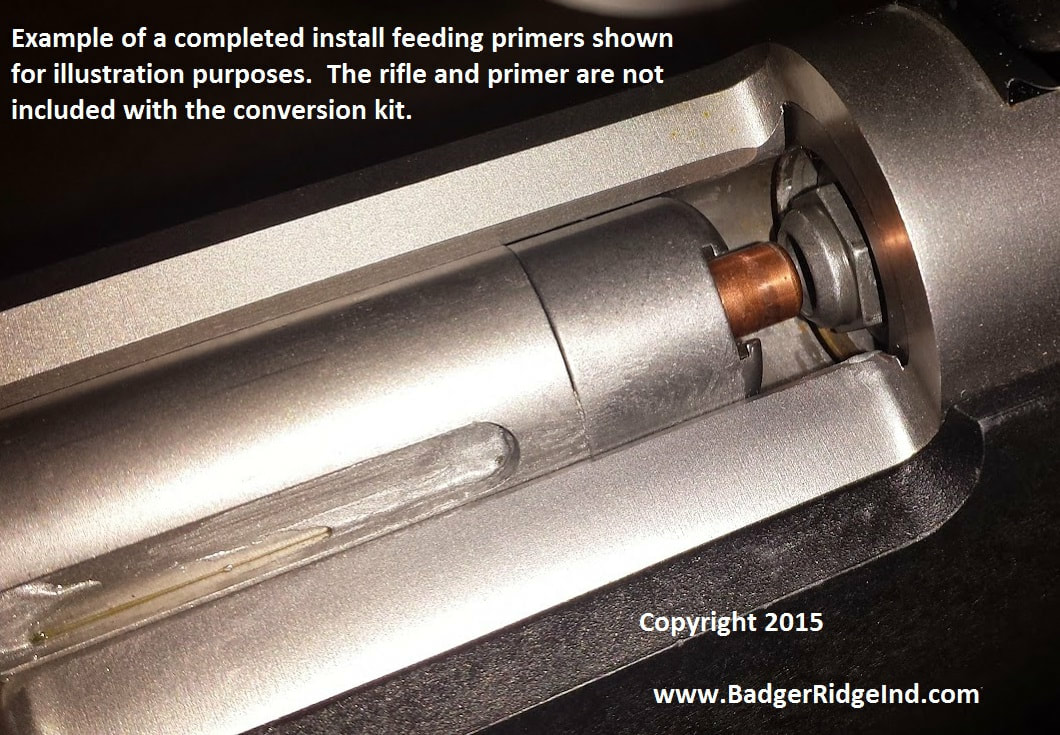 The long answer is, well... long: First lets talk about primers in general and then some history of modern muzzle loader and black powder substitute development. Then BlackHorn209 muzzle loader powder. Yes: modern primers (and percussion caps) have been non-corrosive for years. Corrosive primers formerly used fulminates, like mercury fulminate: their residues are corrosive, but for quite some time most western countries have used other non corrosive stuff (like lead styphnate). The Eastern Block countries were slower to adopt non-corrosive primers, which is why you are likely to run into old ammo from them that has corrosive primers. So today primers are still labeled corrosive or non-corrosive... FYI corrosive primers that use Mercury Fulminate attack brass and make it brittle. You want to avoid trying to reload any brass fired with corrosive primers... especially if it has had the residue on it for a while. Regardless of the primer/cap, Black Powder and most substitutes produce corrosive residue (aka fouling). In the unique case of Blackhorn209 it's fouling is not corrosive, but it is hygroscopic (which coats the bore with water that promotes corrosion). So you need to clean any muzzle loader using Black Powder or a substitute soon after firing. Some manufacturers responded to this by offering coatings, like cerakote, nickle, etc... others use stainless steel to protect the gun from the corrosive fouling. Regardless of steel or treatments that may slow the corrosion, cleaning after shooting is still required to protect the metal from the effects of these residues. Also breech plugs and their components (along with bolts in leaky breech setups) can be fused into the rifle by the fouling and its resulting corrosion if not properly protected before firing and properly cleaned after firing. 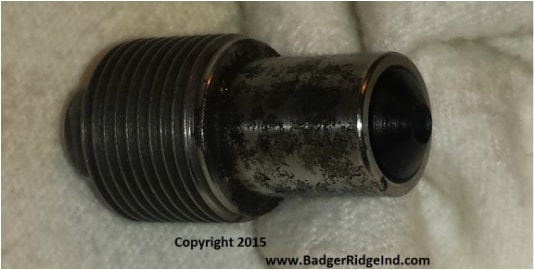 This 416 Stainless breech plug was fired multiple times with Blackhorn209 and left in a rifle for about 8 months before being removed. This is after it was scrubbed with steel wool. Further complicating things is that Black Powder and most of its substitutes' fouling builds with each shot, and tend to be sticky. This fouling will bind and cement stuff together, like breech plugs into barrels. Blackhorn209 is the exception here. It has no more fouling on the 500th shot than after the first, and its fouling is not sticky nor does it tend to lock stuff together. See the breech plug above... it corroded but didn't get stuck in the rifle after being neglected. But I'll get into Blackhorn later. Crud rings became a problem when the venerable standard 209 primer's with so much more priming compound than percussion caps were introduced to muzzle loading. The crud ring forms near the breech (with Black Powder and all its substitutes... except Blackhorn209). It's caused by the organic residue of Black Powder (and its first substitutes) mixing with the inorganic residue of the priming compound. 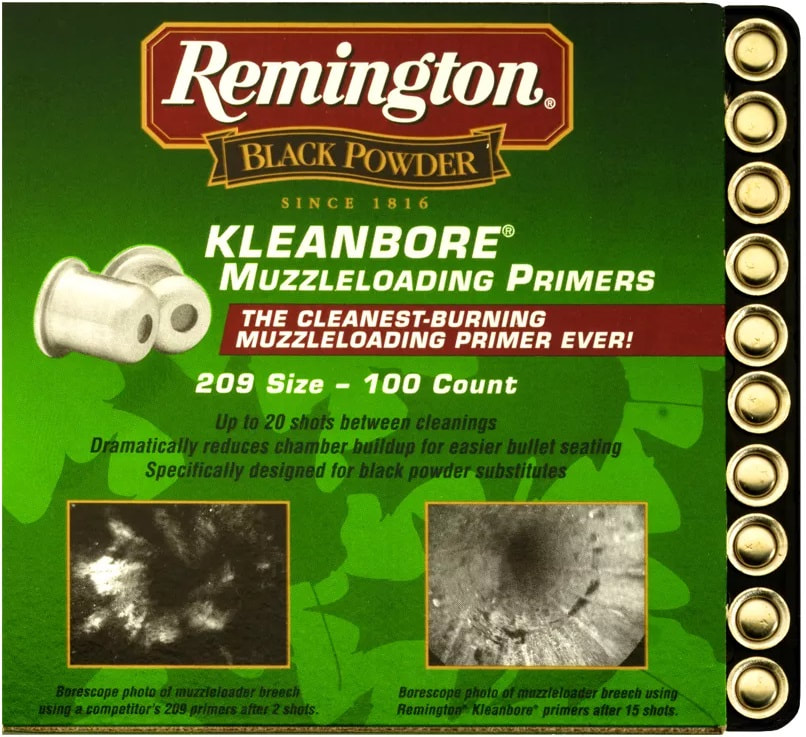 Do not try these reduced power Remington Kleenbore 209s with BlackHorn209... but they work well to avoid crud rings (Black Powder, Pyrodex, TripleSe7en, etc) The reduced powered inline muzzle loader 209's (Remington "Kleanbore", Winchester "777", CCI Inline muzzleloader, etc) were created to combat the "crud ring." The standard shotgun shell is loaded with smokeless powder and smokeless needs a bunch of priming compound to get it burning reliably. So standard 209's are pretty darn hot. With "muzzleloader" 209's, the basic idea is to introduce less inorganic priming compounds because Black Powder and most of its substitutes are reliably ignited by lower charges than a typical shotgun 209 produced. Reducing the inorganic contaminates makes less of a crud ring and makes it easier to clean the crud ring (when cleaning between shots). So that makes these "muzzle loader" primers hotter than a percussion/musket cap, but cooler than a standard 209 primer. 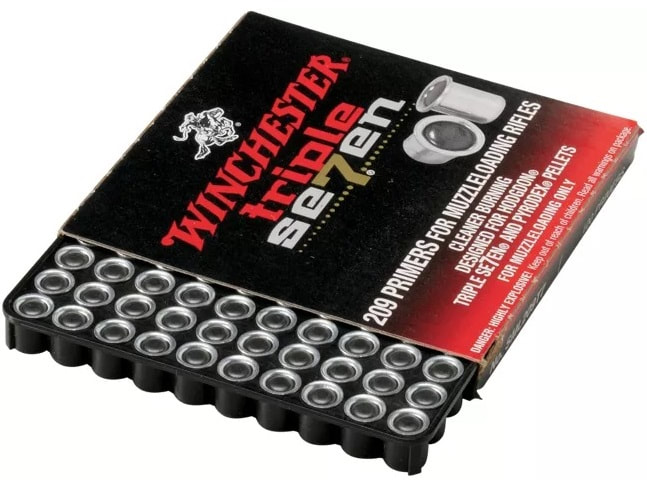 Note: it says on the box its only designed for Pyrodex and Triple Se7en pellets (Don't use with BlackHorn209) However, the logic runs a bit circular when looked at retroactively... guns were designed to use 209s in order to leverage their hotter ignition and hence become more reliable (and of course they were marketed as such and the industry made money). Then more black powder substitutes that were easily ignited, but had organic chemistry were introduced (777 etc, they were marketed as better than Black Powder and the market made money). But the guns became harder to reload/clean because of the crud ring... so the manufactures created "Inline Muzzle loader 209" primer's that aren't as hot but works well enough to ignite most powders and reduce the crud ring (and are marketed as cleaner, but not as less powerful... and the industry makes money). This frequently confuses folks new to the sport... intuition says use the primers labeled 'muzzle loader' in your muzzle loader. Also a general desire to always have the most powerful stuff would mean folks wouldn't buy the "muzzle loader" primer if they knew it was less powerful: So who would label their primers as less powerful? Folk would want to get the more powerful standard or magnum primer and use that wouldn't they? So thats starts some confusion and varying advice on what to use in your muzzle loader. We hope to make it clear what to use and why... so keep reading to find out the rest of the story! Some folks stuck with the more powerful standard primers,,, and occasionally found that if they were shooting easy loading projectiles (aka obturating projectiles that don't seal well or lodge tightly in the barrel until deformed by powder combustion: power belts, bore lock MZ, minie balls, etc), that they lost accuracy with the magnum or standard 209 primers, but when they tried the muzzleloader primers the same loose bullets and powders grouped well. They reasoned they were un-compacting the powder charge before it got fully burning with the more powerful primers. There's so many factors, who knows what the cause is, but the remedy seemed to be using the low powered primer when that rare case arose where full powered primers would not shoot accurately. This also reduced the crud ring. Still, I always suggest folks try standard or magnum primers first. If they can't get a good group, --and they are not using BlackHorn209--, then try the primer with the name of the powder they are using or another muzzleloader specific primer (ie try full powered primers first; if you are shooting 777 and it won't group, try the Winchester 777 primer... or any other low powered muzzleloader 209 primer). Getting a difficult to clean/load situation from a crud ring? Switch to reduced powered primers. Why do I suggest that you try magnum or standard 209's before "muzzleloader" 209s? First, the muzzle loader specific 209's have always been about double the price of standard 209's. I assume that is because they just don't make as many. Second, if you can get it to work with more heat, then that seems better to me as more heat will compensate for other issues when you are in less than ideal situations... like its raining or snowing on a hunt and a big buck appears in front of you. 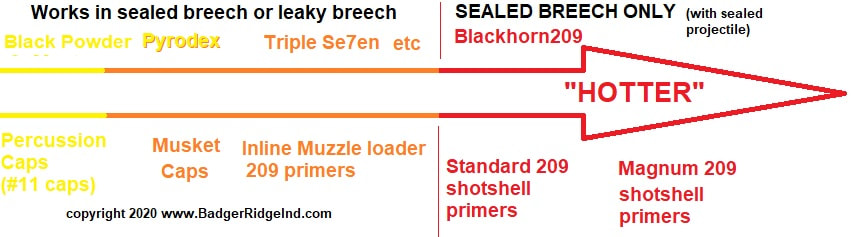 Igntion sources and breech styles grouped with their respective muzzle loader powders. Note I'm not saying full powedered primers are not compatible with Black Powder... I'm saying only standard or Magnum 209's are compatible with BlackHorn209 powder. Of course if they are using our kit to seal the breech, I always suggest they stay away from obturating projectiles and use sabots with Blackhorn209 and full powered or magnum primers.. Our kits work with all 209's, and all black powder/substitutes. The real question is whether the propellent you chose is compatible with the projectile you choose. Blackhorn is not compatible with obturating projectiles and is not compatible with weaker "muzzle loader" primers. After reduced power "Muzzle loader 209's" came out Western Powders introduced BlackHorn209 (which is nitrocellulose based) and needs at least a standard 209. Nitrocellulose is inorganic and cleans up with solvents that also dissolve priming compound residue... so no more soap and water/Windex, no more crud ring, no more fouling in the barrel that builds up with each shot (though you can still get priming compound built up and blocking a breach plug's flash channel... you may need to pull and clean the priming compound residue from your breech plug every 10 or 20 shots or so). So now-a-days we have "muzzle loader" primers that are not hot enough to set off nitrocellulose powders (like typical shotgun shells use). And now we have a great powder called BlackHorn209 that has a good bit of nitro cellulose in it and needs standard or magnum 209's to go "bang". However the intuition of some folks is to use the stuff labeled the same as the purpose... got a muzzleloader, so you use "muzzleloader" 209's... right? Definitely wrong when using BlackHorn209. Why bother with BlackHorn 209? Its just a better solution! First, it makes a lot less smoke... you shoot an animal, you have a ton less smoke to look through and watch it run off/fall over dead. Also, because it doesn't build sticky fouling: It doesn't require cleaning until the end of a day, and it cleans with standard gun cleaning stuff like Hoppies etc. Standard gun cleaning stuff was made to clean up priming compound residue and nitrocellulose fouling, copper fouling, lead fouling, plastic fouling etc, but these modern cleaners do not work as well with Black Powder fouling (along with most of its substitutes). BlackHorn209 performs better. It tends to be more temperature stable than BP and its substitutes... ie it doesn't swing as high or low as they do with large temperature swings... (not saying it isn't affected by temperature... just saying it doesn't swing as much). And is generally regarded safer as its harder to detonate than black powder. Just look at its MSDS if you want the specifics. If you were to chrony 300gr projectiles with equal volumes of BlackHorn209 against any other Black Powder or substitute, you'll find BlackHorn209 has an edge in velocity. All of this is why I use and recommend BlackHorn209 with sabots. But you have to use standard or magnum primers with BlackHorn209. This further gets hard for the novice as most stores typically stock muzzleloader only things in the muzzleloader section, but if they have a reloading section that is where they put the standard or magnum 209 primers. Then guys who just want to shoot, hear that BH209 is better, or see a new thing on the shelf, and buy some along with the 'Muzzleloader" primers in the same muzzleloader section. Then try to shoot it in a leaky breech or with a projectile that isn't sealed setup... (remember nitrocellulose needs to be sealed/fully contained to burn properly, the simple answer is sabots... and yes there are other more experimental ways to seal a projectile that I won't address).  Back of BlackHorn209 bottle has lots of important information Because the gun is leaky... and/or they didn't clean the flash channel and burnt primer compound is clogging the breech plug, and/or the breech plug wasn't made to shoot blackhorn209, and/or the weaker muzzle loader primer is used... and/or the projectile isn't sealed (like Bore lock MZ's or powerbelts in some rifles)... Blackhorn209 bloopers, misfires, or hang fires, and folks get upset and blame the powder... when they should be blaming themselves for not reading/following the instructions on the bottle of BH209, and/or walking over to the reloading section and grabbing full powered primers. Or googling it and finding a thread here where I explain how to get it to work in an old muzzle loader built before BlackHorn209 was on the scene (like having us retrofit a vent liner into your old breech plug)... or... Then you get to today: where some of us make a living helping folks through the mess and getting them to simple effective sealed breech solutions. As most of the mistakes have been made, and most of the answers are in the product's instructions, or posted/explained/sold here. If you have a Remington 700 ML/MLS or Ruger 77/50 and you want to seal the breech, or shoot BlackHorn209 we have your solution. As for Western Powders (now owned by Hodgon Powder Company) recommending magnum primers for use with BlackHorn209... all I can do is wager a guess. (I don't work there nor can I speak for them). I --think-- its a combination of: that is what they tested, and tested, and tested. Factored against: if you want it to reliably go off for the best customer experience, have them get the primer with the most priming compound that may correct for a user error (like not fully sealing the breech or projectile, not fully removing oils and contaminates, not cleaning well, etc). Also if hunting in extreme cold, I do recommend magnums myself. Though I must admit, I've never myself seen an issue setting off Blackhorn209 with standard primers that were sealed into our kits when using sabots, but I don't get a lot of negative temperatures to test in. I hope this has helped you. We specialize in sealing up the Remington 700ML (produced from 1995-2005) and the Ruger 77/50. We also sell many items for the Savage 10 ML muzzle loaders, and modify breech plugs from other guns to get them working more reliably with BlackHorn209. Feel free to call and ask questions; we are here to help. Perhaps on another installment we'll discuss how all the 209 primers vary in dimension depending on the company producing them! (important for sealing up 209's into the breech!) Also don't forget that all breech designs are not equal. Leaky breeches not only cover the shooter, the gun's internals, and any optics in that same nasty fouling, but are hard to maintain and not as reliable as sealed breech systems. Keep reading through the Badger's Den for answers and explanations on leaky breeches, why and how we seal them up.  Thanks for visiting the The Badger's Den (the blog for Badger Ridge). If an internet search brought you here, please stick with us: we have the solution to your Remington 700 ML/MLS and Ruger 77/50 woes. I update this blog frequently and what you are looking for is probably one or two clicks away. This blog is sorted categorically and chronologically. So you can find what you want by looking in the appropriate category, or if you know when it was published, you can use the time line. Or just keep scrolling down! If you are new to our site: YES WE STILL SERVICE AND CONVERT THESE OLD MUZZLE LOADERS! Our kits fix blow back issues, does not rely on most of the parts people tinker with, and can base line the rifle to a solid known good state. However you got here, and whatever shape your rifle is in, welcome to the best, last conversion you'll ever want on your rifle, and a great source for other hard to find Remington 700 ML parts. In this post I'd like to share an email conversation I've had: 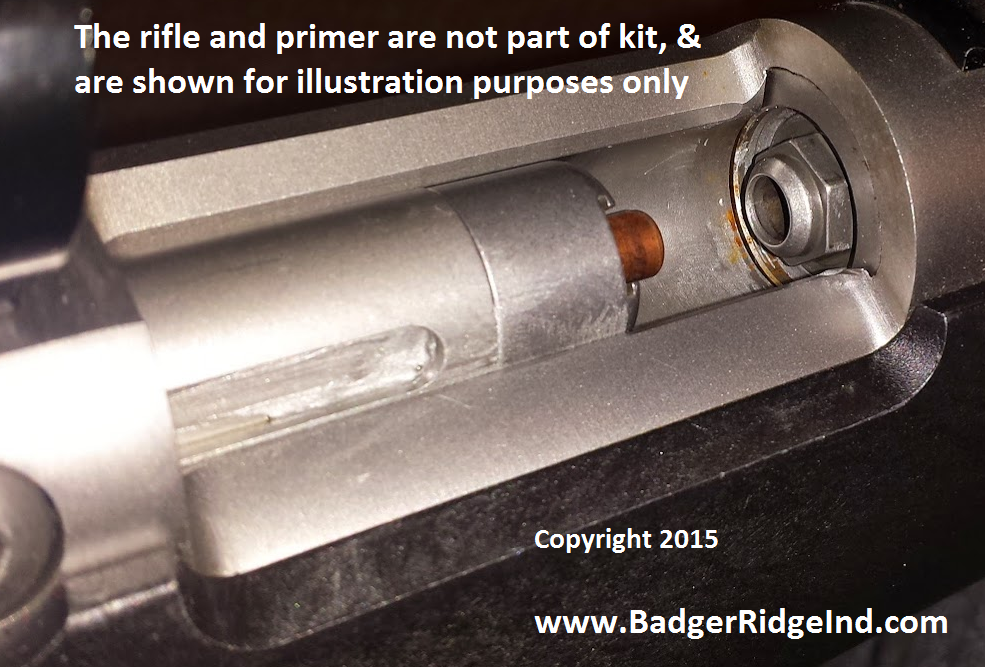 700 ML kit feeding a primer into the Badger Ridge Hunter Breech Plug You've just received a new submission to your Contact Form Submitted Information Name: Rodney A Address: North Carolina Question or Comment: Badger Ridge Industries claims on their Remington 700 ML 209 conversion are 100% ACCURATE! My quest for a no nonsense accurate muzzle loader is now over: I’m so happy that I found this product. There’s 5 other muzzle loaders in my gun safe that I’m now considering selling, they just didn’t satisfy my accuracy or ease of use demands. With Badger Ridge's system: No trying to pick a primer out of a nipple In a tiny space, no converted piece of brass to keep up with and re-prime, no weak or fussy ignition system. This system simply works and is very convenient to use in the field. If I were to run across another Remington 700ML, I’d put a Badger Ridge conversion in it with no second thoughts. This system truly makes the Remington 700ML the ULTIMATE MUZZLELOADER hands down. Mr. Rodney, Thanks for the kind words. We aim to please and fix folks woes! To our prospective clients:
Feel free to browse the site. It is full of resources and answers to your questions. Call us, or use the contact form to email us. We care and take pride in our products and services! Read the reviews! Buy with confidence!  Remington 700 ML 209 Conversion I'm consistently getting asked the same question: Q: "What primer should I use with your Remington 700 ML 209 conversion kit? I usually give the same answer: A: "I'm my Remington's I use the old copper colored standard CCI 209 primers. The new CCI's you can buy now are silver and have slightly different dimension. The old copper colored ones have never given me any trouble, but I don't have enough experience to recommend the new ones (they are probably fine, I just don't have much experience with them). If I didn't have the old copper colored ones, I'd probably start with a standard Federal, their 209A, or the Remington STS 209's. I'd stay away from Winchester. The Winchesters burn hot and ignite BH209 fine, but they tend to balloon and stick in the nose, so I avoid them. If all you have is Winchester, you may have to dryfire on the spent primer to remove it when it sticks." "In my Ruger 77/50 I use whatever crushes without having to use shims. Just a simpler solution."  Then the next question either goes: Q: "But the Blackhorn 209 site recommends, CCI magnum 209 primers?" A: "That is true, however I've had the magnums stick in the bolt nose at lower powder charges and require a dry fire to remove, so I personally stay away from them. If you don't mind dry firing in-order to get the spent primer out of the nose, or you work up to higher charges, you can use them (or any other 209 primer). I've personally had great accuracy and performance with the standard old copper colored CCI and Blackhorn 209 so that is what i use. Federals and Remington STS primers work good too. With our Remington kit, you can really use whatever primer you tune your breech plug to. For the Ruger you can use what gives you a proper crush seal." Or the next question is: Q: "I'm using Pyrodex/TripleSeven/Black powder, I've heard full power primers are too powerful, and will drive the powder down the bore, un-compacting it, and gives inconsistent performance, and poor ignition." A: "That can happen. I believe its most probable with loose fitting projectiles (like minie balls, power belts, Bore locks etc). I stuck with tight fitting Sabots and standard CCI's and was OK back when I shot TripleSeven. Feel free to follow proper load development practices and experiment with other 209 primers. I myself have always been pleased with standard CCI's." "If standard 209's are not giving you the accuracy you want (with black powder substitutes other than Blackhorn209) you may want to try the low power "black powder" only primers. I'd try the ones with the same name as the powder you are using. However, understand, that they may stick in the bolt nose and require a dry firing to remove. ie Winchester 777 primers." If sealed breech and 209 primers are legal for hunting in your state (only Idaho and Oregon restrict sealed breeches and 209's), I suggest you give our kit with Blackhorn 209 a try (and only with regular full power shot shell primers). Blackhorn 209 has given me better performance in every way imaginable. But remember Blackhorn 209 will not work with the low powered "black powder" primers; they don't have enough heat to consistently and fully ignite Blackhorn 209. Check out the video below for real world examples of our Remington 209 kit using old copper standard CCI's functioning just fine with BlackHorn 209 In the video below I shoot a rifle I just converted to sealed breach 209 primers. I used Blackhorn 209 and CCI magnums at 80 grains by volume (a minimum charge), and I got a few sticking primers that required a dry-fire to remove.   The Remington 700 ML/MLS & Ruger 77/50 muzzle loaders have been out of production for years now. These rifles now vary in condition. Some have hardly been used. Others used, but well cared for. Some have been neglected. So their condition truly runs the full gambit. This is further complicated due to the original design and other 209 modifications sending fouling corrosive gasses throughout the bolt and the receiver. New owners can be further confused by the various kits that may have been fitted over the years. Our kits fix blow back issues, don't rely on most of the parts people tinker with, and base line the rifle to a solid known good state. Many folks find their way to this blog from a simple internet search. Frequently because they are having trouble like misfires, failure-to-fire, are tired of blow back, etc. Some just want to use Blackhorn 209 powder (which will misfire or blooper if not sealed up). Other's have a friend that fixed his woes with our system, or saw a modified rifle at the range using our awesome 209 conversion for Remington 700 ML's and Ruger 77/50 rifles. Some just know that there has to be a better way, and there is: you found it in our kits. However you got here, and whatever shape your rifle is in, welcome to the best, last conversion you'll ever want on your rifle, and a great source for other hard to find Remington 700 ML parts. If you are new to our conversions, you may want to skip this blog post and read some of the others, then come back to this one, as it assumes you already know our conversions are awesome and fix your troubles. However some folks are determined to do some even "heavier meddling" and make these rifles something different. I've looked at this and on a personal level, I'm not interested and won't be doing anything more on my rifles than using our kits to seal the breech, and shoot Blackhorn209 powder. We do have products that will aid those who still want to do that barrel swap and burn smokeless, but I myself won't be going down that path. In this post I want to discuss this 'heavy meddling' and explain why I won't do it myself. The number one question I get concerning meddling and trying to do 'more' is converting to 209's with our kit and shooting smokeless powder in the factory barrel: DON'T DO IT! It says it right on your rifle's barrel. No kit will change the fact that the barrel is not safe for smokeless. I don't care what you read on some forum, or what some guy on the range told you. DON'T DO IT! There are not any magical fairy smokeless powders for your rifle, and there isn't any need to take that risk! The problem here is that muzzle loader safe propellants (like Black Powder, Pyrodex, Triple Se7en, and BlackHorn209) have different burning properties than the wide spectrum that makes up modern smokeless powder. And that difference is what saves folks from blowing up guns (so long as they follow the manufacture's rules, don't double charge, double load, etc). I cannot emphasize enough how using only a muzzle loader safe propellant (and using a witness mark on the ram rod to know the rifle is loaded and avoid a double charge) is the key to enjoying this sport safely. That said, some rifles, with special barrels are made to use certain types of smokeless powder. However, your Remington nor Ruger is not one of them. Yes, some folks swap barrels to make a smokeless gun. They of course are 100% on their own, and liable for their own technical problems and safety issues. If it is possible to do a barrel swap, and may be legal in some states to hunt on some hunts with a smokeless muzzle loader... why do it? What really are you going to get and at what cost? Typically those pursuing smokeless want faster, flatter shooting, harder hitting rifles, and think that they need to go smokeless to get better performance. But how much increase in range or velocity will you get versus the $$$$$ spent? How much heavier or more awkward of a rifle will you make? Will it group any better than what you started with? Doesn't the original leaky rifle, with black powder, already have what it takes to kill anything in North America?!?! Our kits seals up those breach leaks and makes it reliable. Many modern muzzle loading propellants already out perform black powder. These rifles with their factory barrels have a reputation of being very accurate. Do you really need more than that? 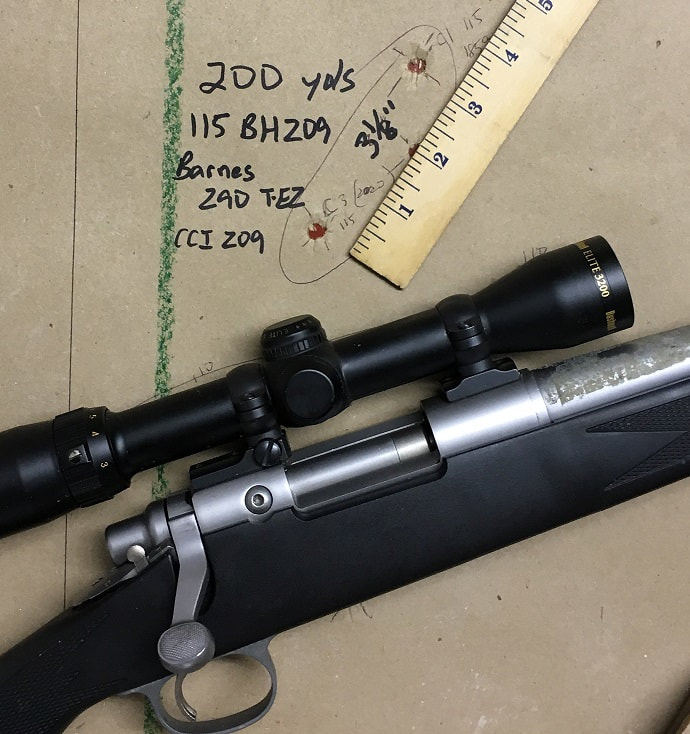 A customer's rifle 209 converted rifle (original barrel) and his group (click picture above to read more customers' feedback) Looking at these rifles as they came from the factory, folks 'just know' that they could be so much better. I agree: our kits take them to their full potential. I believe the factory rifle (with our 209 kit) is good enough: my rifles shoot reliably, accurately, and harvest deer (the largest game I can kill around here is Black Bear, but Black Bear isn't my thing... but I'm sure my rifles could easily handle Black Bear). I'm confident my rifles, with our kit and factory barrels, will kill any North American game to 200 yds. I'm convinced that anyone with a Remington 700 ML/MLS or Ruger 77/50 in good shape and wants to have a top performing muzzle loader, only needs to use our kit, standard 209 primers, Blackhorn209, sabots, and jacketed hand gun bullets or muzzle loader specific bullets.  Steve P, from Lake Orion, Michigan: 130 yard shot, 120gr by volume of Black Horn 209, Parker Ballistic Extreme 300gr and the Badger Ridge bolt upgrade, Timney trigger.  BlackHorn209 gives nearly smokeless performance without the cost, complexity, nor danger. It's sitting on the shelf in my local Walmart. BlackHorn209 gives nearly smokeless performance without the cost, complexity, nor danger. It's sitting on the shelf in my local Walmart. But to continue the comparison: rifles re-barreled for smokeless almost always have much longer, heavier barrels. It must be emphasized that the longer barrel itself gives an increase in velocity... all things being the same: longer barrels increase velocity. Or in other-words, shooting the same powder charge and projectile combination in a longer barrel will generate more velocity. This is because the projectile is in the barrel longer, getting pushed by expanding gasses for longer, so more energy (AKA velocity) is transferred to the projectile. But with BlackHorn209, and your factory barrel, you don't have to go smokeless to get more velocity. At heavier bullet weights, (like 275gr and up) I think you will find BlackHorn209 out performs all other muzzle loader safe propellants. And if you were to chronograph a safe smokeless load in a barrel made for smokeless, and of the same length as the factory barrel, against a BlackHorn 209 charge (both using the same 300gr projectile), the BlackHorn209 load wouldn't be too far behind the smokeless. By too far behind, I'm talking a couple/three hundred feet per second. And lets be honest, 200 to 300 FPS is not much of an increase in range or killing power.  Back of Blackhorn209 bottle with data In general barrel swaps cost around $1200.00... Frequently more, occasionally less if you do a lot of the work yourself. To consider what our kit does to a standard rifle vs doing a barrel swap, you have to consider the cost against the potential performance increases. And I don't think that $1200 is worth it. Especially because BlackHorn209 is readily available, and safe! You must realize that if you get something wrong with the smokeless gun, you are more probable to have a KABOOM! Remember, a longer barrel is essentially what the newer Remington 700 Ultimate Muzzle Loader (UML) has over the older Remington 700 ML/MLS. The Ultimate is a longer, heavier rifle. It is not as handy, and costs so much more than a good used MLS. Plus I understand Remington no longer will warranty the rifle if its been shot with Blackhorn, so in that case, you are restricted in the powders you can use. I've had plenty of customers tell me they sold their Ultimate and got a used 700 MLS rifle and our kit because it does the job, is more handy, easier to carry, and actually saved them $ because its cheaper over all. I have a Savage 10ML2, new in the box. I've never shot it! Why? Because its super long and super heavy: my Remington 700 ML's and Ruger 77/50's (with their original barrels) get the job done and are so much lighter and handier. And I don't go deer hunting from a bench... I'm walking out to the fields and woods, climbing trees, up ladder stands, etc. My Remington and Ruger rifles with their factory barrels win hands down overall when it comes to hunting.  BlackHorn209 cleans up with standard gun cleaning products. BlackHorn209 cleans up with standard gun cleaning products. So for me, I wouldn't entertain a barrel swap unless the barrel was not serviceable. And even then its probably cheaper (and definitely easier) to just buy another rifle with a factory barrel!... or find a take off barrel on Ebay from someone's smokeless build. I get nearly the same performance from my factory barreled rifles, and without all the cost, weight, awkward handling, and added trouble of doing the work to swap a barrel. Dollars & work in vs performance out: I'm tickled pink with our kit and my factory barrels. If you are tired of the clean up of Black Powder substitutes, and wanting to get away from them for that reason, BlackHorn209 comes out ahead there too. Blackhorn209 cleans up great with standard gun cleaning solvents, just like a smokeless gun. You can read more about that by clicking here. All that said: any muzzle loader safe propellant works great in the Remington and Ruger original barrels (with our kits installed on the bolt and sabot/projectile). It so much easier just to convert to our system and get great performance, I don't think I'll ever re-barrel a rifle and go smokeless. But if you are absolutely set on swapping barrels, we offer "half kits." Smokeless conversions usually use a custom breech plug that sits deeper into the breech. So, folks putting a new barrel on a Remington will probably want a longer nose. Our long nose protrudes farther forward and will not work with our standard breech plug, nor the original barrel. The cost is the same for a half kit with a long nose or a standard nose (just tell us in the "note to seller" portion of check out what nose you want). ONE LAST COMMENT ON BARREL SWAPS: IF YOU SWAP THE BARREL YOU OWE IT TO WHO EVER USES THE RIFLE AFTER YOU SELL IT (OR PASS IT ON TO) TO INSCRIBE ON IT SPECIFICATIONS: #1: its caliber, ie ".45 CAL" #2: what powder is safe in it: "Use ONLY BLACK POWDER/BLACK POWDER SUBSTITUTES" &/or "USE ONLY APPROVED SMOKELESS POWDERS AT APPROVED QUANTITIES" etc. 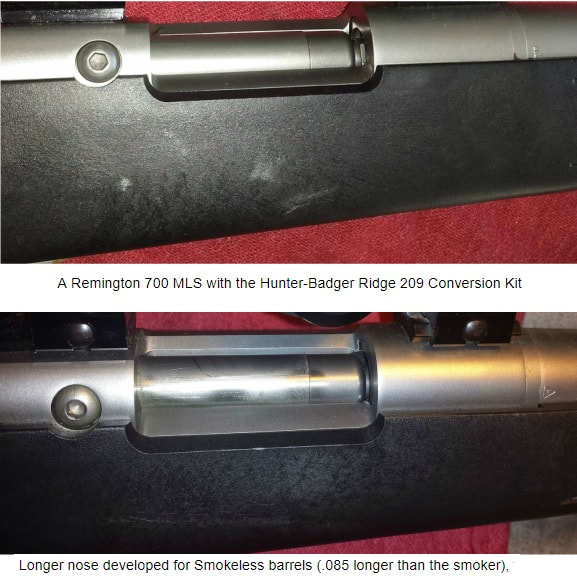 So there you have it. I got on my soap box, and told folks that I'll sell them what they want, but I won't necessarily agree with them that they 'need' it.
So if you contact me asking about smokeless mods, I'll try and figure out what your priorities are, see if they could be met with a cheaper option: our kit, the rifle's original barrel, BlackHorn209, and Sabots. Those are deadly combinations. That's my advice, because that is what I use and resolved to myself. Alas, the customer is always right!  Our Remington 700 ML 209 kit in action Our Remington 700 ML 209 kit in action Welcome to the blog of the company that has the best fix for your Ruger 77/50 and Remington 700 ML/MLS. Our kits are the fix for blow-back, miss fires, etc. Our kits are Blackhorn209 compatible and seal up the breech with 209 primers. If an internet search brought you here, your search is over. This blog has lots of articles about those two rifles and our products for them. You can click on the links in them or in the banner at the top of the screen to find the items you may be interested in. The Remington 700 ML and Ruger 77/50 are our specialty. They both came from the factory with the same fatal flaw: blow-back coursing backwards through the bolt from each firing. The Remington and Canadian 209 mods didn't improve this. If anything they only made blow-back worse. If not quickly and properly cleaned after firing, the bolt will corrode and freeze up. Our kits correct this fatal flaw by sealing up the breech. But not everyone has our kit yet, and seeing these rifles are all 10 to 20 years old, it's all to common for some one to have shot and then put it away without a proper cleaning. Be thankful if the bolt was at least removed! Getting a frozen bolt out of a rifle is a nightmare! So beyond installing our 209 system on bolts that have been well to decently cared for, we frequently get challenged when folks send us neglected froze up bolts. Sometimes we get them before they get beat on, other times we get to see if we can pick up the pieces and make it work. You can read more about some of the crazier ones we get here in the "Badger's Den" by clicking the "Maintenance" subcategory on the menu bar. If you have a tough Remington or Ruger bolt, please reach out to us via our contact form. We'll get back to you with a cell phone number and email address so we can start the process! 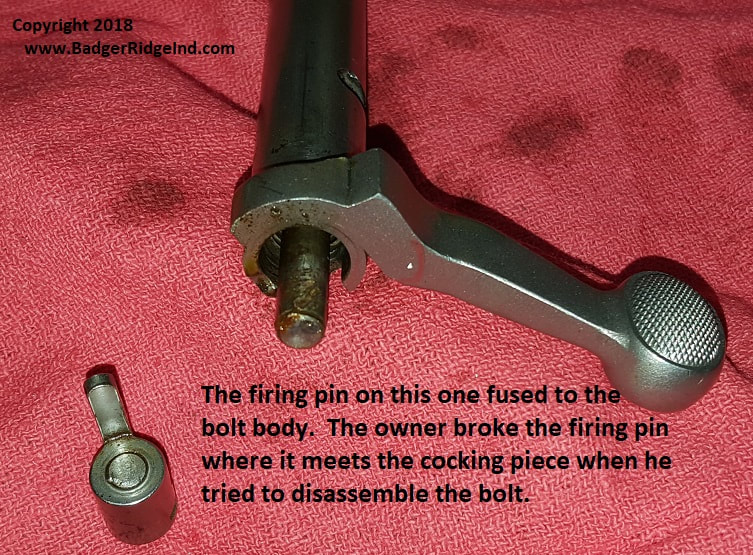 This bolt was sent to us after the owner attempted to fix it, and broke the firing pin where it attached to the cocking piece. When the owner of the bolt seen here contacted me asking if I could help, once I replied to him, he was thoughtful enough to text me pics. After looking at his pictures, I was pretty sure I could fix it: But I wasn't certain what parts of his I could salvage and what parts I would need to replace. The bolt plug looked good, which was surprising... usually when folks try to take these apart and break them they mangle something. So I counseled him that I was confident I could fix it, but couldn't be sure of the price until I had it in my hands, tore it down, and scrubbed it all clean. I commonly have to sell new components in cases like this, or have to ask for some more money beyond the basic install fee for my time and tools/materials I put into fixing these. But I told him to start by buying our standard kit and installation, then send me the all the pieces he had from the bolt, and we'd take it from there. 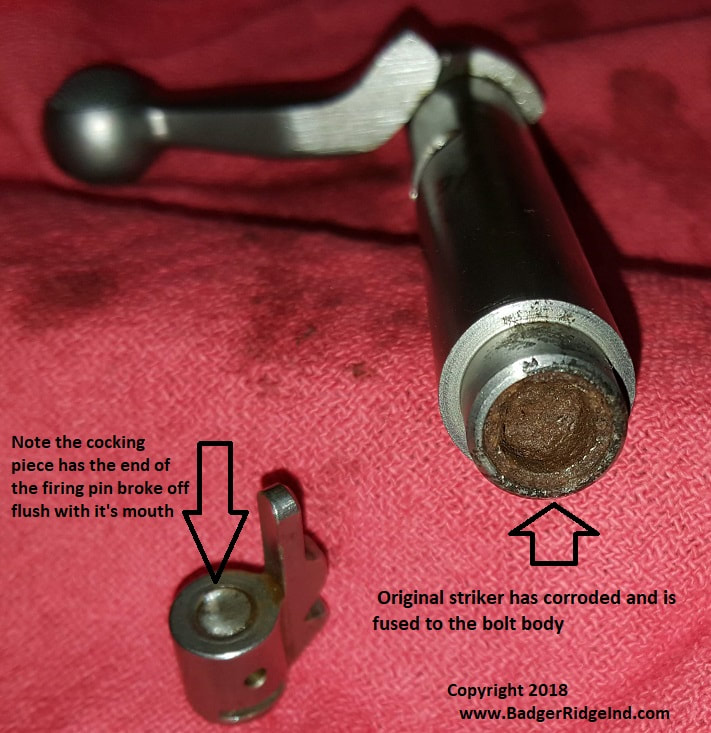 View of the front of the bolt. Note the firing pin is wedged in and solidly corroded to the body When the parts came, it was very clear that the striker/firing pin was fused to the body pretty solid. I tried my normal tricks to get it loose, and even tried to press it out with my jig and 12 ton press. It wouldn't budge. So I began flushing the gunk I could out of it from the back end of the bolt, and tried the jig and the press again. No luck. It actually kept breaking the sacrificial pin I built into the jig to keep from over stressing stuff: This bolt wouldn't break free. Frustrated: I filled the back end of it up with Kroil penetrating oil to sit over night. Worst case, I'd have to sell the customer a new bolt body (we make and sell them). I then turned my attention to the cocking piece. I chucked it up in my lathe and tried drilling it out left handed, that normally does the trick but it didn't budge. So I tried small holes with screw removers wedged in, and every other trick I knew, but it wouldn't budge. So I ended up just drilling it out and leaving the little spiral of the V from the thread in it and then picking that out. It was a bit tougher than removing a screw from a blind hole as it all kept fracturing where the cross pin was drilled through, and it's a deep hole proportionally to its diameter. But eventually I got the parts deep towards the bottome out with a bottoming tap and a small dental pick. I'm glad I could save the customer from having to buy a new one (but we do stock them). 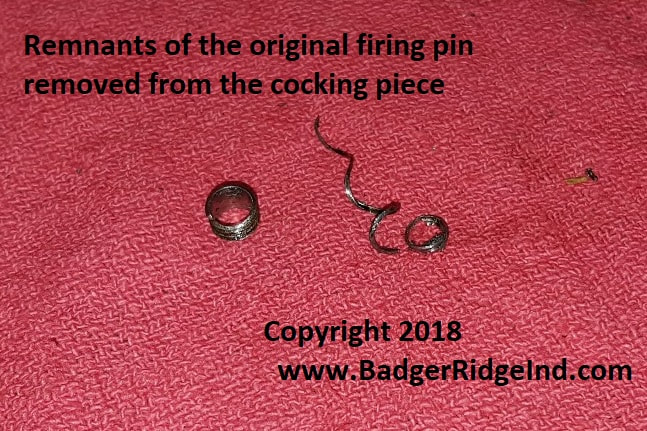 What remained after I drilled most of the firing pin out of the cocking piece I left the bolt body to sit for the evening so that the penetrating oil could do its work. When I came back the next morning none of the Kroil had seeped through to the nose. That wasn't a good sign, as it meant that pin was wedged in there and sealed. I tried the jig and the press again. I sheared the breakaway pin (I was really frustrated having to fab more break away pins!). So I made a new jig that didn't have a shear pin. Either I was going to break the pin free of the bolt body, or I'd break the bolt in the press. At this point I had nothing to lose. Luckily for the customer the 12 ton press and the new jig (and probably the Kroil) did the trick, the pin busted free of the bolt body, but bent the old firing pin the the process, which made it super tricky to get out, but I managed to get creative and work that one out. 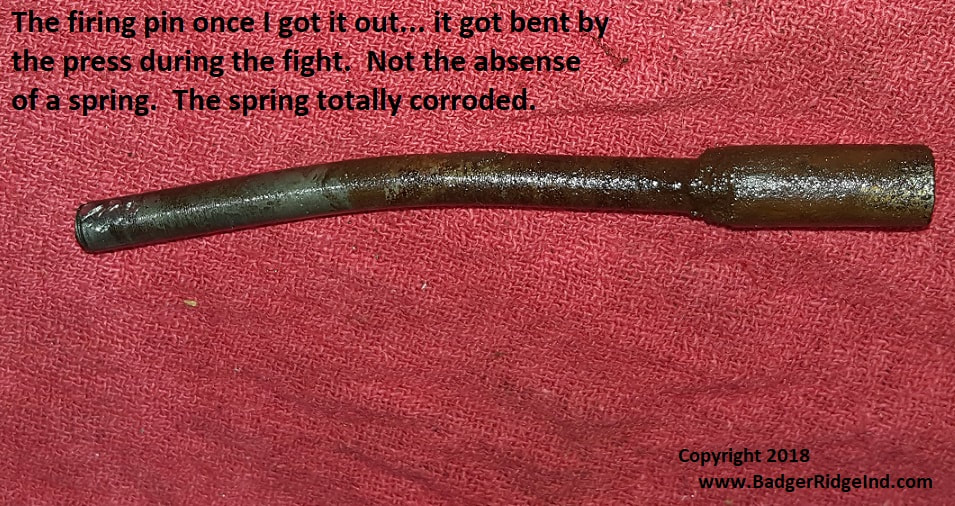 I was amazed. Typically when I break these apart there are sections of mainspring that come out. In this case the mainspring had completely corroded. It must have been all that corroded mess that I had flushed out the first evening! Anyways from here it was just cleaning up all the crud, and removing any pitting that would interfere with the new firing pin. Now that I had the parts all apart and cleaned up: it was just a normal installation. I asked the client for a little more money and sent his bolt back to him: Crisis corrected. If you have a tough Remington or Ruger bolt, please reach out to us via our contact form. We'll get back to you with a cell phone number and email address so we can start the process! 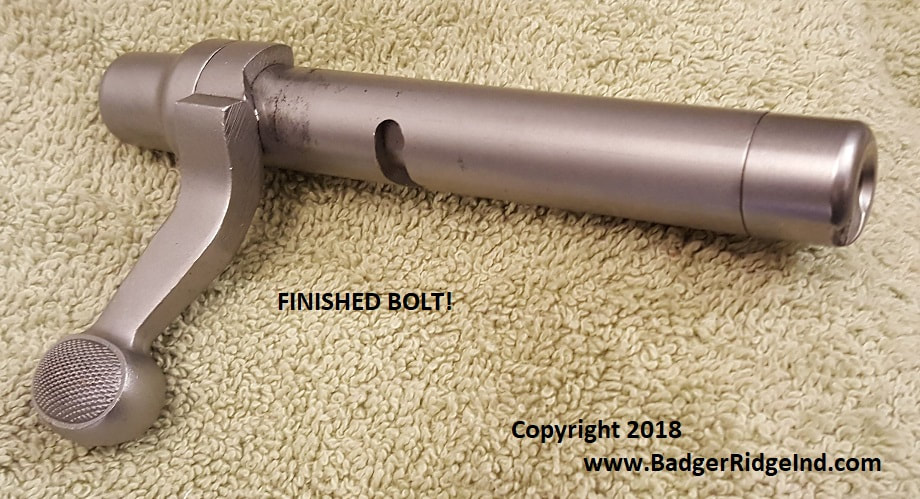 The completed bolt back together with our 209 Conversion kit  If an internet search brought you here looking for a solution to your woes with a Remington 700 ML or Ruger 77/50 muzzle loader: Don't worry, you are in the right spot and we have the fix you are looking for. Just keep scrolling down or click here for our wonderful 209 sealed breech fixes for those rifles. We are a dynamic business and constantly adding to this blog. In this installment, I figured it was time to discuss breech plugs: what works, why it is probably different than most think, and why I think it works. I'll also showcase our service of retrofitting vent liners into breech plugs (to help them work more reliably, accurately, and better with Blackhorn209 powder). Yes: we can help with more muzzle loaders than the Ruger 77/50 and Remington 700 ML. One of the first things most folks realize when they examine our kits, is that the Badger Ridge breech plug, is unique and different from the rifle's original. Our kits won't work with the original breech plug! Our system just plain works. Because our design works, folks frustrated with igniting BH209 in other rifles send us their breech plug for modification. BOTTOM LINE UP FRONT: A good breech plug is a compromise of many different features. Our design works with any muzzle loader safe powder (we can make other rifles' breech plugs work with any muzzle loader safe powder... like Blackhorn209). I'll try not to delve too deeply into chemistry, physics, and thermodynamics both because most won't care about the details, but also I'd probably rapidly reveal the limits of my understanding. But some basic understanding is required. First, heat flows from hot to cold. There is truly no such thing as cold... cold is a relative lack of heat. Heat can be thought of as a form of energy... thus a hot piece of metal just has more energy than a cold piece of the same metal. So heat from discharging a primer will flow into the metal around it, and into the powder charge we want to start burning. 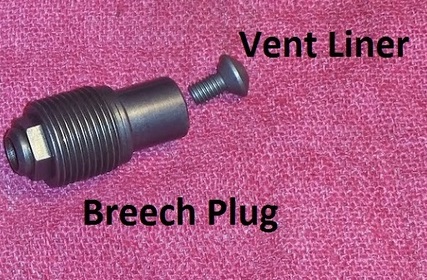 Badger Ridge breech plug with vent liner Badger Ridge breech plug with vent liner So you might be thinking "What does that have to do with muzzle loading and breech plugs?" Well every time we discharge a primer we convert the chemical energy of the primer into heat and expanding gasses. Seeing our real goal is to get the powder burning, the primer's flash needs to be directed into the powder charge, and it has to stay hot to get the powder charge burning. It is the powder charge that turns into more heat and more expanding gasses that push the projectile down the barrel. 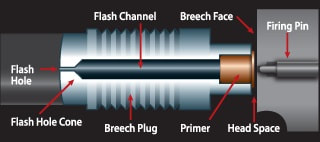 Generic breech plug from BH209.com Generic breech plug from BH209.com So at first it seems to get reliable ignition, you just need to get the primer close to the powder, and minimize the metal in between. And many of the first generation of inline muzzle loaders followed that design idea. But if you have seen any of the more modern breech plugs, especially those that use 209 primers, and are reliable with Blackhorn209: there is a large expansion chamber in front of the primer, creating a big air gap, and has a small hole at the end that abuts the powder charge. Just thinking about heat flow, all the metal that makes up the wall of that expansion chamber, and that super cold winter hunt you might take your muzzle loader on, it seems stupid to lose some primer heat to it. So why does a good breech plug have that chamber? And why would it have a metal constriction on the end of it (ie a vent liner or small flash hole)? Before I answer that, let's consider another reason the flash chamber doesn't make sense at first glance... as the primer's burning gasses expand they would cool just through the act of expanding into the flash channel. Fact: pressure, volume, and energy are all connected. For a steady state, ideal reaction I learned in High-School Chemistry: PV = nRT (or Pressure * Volume = number of molecules * their constant value * Temperature) Or in simpler terms if you don't change the temperature but you increase the volume the pressure will decrease to keep it all in balance. But in real life you get both: as the hot gas expands into the chamber it loses heat just from the expansion, even before we take into account the heat that flows into the cold walls of the breech plug! "OMG" you exclaim, "I knew that primer should be right up against that powder to be 100% reliable!" But, I'd say practice has proven that to be wrong, our breech plugs have expansion chambers for good reason: to keep the powder charge from blowing up the primer and venting gas all over the shooter and dropping accuracy! Remember, after we get that powder ignited and burning, it produces a whole lot more pressure and heat than that tiny, thin walled primer could ever contain. We want all that heat and energy to push that projectile down the barrel, but because there is that small flash hole right next to it, the gas shoots backwards into the expansion chamber that is being sealed by the primer. The trick here is that the flash hole is so small it greatly restricts the rearward flow, and what flow makes it through, finds itself rapidly expanding, dropping pressure, and cooling as it flows into the primer's flash chamber. And that is why the flash hole and flash channel (chamber) are there. They work together to keep the pressure from burning powder from blowing up the sealed primer. Keeping that primer sealed and intact keeps the mess in the breech plug, and tends to increase accuracy as the pressure seen at the back of the projectile is consistent shot to shot. 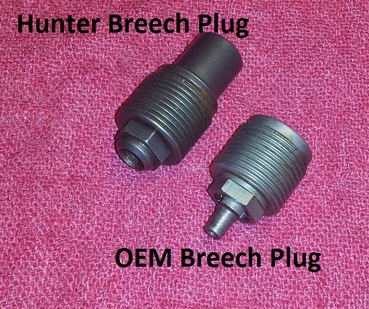 Badger Ridge's Hunter Breech plug versus OEM Badger Ridge's Hunter Breech plug versus OEM Our sealed breech systems have the expansion chamber with a 209 primer sealing one end of it, and a removable vent liner so that we avoid the bad things that happened without an expansion chamber (and I say happened because many of the first 209 designs lacked the expansion chamber and vent liner design, but beware: they are still out there!) Lets over simplify and say that there are four basic ideas on how to make a breech plug. Two are bad ideas, and two work well with the back pressure burning powder generates: 1. Don't even try to seal the primer and vent the back pressure (ie Blow-Back) into the action; let it leak out. This makes a horrible mess, and tends to shorten the life of the system as sticky corrosive goo covers everything. This also tends to send flying fragment primers and percussion caps into things, like the shooter. Also these systems won't work with Blackhorn209 as it has to be sealed up. (BAD IDEA) 2. Seal up the 209 without an expansion chamber and vent liner: Direct all the heat into the powder charge but blow up the primer/cap due to blow back, and then have blow back escape where ever it goes. This tends to drop accuracy as you don't control the time nor pressure when the rupture occurs. Plus just like #1 above, it makes a mess and sends pieces of primer all over the place. And just like #1 above, Blackhorn209 does't like this will yield unreliable performance at best. Again: Flying primer fragments are dangerous! (BAD IDEA) 3. Seal the 209 up with an expansion chamber that has a small orifice at the end to deal with the back pressure the powder charge generates. 4. Use large primer holders/brass cartridge cases that are strong enough to hold the pressure in. 209 primers in and of themselves are not strong enough for #4. Most systems that use #4 use primer carriers and magnum rifle primers, also break actions enclose the 209 primer in steel. -The original #11 percussion cap systems on the Remington 700 and Ruger 77/50 followed 2 mostly. -The Remington 209 modification followed #1 (note the big slits on the side). -The Canadian 209 mods for both rifles did a bit of #1 and #2 in my book (sealed until back pressure unseated the primer, also tended to blow up primers). -The Remington Ultimate Muzzle loader uses #4, but is very expensive and requires reloading gear to re-prime the cases. -Our 209 kits use #3. And we can modify other rifle's breech plugs to do the same. The down side is that the chamber must be sized right: it is "Goldilocks" work. Not too big (lose too much primer heat) not too small (blows up primers). The other down side is that the orifice/flash hole slowly erodes with each shot. 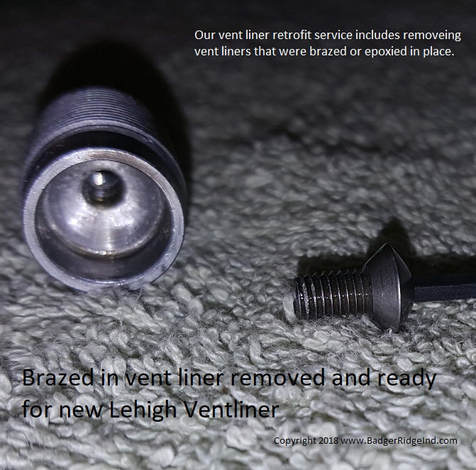 A knight BP that had its vent liner soldered in (removed and ready for a new vent liner) A knight BP that had its vent liner soldered in (removed and ready for a new vent liner) Remember that back and forth flow of hot burning gasses (primer residue and combustion gasses) erodes the flash hole with each shot. When breech plugs that don't have vent liners open up, they loose accuracy. Most folks don't realize this, and just know that their rifle doesn't shoot like it used to. They typically look for loose scope mounts, bad scopes, loose action screws, etc. I get calls from them and they are frustrated as they can't seem to figure out why the rifle isn't shooting well now. For some, the light bulb comes on when I start asking about the size of their breech plug's flash hole. And do they have a gage pin to measure it? I'm confident, that manufacturers know that flash holes have a limited life. Some just go with a cheaper breech plug, or even solder in vent liners! Seems they just want to sell entire new breech plugs. But we usually can offer a different solution: modifying the breech plug to take a vent liner. Most of the time we can convert those breech plugs to take inexpensive vent liners and also put an expansion chamber between them and the 209 primer to keep the primer from seeing excessive pressure. 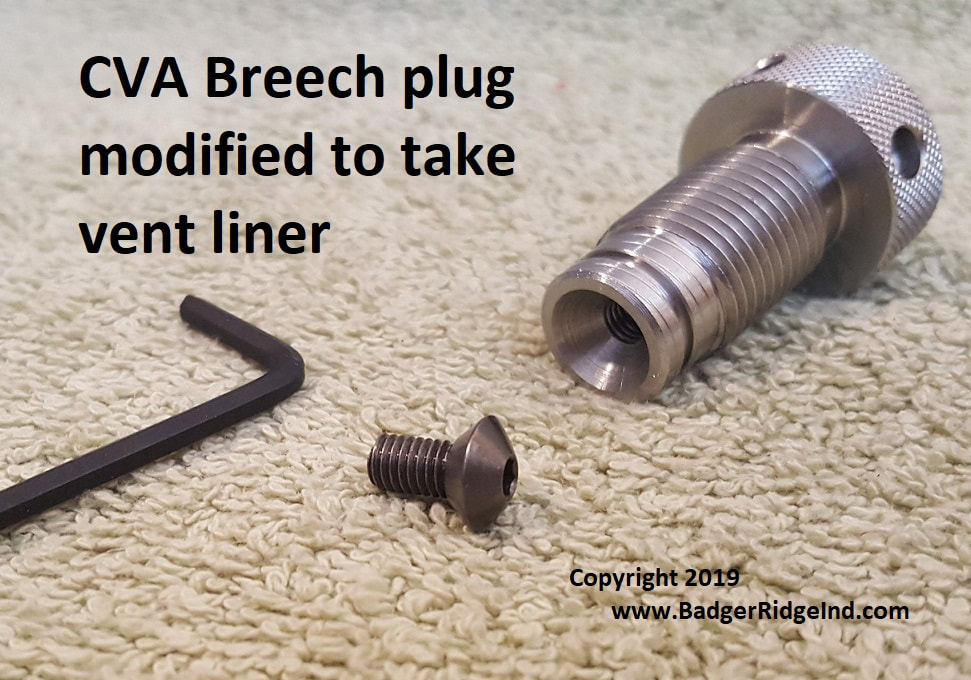 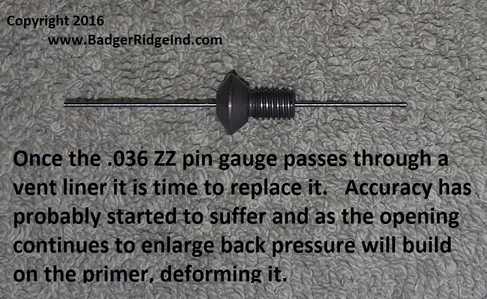 The vent liner is the removable flash hole our breech plugs use The vent liner is the removable flash hole our breech plugs use So there you have it, a good 209 breech plug is a compromise between directing the energy of the primer into the powder, and keeping the pressure from the burning powder from blowing up the primer. To use Blackhorn209 powder, it must be sealed up. To use 209 primers the breech plug needs an expansion chamber that is sized to allow expansion but not rob too much heat, and it needs a small orifice in the end that abuts the powder charge.
At Badger Ridge, we go a step further by using inexpensive replaceable vent liners. Our breech plugs are designed for longevity: we use vent liners to cheaply replace the flash hole instead of forcing shooters to buy new breech plugs. And we sell pin gauges so that you know when to replace the vent liner: if it goes through its time to replace.  Our Remington 700 ML kit feeding a primer into our sealed breech 209 primer system Our Remington 700 ML kit feeding a primer into our sealed breech 209 primer system Welcome to the website with the only conversion kit you'll ever want on your Remington 700 ML or Ruger 77/50. I've been writing and updating this blog for years. If an internet search brought you here, you will find what you are looking for by reading through these articles or finding the topic you are interested in along the right hand side. A while back I got on my soap box about trying to figure out all 50 states muzzleloader rules.... and the major head ache that it gave me. You can read that blog post by clicking here if you desire. 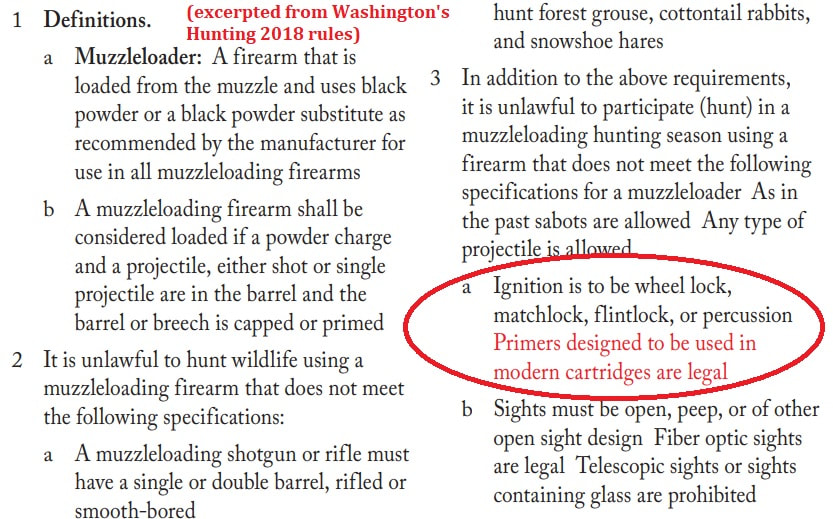 (Excerpt from 2018's Washington rule book, Page 87 (allows sealed breeches and 209's, in red) For those who hunt in Idaho and Oregon (The only two states where (I think) you still cannot use sealed breech 209s for all muzzleloader seasons) we offer complete bolts for the Remington 700ML or Ruger 77/50. A second, complete sealed 209 bolt helps folks who hunt in these states to swap between sealed breech system and the original unsealed system. This is useful when one season or area allows sealed breeches, but another does not. However, if you only hunt in places that allow sealed breeches (which is 48 out of 50 states now!), it's always cheaper to convert your bolt than to purchase an entire new bolt. It's always best to have a sealed breech: it stops blow back from getting into nooks and crannies and protects the shooter!  Badger Ridge's Ruger 77/50 209 conversion  Brand new 209 converted Remington 700 ML bolt  Welcome to the website with the only conversion kit you'll ever want on your Remington 700 ML or Ruger 77/50. I've been writing and updating this blog for years. If an internet search brought you here, you will find what you are looking for by reading through these articles or finding the topic you are interested in along the right hand side. The Remington 700 ML and Ruger 77/50 are our specialty. They both came from the factory with the same fatal flaw: blow-back coursing backwards through the bolt from each firing. The Remington and Canadian 209 mods didn't improve this. If anything they only made blow-back worse. If not quickly and properly cleaned after firing the bolt will corrode and freeze up. Our kits correct this fatal flaw by sealing up the breech. But not everyone has our kit yet, and seeing these rifles are all 10 to 20 years old, it's all to common for some one to have shot and then put it away without a proper cleaning. Be thankful if the bolt was at least removed! Getting a frozen bolt out of a rifle is a nightmare! I was contacted by a Remington 700 owner who admitted he shot his rifle a few years ago, removed the bolt but never cleaned. He had soaked the bolt in penetrating oil for a couple of days, but he couldn't get it to budge. I recommended he buy our 209 conversion with installation, send me the bolt, and if it wasn't too much additional work I wouldn't bother him. He was on a tight budget and couldn't afford our 209 conversion. So, I told him to purchase our legacy mainspring replacement service and ship me the bolt. We'd go up from there as my time and replacement parts required. We have new bolt bodies, mainsprings, and more! Once I got the bolt in my hands, it looked like any other Remington 700 bolt with the Canadian 209 mod, but indeed I couldn't compress the mainspring nor get it to move when I put it in a rifle. I proceeded to soak it a couple of days in penetrating oil as well. After the penetrating oil bath it still wouldn't budge, so I put it in the jig I made for these bolts and pushed on the firing pin with my 12 ton press. That worked! 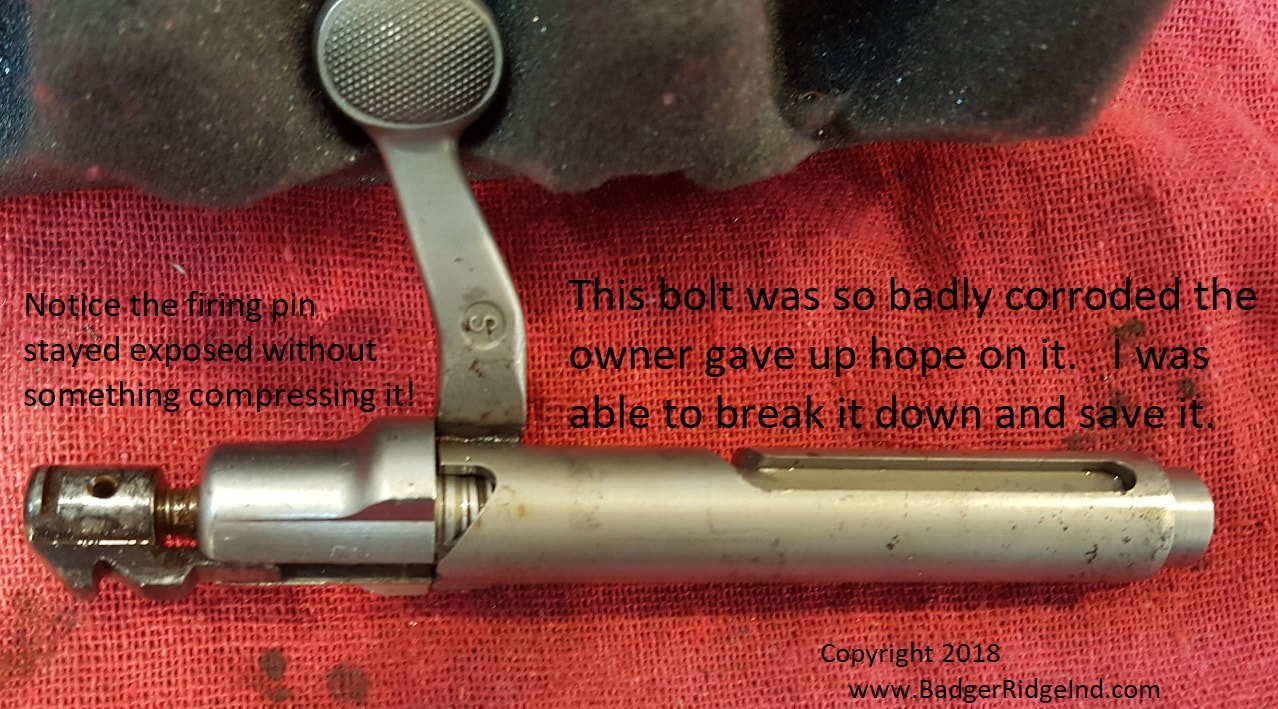 Remington 700 ML bolt so badly corroded it wouldn't budge in any way: I had to press the firing pin out from the front The firing pin finally gave way and "protested" a little as it protruded. From there I had to cut the firing pin off at point where it threads into the cocking piece. I removed the remnant threaded end from the cocking piece. Then I reversed the bolt in the jig and pressed out the pin from the back: 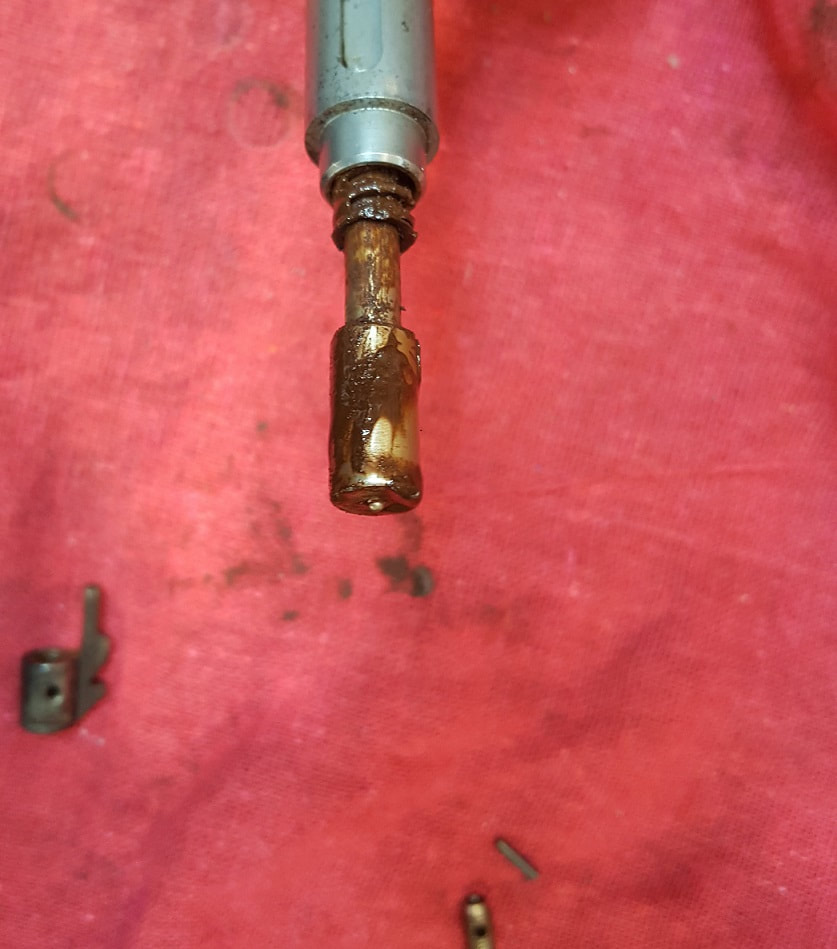 Fring pin pressed out from the rear after cutting it near the cocking piece. The brown crud isn't grease: its penetrating oil soaked rust and crud Because it was corroded through in multiple places: most of the mainspring came out (in 3 pieces) with the firing pin, but not all of it. The bolt plug wouldn't unscrew, even after I cleaned it up. I realized the back end of the mainspring had fused itself to the bolt plug, so back into penetrating oil for another night. The next day I managed to get the bolt plug to break free of the body. Removed the mainspring that had fused itself to it, and cleaned up all the pitting. After a lot of cleaning, scrubbing, and gingerly re-freshening of threads: the cocking piece, bolt body, and bolt plug ended up being serviceable. As I had to sacrifice the original firing pin to get it apart, I pulled an old used Canadian firing pin out of my junk bin. All I needed was a new mainspring to put it all back together. The client made my additional trouble 'right' with a few more dollars and it all went back in the mail. While the customer is always right, and he is very happy... I have to admit it didn't sit right with me to do so much work just to leave the bolt with a leaky setup that will likely fail even if properly cared for... and if neglected it will totally lock up again. I really felt this rifle needed our sealed breech 209 conversion. But the customer is always right. Hope this has helped you. If we can help you in anyway (perhaps with a Ruger 77/50 or Remington 700 ML) please use the Contact page to reach out. We usually reply within 24 hrs. Be sure to mention what type of muzzle loader you have!  Badger Ridge Sealed breech 209 converted Remington 700 ML bolt 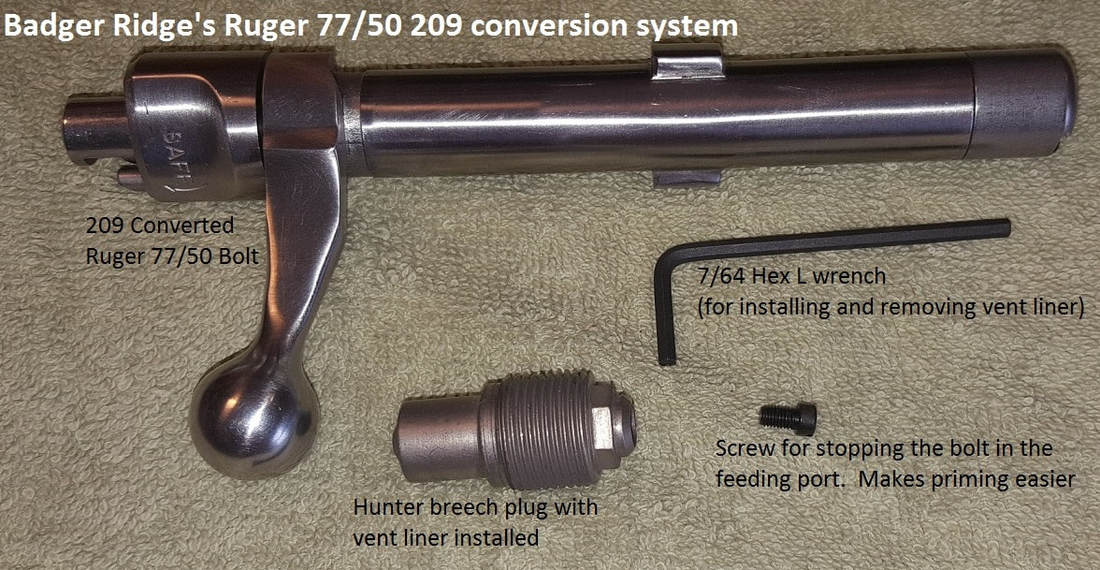 Badger Ridge Ruger 77/50 converted bolt with new breech plug and accessories  The Remington 700 ML/MLS has been out of production for years now. Those that are out there vary in condition. Some have hardly been used. Others used, but well cared for. Some have been neglected. The condition of these rifles truly runs the full gambit. This is further complicated due to the original design and other 209 modifications sending fouling corrosive gasses throughout the bolt and the receiver. Our kit fixes these blow back issues. Many folks find their way to this blog from a simple internet search. Frequently because they are having trouble like misfires, failure-to-fire, are tired of blow back, etc. Some just know that there has to be a better way, and there is: you found it in our kit. Other's have a friend that fixed his woes, or saw a modified rifle at the range using our awesome 209 conversion for Remington 700 ML's. However you got here, and whatever shape your rifle is in, welcome to the best, last conversion you'll ever want on your rifle, and a great source for other hard to find Remington 700 ML parts. YouTube video of our Remington 700 ML/MLS 209 kit in action (above) So while our sealed breech, any muzzle loader powder compatible, 209 ignition system may be new to you, its old hat in many other ways. So please let me guide you through figuring it all out: First and foremost, this website has a FAQ (Frequently Asked Questions). If you go to the FAQ and scroll down to the question and answer area for our muzzle loader products, you'll probably find the answer you are looking for. Also, I've been writing this blog for years. Along the right side are all the posts, sorted by date, then Category (subject). If you have a question, the answer is probably in those blog posts or the FAQ. If you want to get it from the beginning, I think some of my very first blog posts will be a good read: How to make a diamond in the rough shine Badger Ridge Industries offers: - The best 209 conversions for the Remington 700ML and the Ruger 77/50, seal the breech and are compatible with any muzzle loader safe powder - MMP sabots, they work great with Blackhorn209 powder and modern hand gun bullets - The best replacement bolt bodies for the Remington 700 ML/MLS - Replacement parts for Remington 700 ML's like bolt stop cam follower screws (similar to Remington #: F99286) and main springs - The best price anywhere on 17-4 Stainless Savage type vent liners - Pin gages to know when your vent liner should be replaced  Remember: if you have questions, please read what you can, watch the videos, and then use our Contact form to reach out to us. We usually reply via email or phone call within 48 hrs. (A second YouTube video below)  Feeding a primer and swaging into breech plug to seal Feeding a primer and swaging into breech plug to seal We keep hearing great things from our customers! It makes this line of work very rewarding! We look forward to helping you! Here's an email conversation between us and Wes G from North Carolina! To purchase a conversion or learn more click here, or any of the pictures or links below.  Badger Ridge's 209 kit above You've just received a new submission to your Contact Form. Submitted Information: Name Wes G: I just had you install a conversion kit on my 700 ML. Haven't had a chance to shoot it yet. Can't wait. Question: Groups before your conversion between 1.5 and 2"@ 100 with 105 gr BH 209 and Barnes 290 gr T-EZs. While that level of accuracy is fine for deer @ 100 yds, I am heading to NM for elk this fall and would like to improve my 5" groups @ 200. Thanks. Wes  Primer about to be fed into breech plug for a tight seal Wes, Try out the kit and see. Usually sealing up the breech improves accuracy as it makes pressures more consistent. What you are reporting is pretty good with any muzzleloader. Tom Tom, Thought I’d send you an update. Shot the conversion yesterday. My previous unmodified load was 110 gr (by volume) BH 209, CCI-M, 290 T-EZ in supplied sabots, averaging 5.25” @ 200 yds & 1919 fps (10’ instrumentation). Since you recommended standard CCIs, I switched to those. Two shots with previous loads were 6.625” apart averaging 1863 fps. Bumped charge to 115 Black Horn 209 (by volume) with standard CCIs and shot a 3 shot group of 3.125” @ 1923 fps [all groups at 200 yds]. Thinking the slower velocity with the 110 gr load was due to the primer switch. Upping the powder got my velocity back with the standard CCI primers. That velocity appears to be the most accurate node from this barrel (having tried 105, 110, 115, and 120 gr by volume). I’m out of both powder and bullets currently, but after I resupply, I will shoot some more to verify repeat-ability. I may also try 110 gr by volume with the CCI-Ms to see how it does. At any rate, I am thrilled with that group and that my glasses, nose, and thumb are no longer coated with soot and oil from the bolt. Thanks for your help and a great product. Wes Wes, That is great! Thanks for the kind words! Remember that you can try the CCI-M's... they may stick in the nose and require a dry fire to remove... but usually that goes away at the higher charges you are using. I always recommended standard CCI's as they have never stuck in the nose on me, but recently CCI changed from a copper colored primer to a Silver, and I don't have any experience with it yet. Regardless, you can use whatever primer you desire with our conversion, they just may require a dry fire to remove them. Thanks for the update... Tom  Wes G's 700 ML with his 200yd group Tom, Here’s a pic. Trying not to get too excited until I get more powder and bullets to make sure that group is repeatable. The 3 shot group with 115 gr by volume was cleaned between shots. Wes  You know you have a great product (like our sealed breech 209 conversions) when so many of your customers take the time to write such detailed, complete, messages. Below is what Al R from Indiana had to say about our Remington 700 ML 209 conversion that he installed himself. For purchasing information click here, or on the pictures of the kit. If you don't want to read his insightful feedback, feel free to click the topics along the right side to find what you want concerning our Ruger and Remington 209 conversions (or click any of these blue links). Good morning, Yesterday I converted the bolt on our family-owned Remington 700ML. My son, Matt, (who is much more computer savvy than I am) ordered it about 7 or 10 days ago. For the sake of you knowing how much mechanical background this (very satisfied) customer has, in 1966 I was an apprentice tool-and-die guy. Within a year or so in the apprentice program I changed career course and enrolled in engineering school, which has paid the bills for the last 50 years, until my retirement. Over the years I accumulated a small hobby garage machine shop (drill press, vertical mill, engine lathe, shaper, welders, etc.). I consider myself an upper-echelon, non-professional, hobbyist. With those credentials, I hereby give a grade of “A” to Badger Ridge for your VERY complete instructions (both electronic and hard copy) and the materials kit for making a Remington 700ML 209 Bolt Conversion. Certainly the key to doing the conversion yourself is “Tool 002”. I’ve attached a photo of my rendition of “Tool 002” that didn’t require welding. (It was only 10°F here yesterday in central Indiana, and I didn’t want to have the shop doors open to do the welding). The B/M for my “Tool 002” is: (1) short piece of angle or barstock (2) #10 ViseGrip pliers (2) ½-13 nuts (while square is best, heavy hex would be ok, and standard nuts would work) (1) ½-13 hex head cap screw, drilled to accept firing pin  Al's improvised bolt tool is pictured above and below (aka "Tool OO2") 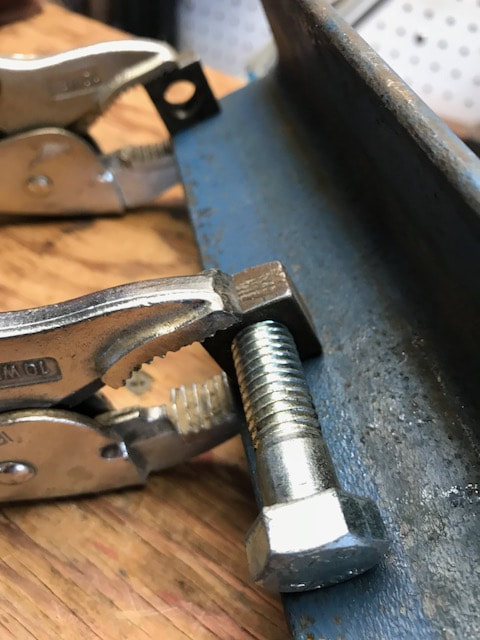 The other suggestion I have is to recommend that when tapping the cross pin (out and in) the instructions need to prescribe support, or it will bounce, (and eventually bend), I suppose. I used a machinist V-block, but anything could be shimmed up and made to work. As to tuning the breech plug, Fiocchi 209 primers will not fit in my rifle without tuning. I can’t wait to get the scope mounted and some Blackhorn powder and take the gun to the range, once it warms up. On a larger picture, projects like 209 Conversions make America stronger, as DIY people who do these types of projects are problem solvers that extends way beyond a single 209 Bolt Conversion. I’m a strong believer in “Made in America”. I’m glad to see that you’re doing your part. Best wishes to Badger Ridge for 2018, and keep up the good work!! Sincerely, Al Al, Thanks for the kind words, encouragement, and insight on an easy way to improvise a firing pin tool. As for the cross pin removal: I like to use the pipe nipple with the welded nut bolt tool on 700ML's... it holds it all very well, and holds best when clamped in my vice. Makes tapping the pin out a breeze. With this tool I've had little trouble removing all but the most stubborn cross pins. If the pin doesn't want to budge, usually trying from the other side is all it takes. However for the really stuck ones, I do place the cocking piece on the anvil of my vice, or in a V block and use hard strikes to remove the pin. 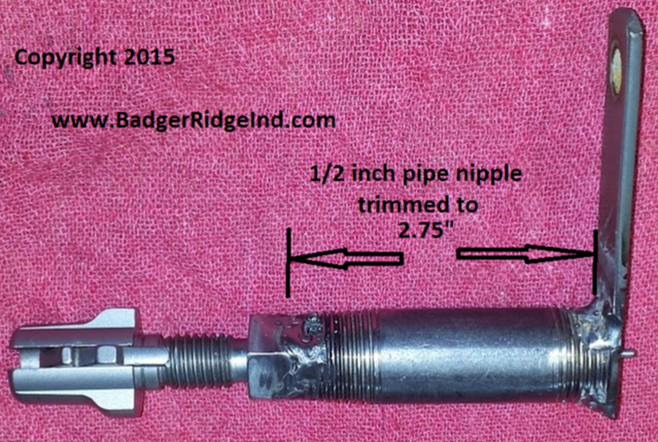 My favorite firing pin tool above.. (Aka Tool 002) When putting it all back together, using the roll pin we include with the kit (and de-burring the pin with a little light filing) usually requires little undue force. I tend to use the tool I welded up quick (two nuts welded to small angle... similar to the one you shared) when I work on un-threaded cocking piece firing pins that have to have solid dowel pins... and with solid dowl pins, I pre drill 3/32, then disassemble & chase each hole individually with a #41 drill bit. This way the solid dowel pin floats into place (so there is little friction on the pin requiring hard strikes).
As for primer recommendations: Yes, Fiocchi and other European 209 primers are typically fatter than US primers. (I used recommend standard CCI but now that CCI changed their dimensions and color [now they are silver] I cannot recommend them, and instead suggest Federal or Remington primers). With most of these you will probably have to tune. Remember if a primer sticks in the nose, a dry fire usually will loosen it. Thanks again for writing in and allowing me to share your message with everyone, Tom 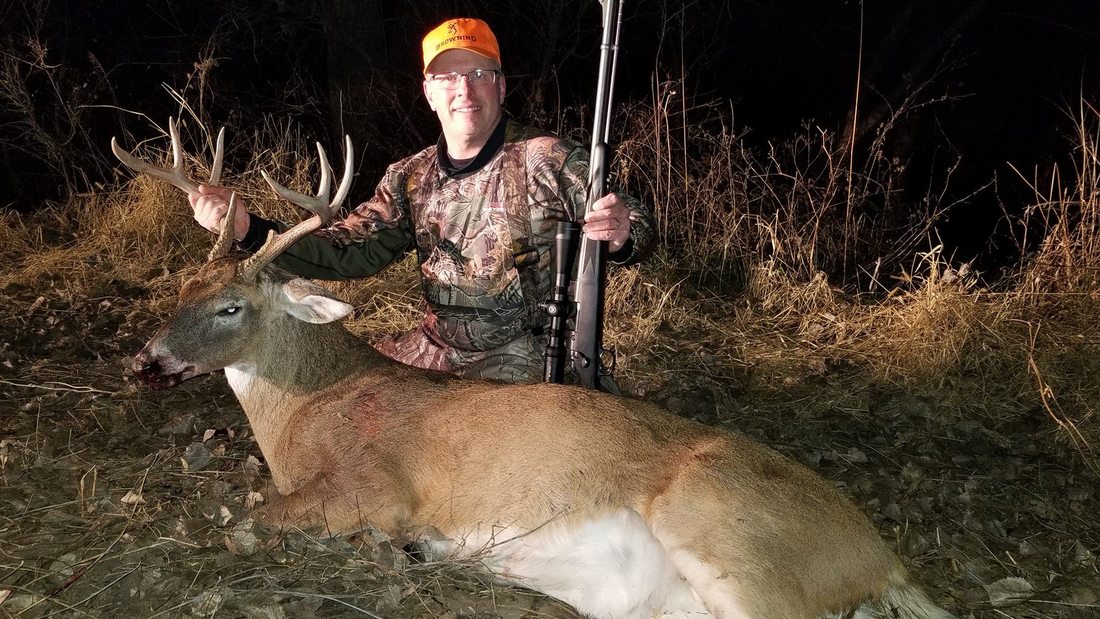 Steve P from Lake Orion, Michigan was so pleased with his Remington 700 ML 209 Conversion he took the time to send us the picture above via Facebook. Here's what he had to say (short, sweet, and to the point): 130 yard shot, 120gr by volume of Black Horn 209, Parker Ballistic Extreme 300gr and the Badger Ridge bolt upgrade, Timney trigger. Wow! Nice Buck! Well Done!
 If you are looking for a great gift to a Remington 700 ML or Ruger 77/50 owner, look no further. Unless they hunt in Oregon, or Idaho (the last two hold outs that don't allow sealed breech 209's), our sealed breech 209 conversion kits are the best thing they could ever have on their rifles! And if they hunt in Oregon/Idaho you could send me their bolt and I'll deep clean it and change the Remington's mainspring. Or I can build an entire new bolt so that they can switch back and forth between the original system and our system. So we have y'all covered too! You may wonder how it works. You can think of having three basic options: Option 1: Buying a DIY kitYou can buy a Remington 700 ML kit as a gift to be installed by the owner or their gunsmith. (option 1) This is your least expensive option. Note, that there is not an "Option 1" for a Ruger as the Ruger's conversion is too complicated.  Remington 700 ML/MLS complete conversion kit (option 1) Option 2: Send us the bolt and pay us to convert itYou can purchase our Remington kit, add installation before you check out, and then ship us the bolt. Lets call this option 2. It's in the middle of cost, but very simple as you just have to ship us the bolt, we convert it and send it back. The costs differ but this option is basically the same between the Remington 700 ML and the Ruger 77/50. When it comes to option 2: you send us the bolt, it's converted, then shipped back with the new breech plug/vent liner and other small tools. Of course with the Ruger 77/50, there is no option one.  209 Conversion installed on an existing 700 ML bolt Option 3: Buy a new bolt we build from scratchOption 3 is the most expensive option: buy an already converted bolt with a breech plug. I only recommend option 3 when people hunt in Idaho, or Oregon for some hunts where they have to use exposed caps, but have other hunts where they can seal the breech and use 209's. This option is also viable for folks who have rifles that are missing bolts. We can build bolts for both the Remington 700 ML/MLS and the Ruger 77/50. 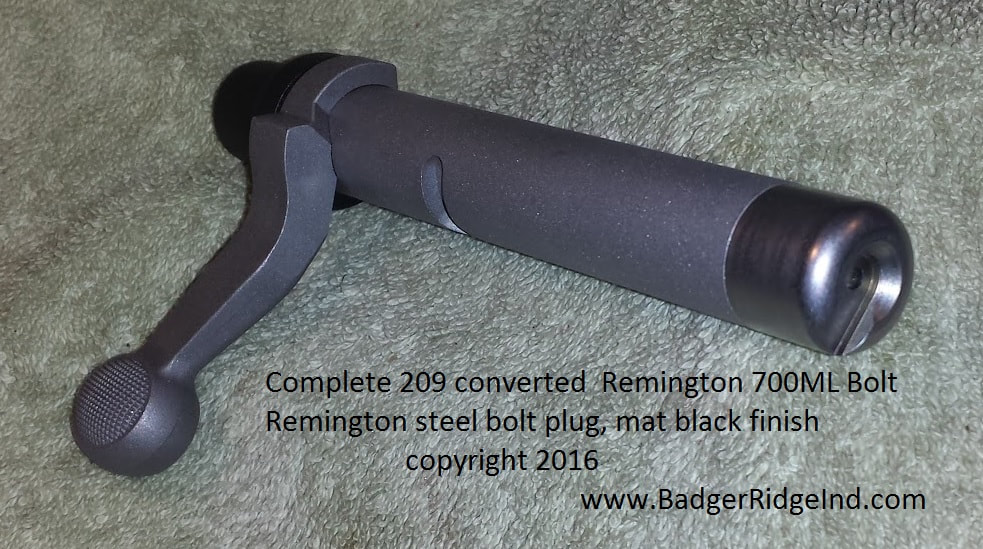 Brand new 209 Converted Bolt (built from scratch)  Converted Ruger 77/50 Bolt with breech plug If you have questions, you probably can find an answer in our FAQ, or within the archives along the right side of these Badger's Den posts. If you aren't finding what you need, you can use the Contact page by clicking here (or under "More" in the banner above) to initiate a conversation. We'll reply with an email answering your question along with our phone number (Sorry but we have to use the contact page to screen telemarketers and scammers). So please take a look at the FAQ before you use the contact form: we'll reply with an email and phone number so you can chat with us. Remember you can always add what you want to your chart, and complete an online check out. Hope this helps and you have a wonderful Christmas & Happy Holidays! 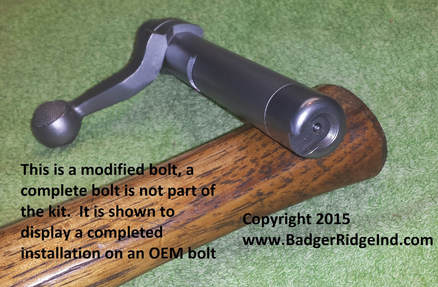 After years of selling our Remington 700 ML 209 conversion, and installing many hundreds of them, I still enjoy it when folks take the time to send feed back. I installed our kit on the customer's bolt below. After he got it back, I received the very detailed message shown below (and received permission to share it with you). Subject: Remington 700 ML 209 Conversion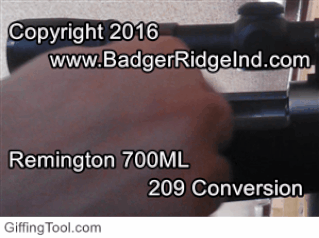 Badger Ridge Staff I got to the range yesterday (finally) to do some testing. As expected I had to do just a bit of tuning on the breech plug to allow the primer to fit properly with the provided drill bit. The time at the range sort of got away from me so did not get to test every powder option that I wanted too, however my plan was to end up with Blackhorn 209, so that is what I ended up using for most of the testing. Powders Initially Desired to be Tested Pyrodex Select Powder – did not get a chance to test. Pyrodex Pellets – did shoot one three round group with this powder source Triple Se7en Magnum Pellets – did shoot one three round group with this powder source Blackhorn 209 – Shot 15 loads with this powder Bullets Tested: Barnes - 245 grain - .451 Spit-Fire MZ™ - 1763 fps T/C - 250 grain - .451 Polymer Tip - 1712 fps Harvester - 260 grain - .451 Polymer Tip - 1705 fps I ended up with the Blackhorn 209 powder (100 grains by volume), the Harvester 260 PT Shockwave bullet, and CCI Shotgun Primers giving just under 1.5” groups @ 100 yards. I think I can actually improve on that. I shot 21 rounds with the new 209 Conversion setup and did not experience one misfire of a 209 primer during this testing. Plans are to do some additional testing to build a proper scale as my Bushnell Scope has a BDC reticle. I would also like to revisit the use of Pyrodex & Triple Se7en Magnum pellets as that is a very convenient method to load and/or reload for a second shot versus the Blackhorn 209 loose powder. I did clean between (3) shot groups and was a bit surprised at the amount of “black” residue from the Blackhorn. It did not seem to be any cleaner than the other powder sources. Maybe I was expecting too much from the advertising. The only downside with this new setup is the removal of the fired 209 primers and reloading of a new one seems to take a bit more time than the old #11 percussion caps. However, the greatly improved ignition system and lack of any powder blowback in one’s face is well worth that. Besides, I have not had to use a follow-up shot in all my deer hunting for the past 50 years and do not plan on starting now. From my experience and initial testing, you have a very well designed product and have given my Remington 700 ML new life. Thanks Raymond F Omaha, NE 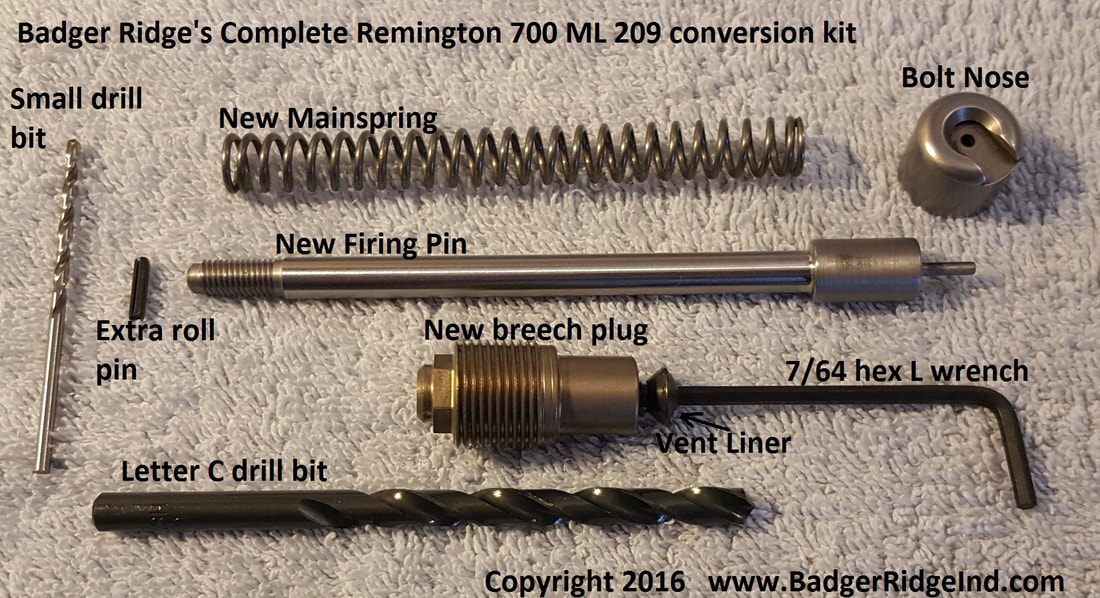 Badger Ridge's Complete Remington 700 ML/MLS 209 conversion kit 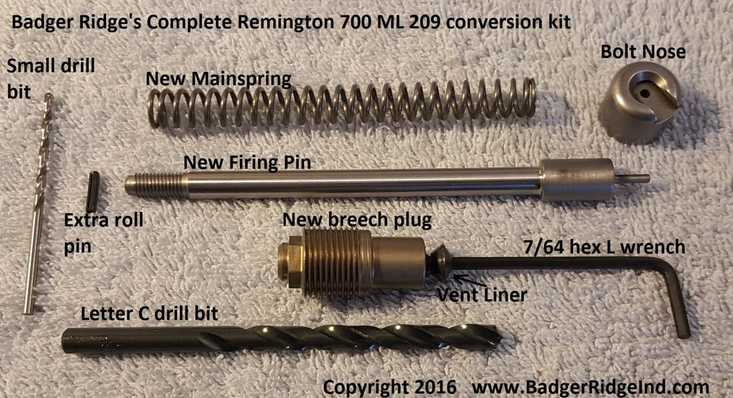 We sell the best 209 conversion for your Remington 700 ML, here's what is in the kit  Tired of miss fires? Tired of blow back in your face and all over you scope? Had enough stripping the bolt and action to clean after every time you shoot? I know I was... until I put this conversion on my 700 ML rifles.  Installed and feeding primer into breech plug to seal up the breech. NO BLOW BACK! 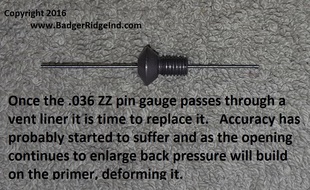 Now my Remington 700 ML rifles are the wonderful deer killing machines I knew they could be, and without all the fuss, crud in my face, and 'will it go off' worries i had before! Want to buy a kit? Click here!!! Want to read customer feed back about our kit, try here!!! Want to know more out our 209 conversion kit? Please read my posts here in the Badger's Den and our FAQ. Already have a kit and need some vent liners? We sell them to, and at a great price! Think your vent liner is worn out? It could be. Know for sure with this pin gage!  We can convert your bolt to use 209's for you, or sell you a complete converted bolt! 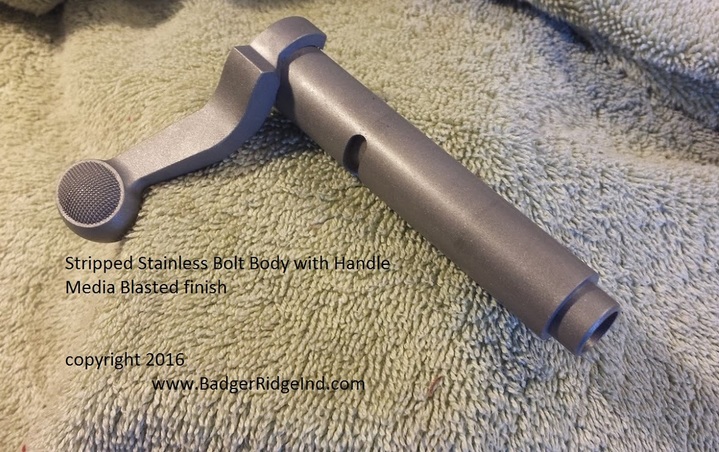 We also build our own bolt bodies. You won't find a better body or a better price on the internet! 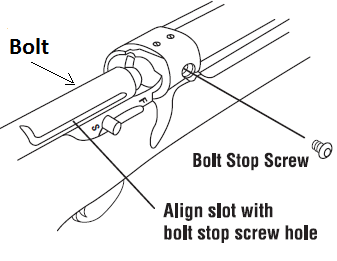 Excerpted from Remington Manual Excerpted from Remington Manual We're always looking to help Remington 700 ML/MLS shooters. So on top of our awesome 209 Conversion Kit, Brand new Bolts, New Bolt Bodies, Mainsprings, Vent liners, etc, we now sell replacement bolt stop cam follower screws. So if you lose yours (we've had a few folks contact us asking for help) we can help you out. We had these made out of 416 Stainless steel to produce something similar to the Remington part #: F99286 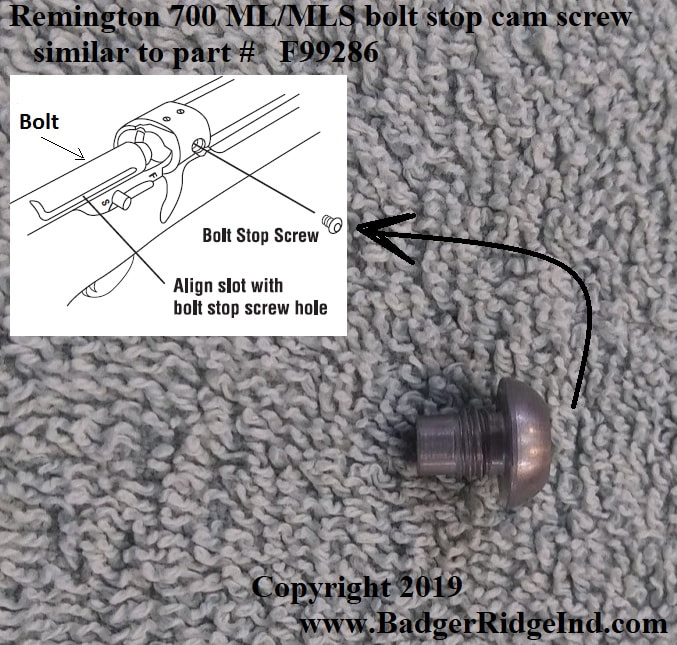 Remington 700 ML bolt stop (cam follower) screws, 416 Stainless Steel Note: Our stainless steel screw will work just fine in blued alloy rifles.
 When you run a business, you get to communicate with folks from all walks of life. 99.99% of our customers are truly awesome people. Part of the reason I'm in this business is the sort of people it draws. Again another satisfied customer took some of his time to write in and share what he thought about the Remington 700 ML 209 conversion he bought and installed on his rifle. I asked and he didn't mind if I shared his email here (I did remove most of his last name for some anonymity): Just wanted to let you know I received your 209 conversion for my Remington 700. I installed it at home with the help of your instructions and the online video. It works great. No more failure to fires due to the weak #11 caps. It shoots every time. Period. No misfires. I know it's not the cheapest kit, but I'm confident I won't have to worry. I'd buy it again without hesitation. It's a great product. Thanks again. Mike G, from Wisconsin Thank you Mike for the positive feedback! We aim to please. Like you said, quality costs, our kit is not only quality and made in the USA but it's also the solid fix to all the Remington 700 ML's initial flaws. It gives me the confidence to reliably harvest animals. We'd love to see pics of your successes!
 Loading, feeding, and swaging 209 primer into breech with our conversion kit Loading, feeding, and swaging 209 primer into breech with our conversion kit I always enjoy hearing from our customers. This time, Mike A from New York, who had me convert his Remington 700 ML to our 209 conversion over a year ago, took the time to write in. To me, it says a lot about your product when people love it so much they take their time to write a thank you note. I can just say, "Thank you for being a great customer!" The message I received from Mike A, New York is below: QUESTION OR COMMENT FOR BADGER RIDGE: Just a positive comment... You converted my Rem. 700 ML a few years ago. I've taken it into the field for a few years now during deer season, and to the range about once a month for those same number of years. Essentially, with 90 grs. of BH 209, 300 gr. Hornady XTPs, MMP EZ load sabots, and CCI 209 Magnum primers, the result with a low ringed scope is clover leafing dead center at 50 yds. And dead center adjusted up + 3" at 100 yds. The holes are paper punch clean. The gun is competitive with any of the other BP guns I own. It is fun to shoot. You turned the firearm from a tomato stake to a reliable, easy to clean, accurate, easy to use gun. Thank you. Mike A New York Thanks again for writing in. All of my rifles have shot best between 80 and 100 grains by volume of Blackhorn 209 as well. Glad you are satisfied! 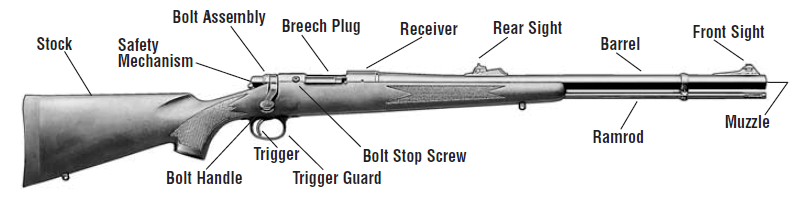 Nomenclature from Remington Manual 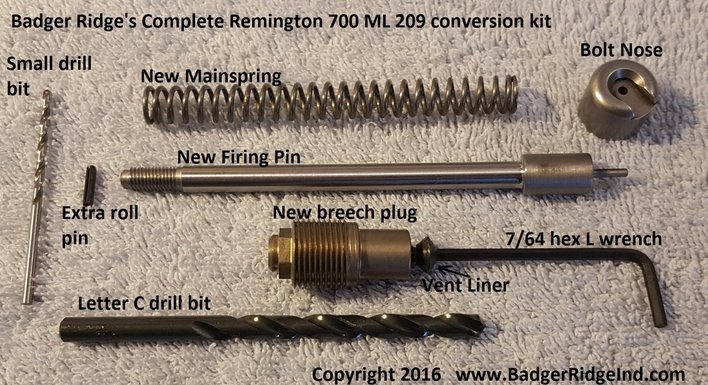 Badger Ridge's Remington 700 ML 209 Conversion kit Badger Ridge's Remington 700 ML 209 Conversion kit From what I've been able to gather there is a good bit of variation on how people learn about our awesome 209 conversion. While we have a lot of repeat customers, and folks learning about us through word of mouth, most arrive here after an internet search. Frequently newcomers are having problems with their rifle and looking for replacement parts or guidance on how to troubleshoot their woes. If you are tired of blow-back (aka blow-by), blowing up 209 primers, priming/de-priming tools, having misfires, hang-fires, bloopers, or trouble setting off Blackhorn209: Our kit is the fix, but it's not a $20 solution.  Our "drive train" fix in action Our "drive train" fix in action I understand the desire to find a $20 fix, but for the 700 ML/MLS, especially with the many years they all have on them now, there isn't a $20 fix. A lot of folks who end up here realize quickly that our kit is the right solution, but for others they are stuck on the $20 fix. A good analogy is if this were cars... sometimes it feels like some folks are skeptical I am ethical when I tell them an entire drive train overhaul is required; they are looking for wheel weights to stop a wheel vibration. The truth is: the reason it's throwing wheel weights is that it has a bad drive train! We can fix it, and you'll love your rifle afterward. Trust me; take the time to understand the problem isn't the wheel weights! 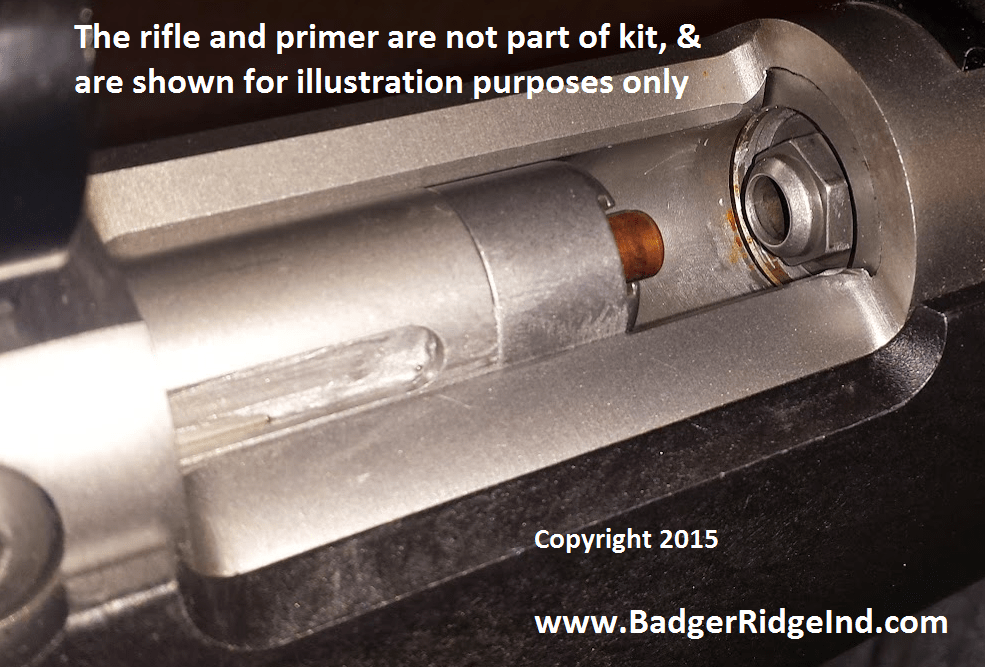 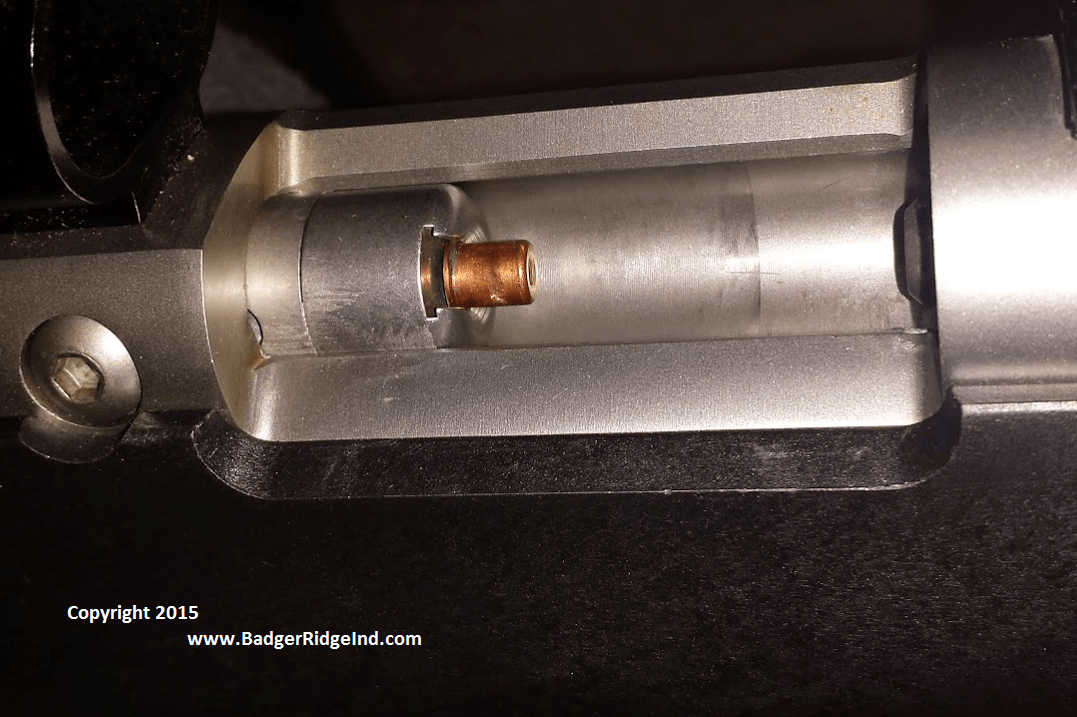 Badger Ridge's Remington 700 ML 209 conversion above. Seals the breech, without special tools, prime and deprime with your fingers You get what you pay for!There are so many little flaws in the original system: blowback getting into the bolt, shooter's eyes, and burning the scope are chief among them. Then they get amplified with age, corrosion, use, and abuse; as soon as one is fixed another will creep up. Then the rifle doesn't go bang when desired. So it doesn't make sense to spend a dime to keep the original system running. The only exception is when someone hunts out west where some hunts prohibit 209 primers or sealing of the breech. But even for those folks we offer entire 209 converted sealed breech bolts and breech plugs so they can switch to sealed breech on hunts where it's legal, and keep their original system for hunts that it is not. One rifle can meet both requirements with a bolt and breech plug swap. But therein lies the rub... a small minority -have to- keep the original system running for those special hunts. So for those select few I'll share how I'd try to keep the original system functioning (though my goal is to get those non 209, non sealed breech states to come to their senses and convert every Remington 700 ML to our sealed breech system). What I would do if forced to keep the original system running:My goal here is to help you understand where the original goes wrong, and unless you hunt out west this should also show you why you need to dump the original and use our 209 conversion. But here we go: - If legal I'd use 209's; if the rules prohibit 209's then i would use musket caps. I'd dump any #11 percussion cap system. 209's and musket caps are hotter and more reliable than #11's. The nipple can be removed from the breech plug with wrenches. One must be careful not to damage any threads. New breech plugs are available if the nipple won't come out. I'd put a small dab of anti-seize (or choke tube lube) on the threads of the new nipple so I could replace it later when it mushrooms. And it will mushroom. - Unless someone has owned the rifle since it was new, they don't know what sort of swapping and fiddling has been done to it. Not all strikers are equivalent, nor do they all work with the same primers/caps and nipples. Remington had two different firing pins for the rifle. Their first version only did percussion caps, then they released the 3 way system where one pin could discharge all three (209's, #11's, & Musket Caps). Plus the Canadian mod is out there as well, but it only does 209's. 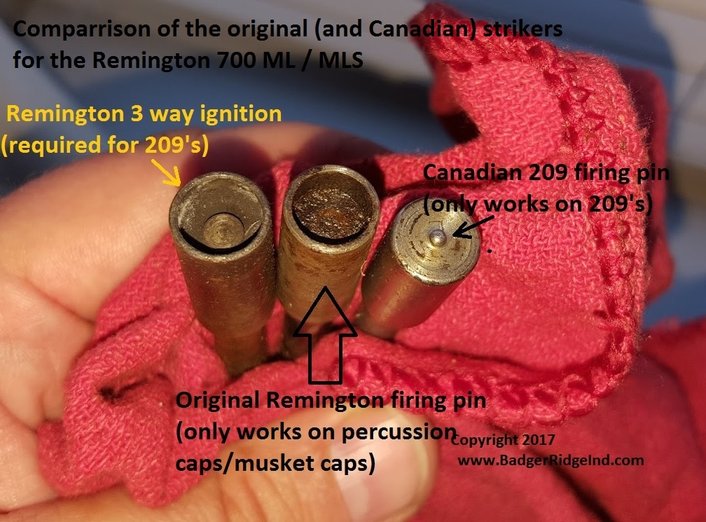 Comparison of the original Remington 700 ML system's strikers along side the Canadian 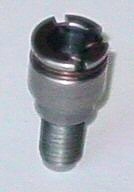 Leaky Canadian 209 nipple Leaky Canadian 209 nipple I've seen rifles with the original flat firing pins installed with 209 nipples. The folks who had this set up contacted me complaining that the rifle wouldn't fire! Of course it won't fire with the wrong firing pin! Remember, the Remington 3 way ignition system had a raised central area for discharging the 209's, and also worked with both types of caps. But it needs to be coupled with the proper Remington style 209 holder. The Canadian won't work unless its coupled with it's unique primer holder. Whatever leaky original system used, it'll need priming de-priming tools as well. Who wants to try and find all that for a reload in the field? The original system is known for blowing up primers and needing special picks and tools to prime and de-prime the rifle. 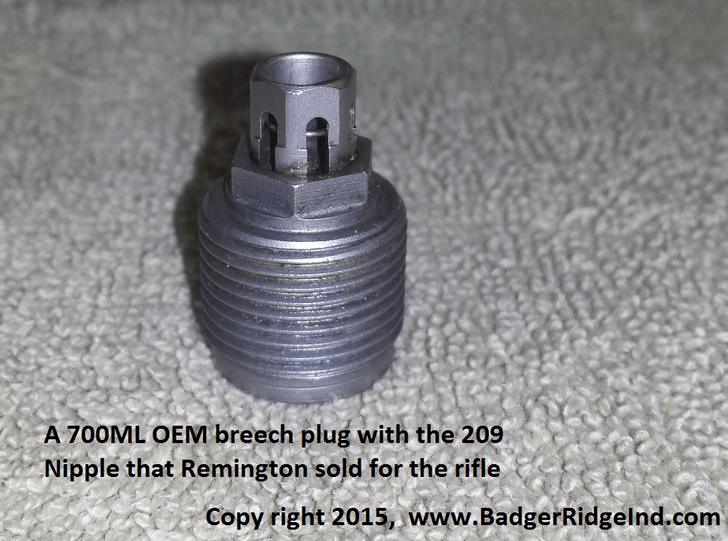 Vented (leaky) Remington 209 system above - I'd completely disassemble and clean the bolt and firing pin assembly. That means tearing the assembly totally down, scrub and clean all fouling and corrosion from every nook and cranny, and replace the mainspring. Our installation tutorial will prove useful here. If that is too much for you to do, I can replace the mainspring on your bolt for you. - I always ensure the rifle is unloaded and empty, and in a safe area I shoot some caps/209's to ensure the rifle will set them off. Remember even caps/primers will shoot things out the barrel with enough energy to hurt, maim, or blind. So if you decide to to this, ensure the rifle is unloaded per the procedures in the manual, keep the rifle pointed in a safe direction, and at a proper back stop. -Crud and misshaped nipples prevent caps/primers from properly seating. Then when the striker hits them instead of detonating, it pushes them forward towards a proper seat. Then once seated, a subsequent strike can set it off. Sometimes the nipples/primer holders get so mashed there is no saving them. I'd clean out any crud, and correct misshaped nipples (I'd say its usually best just to replace with a new nipple). - If the first strike doesn't set off the cap/209, I'd try a second, third, fourth, or fifth before trying another cap/primer. If a subsequent strike on the same cap detonates it, I'd suspect a misshapen nipple/primer holder. If none of them set it off, it could be the nipple or it could be the bolt/mainspring (but with a good tear down, correction to any corrosion, goo, fouling, proper lubrication and new mainspring, I'd suspect the problem lies in the the nipple). The repeated strikes the nipple receives eventually mushroom and mis-shape it. Even the 209 holders/nipples suffer this fate. Though the Canadian system will probably outlast the Remington vented 209 primer holder. But that is just degrees of bad... I wrote about how bad the Canadian conversion was in one of my first posts to this blog. - Each time the original system is fired, blow-back pulses the mainspring back and away from the nipple. At higher loads it can even drive back the firing pin into your thumb if you were to place it near the tang! (It hurts... trust me) These cycles and extreme compression coupled with the heat and corrosion then deteriorate mainspring life. Blow back coats the firing pin assembly in a corrosive sticky mess. I would tear down and clean after each time the rifle is shot, and I'd do a complete tear down and get everything out of every nook and cranny after each season. Blow back will find its way into the inner recesses of the bolt plug and cocking piece... trust me on this. I've torn hundreds of 700 ML bolts down. I'd replace the mainspring on the original system every few years. Again, I can do that for you if you like. Why our system is betterSo with the variations of the original system a shooter will have all those issues to deal with and think through. Once they fix one, soon another will creep up and cause issues. Those are a lot of inherent pit falls. All the while dealing with the blow back shooting into the bolt, a shooter's face, and all over the scope. Seems much smarter to me to rid oneself of that entire mess, use our sealed breech 209 system, and not be forced to strip a bolt down every time you shoot. Why don’t we sell any replacement parts for the original system nor the Canadian? I don't like to sell things I don't believe in nor use my self. Though the main spring is the same and we will replace it for you regardless of what system you use. I don’t want to be on the hook to keep something running that is flawed at its core, so I don't sell or support it beyond changing mainsprings. But I'll gladly replace the old leaky system with our sealed breech 209 system for you. Any state forcing folks to use that sort of system is beyond logic to me. Our 209 system seals the blow back in, which vastly reduces bolt strip downs and cleaning. With our system one only needs fingers to prime/de-prime, and the only parts that wear are the 209 primer (which is discarded after every use), the vent liner which is cheap and easy to replace (and the rifle will still go bang when its time to replace it), and arguably eventually someone will have to replace the mainspring. Mainsprings always have a finite life. It is true on any center-fire rifle; springs will eventually wear out. However the mainspring lasts much longer in our conversion because it is spared all the extra cycles, heat, and corrosive blow-back of the original. Also even if someone was to fail to seal the blow back in with our system (i.e. it seeped around a primer somehow), the bolt nose and the 209 primer itself essentially block any blow back from making it inside the bolt. With our system a shooter only has to tear the bolt down and clean it as often as they would a center fire rifle... which is not that often, perhaps as often as replacement of the main spring is required on a center-fire 700. You don’t have to take my word for it, you can read our customer feedback section and see for yourself in the video below.  The Remington 700 ML 209 shot shell conversion kit we sell is very different from the original rifle's system, or any other 209 systems available for the 700 MLS. Our system uses a bolt nose that holds and feeds the primers into our unique breech plug. The action of the bolt swages the 209 primer into the breech plug; sealing it up, and essentially eliminating blow back. Thus it requires a little different maintenance than the original system. Most of that is due to our breech plug being of a different design: It uses a vent liner.  Badger Ridge's Remington 700 ML 209 conversion kit So people only familiar with the old system, do have a new component and some learning to do. But it's not hard; it is simple breech plug maintenance. 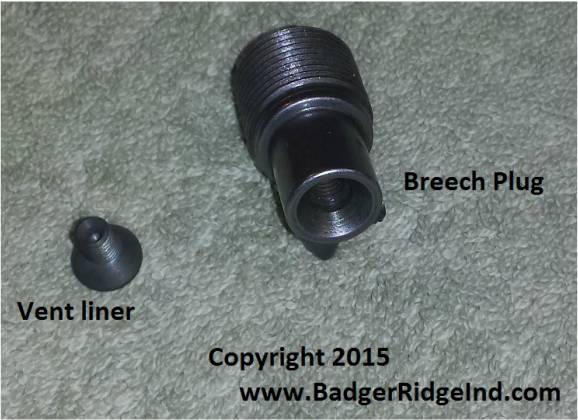 The instructions that come with the kit explain this, and it gets into more depth in our Frequently Asked Questions (FAQ). There is a lot of good reading in our FAQ but I wanted to emphasize it again here. Excerpted from the instructions that come with the kit: Breech plug maintenance: After firing 209 primers, burnt priming compound will coat the flash chamber & the flash hole of the Vent Liner. To clean: remove the breech plug & ream the flash chamber gently with a just under size drill bit (7/32). Use torch tip cleaners to clean the vent liner. Scrub & remove all fouling with the appropriate solvents, & place anti seize on all breech plug/vent liner threads before using the breech plug. Eventually the vent liner will wear out; it should be replaced when it’s interior has opened to .036” or accuracy will suffer. Always use a vent liner in the breech plug, or you may see excessive/unsafe pressures at the primer!!! 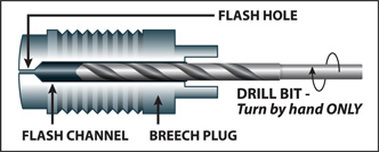 Generic breech plug from Blackhorn209.com Generic breech plug from Blackhorn209.com None of this is new to anyone who has owned or used many of the newer designs that use 209's to seal up the breech. Here is an generic breech plug maintenance image from Blackhorn209.com: 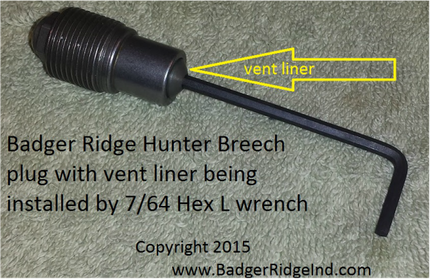 The main difference between our breech plug and the generic one above it that ours uses a vent liner to form the flash hole. This is because each shot erodes away part of the flash hole, and if the flash hole was machined into the breech plug eventually the entire breech plug would require replacement. It's much better to only have to purchase an inexpensive common vent liner, over replacing an entire breech plug. 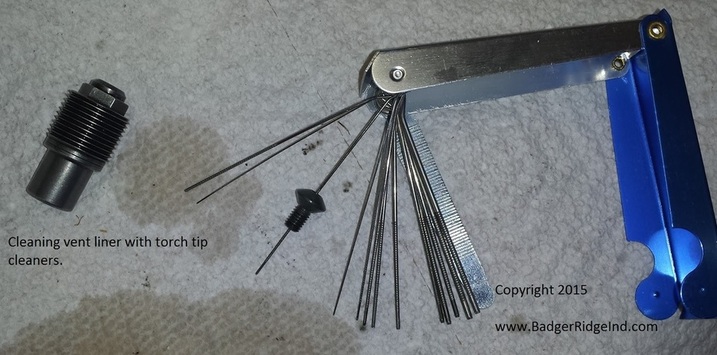 So that leaves the question: "When is it time to replace the vent liner?" The simple answer is when its interior has opened up to .036. Vent liners start at about .030 and open up oh so little with each shot. We sell .036 ZZ gauge pins to help you determine when its time to replace them. Alternatively when you use torch tip cleaners to clean the vent liner, you can measure the largest one that will pass through. When its .036 or larger, replace the vent liner. Or in other words, if the .036 ZZ pin gage passes through, replace the vent liner. 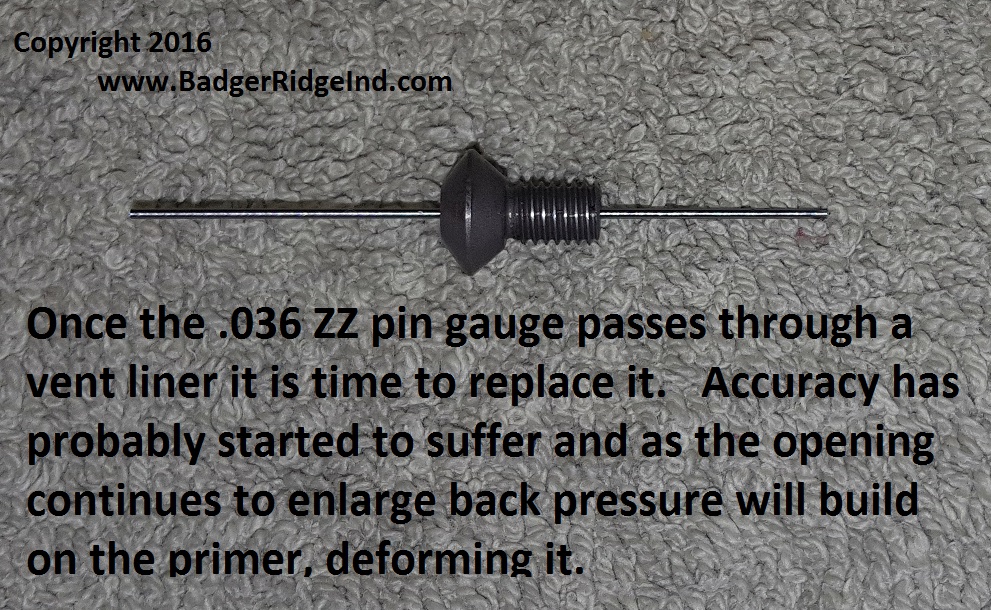 .036 ZZ gage pin passing through a vent liner = time to replace the vent liner If you don't replace the vent liner when it opens to .036 you can expect a drop in accuracy. If you keep shooting you'll continue to open it up, accuracy will degrade, and back pressure will start deforming primers. You can read more about this in the FAQ (Frequently Asked Questions)
This time Jessica A, from Virginia wrote to us on FaceBook concerning the Remington 700ML/MLS 209 Shot Shell Primer Conversion I performed on her bolt. Check out her nice buck below! 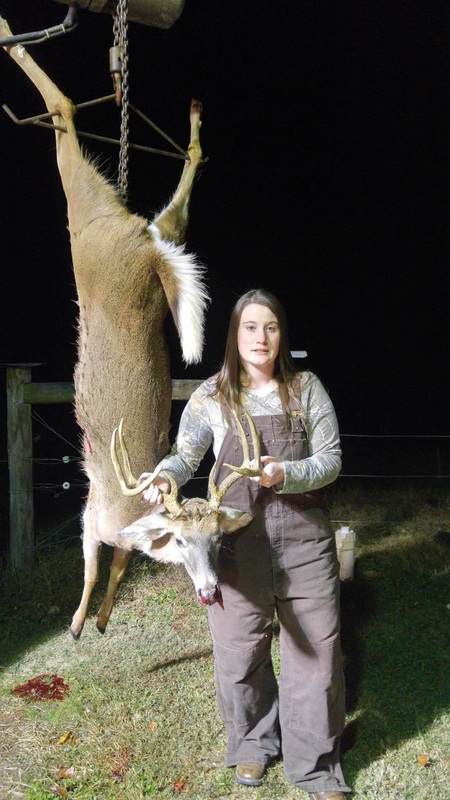 Thanks a million! I had no worries about my gun firing this year. The Remington 700ml 209 conversion did the trick! Jessica A, Virginia 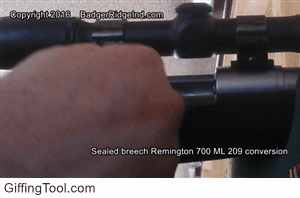 Jessica reached out to us a few months back via our contact form. She had a lot of good questions. I answered them via email and gave her my phone number. She called. During our chat she mentioned that she'd missed a few bucks due to miss fires and was ready for a better solution. She purchased our Remington 700ML kit with installation, and sent me her bolt. I converted it and sent it back with the breech plug and other accouterments. It's always great to have happy clients... most especially nice when they share that they bagged nice trophies! It's great to have clients that 'like us' on FaceBook. It really helps to build a business and we aim to please!
Always enjoy helping customers. It really seems like plain 'ol good Americans like to shoot muzzle loaders, and many of them have the old Remington 700 ML/MLS and are tired of unreliable ignition, crud in their face, and scopes getting eaten by blow back. They are looking for the better solution we offer. Below is a recent email from a repeat customer, Dennis, from North Carolina, who bought our Remington 700 209 Conversion Kit and installed it himself:  Badger Ridge Remington 700 ML/MLS 209 shot shell conversion kit, sealed breech, Blackhorn 209 compatible Shot my first Blackhorn 209 through Rem 700MLS on Saturday after upgrade with your kit. No misfires or problems of any kind on 3 shots and all between 1852 and 1879 fps with 70gn by weight (to test) and 240gn HP/XTP. Was a little slower than expected based on experience with Pyrodex. But, I think I have room in BH 209 powder charge to get back to 2000 fps safely and…. I can give away my protective scope wraps. Primers slip in and literally fall out if I turn gun over. Bolt disassembly is no longer part of each cleaning. Good product. Firing pin install was a little tricky but overall installation not too bad. Best regards, Dennis Thanks for the positive feed back, Dennis! As you are using BH 209 by weight, and 70gr by weight = 100gr by volume (equivalent black powder is measured by volume, not weight), you can increase your load by working up to 120gr by volume according to Western Powders. So you have more room to increase velocity if that is your desire. Most of my 700 MLS rifles have shot best at 80 to 100 gr by volume of Blackhorn209. For those of you who don't want the hassle of installing the firing pin and nose to your bolt, we offer installation of the kit for reasonable fees and have great turn around times. Videos of our 209 kit in action are below: 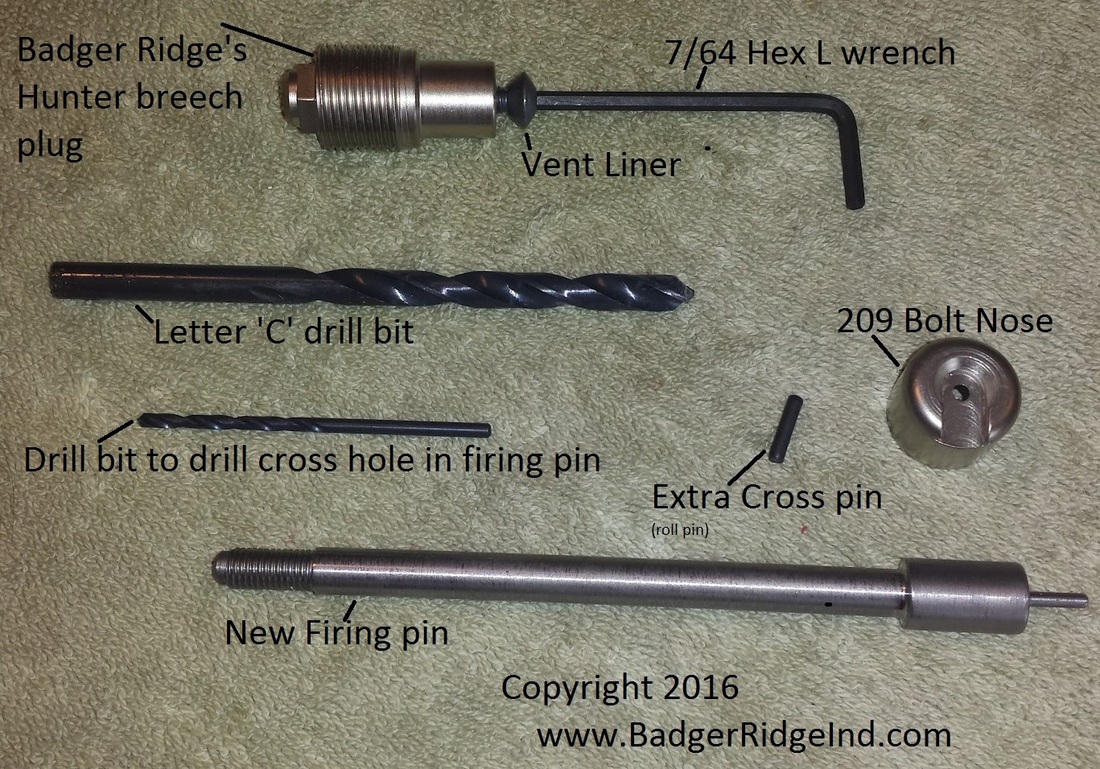 Badger Ridge 700ML 209 ignition upgrade kit... This is the full kit Kenny G bought. When properly installed it seals the Breech! Badger Ridge 700ML 209 ignition upgrade kit... This is the full kit Kenny G bought. When properly installed it seals the Breech! With our 700ML 209 ignition upgrade we try to keep it simple and yet very effective. And frankly we are proud of it. We understand that its going to be new to most folks. Though we do have a number of repeat customers, who realize once they see our 209 conversion in action realize how great it is, and start buying up used 700ML's. Below I've put together a fairly common exchange for the benefit of the newcomer (and yes, did some editing for clarity and to protect the client's identity, etc). 28 July You've just received a new submission to your Contact Form. Submitted Information: Name Ken G Question or Comment First, I would like to thank you for your service and hope it has been as rewarding as the 22 years I spent serving our country. I just received the full 209 conversion kit I purchased a couple of days ago. I am now opting to have it professionally installed - hopefully by you. Is it possible to return the kit along with my bolt and payment to you for the service? Thank you in advance. Kenny G 28 July, From BadgerRidge to Kenny G: ------------------------------------ Mr. G, Thanks for your service. You certainly can have me install your kit. Please purchase installation at our website with a note saying that you will ship the kit with the bolt. Then drop it all in the mail to me. I appreciate your business! Tom (phone number removed.... if you want it, send me a contact form) 28 July, Kenny G's following messages to Badger Ridge. ------------------------------- Thanks Tom. I will do just that. Ken --then I received his bolt, converted it and mailed it back to him the day after receiving it, he got automated emails with tracking information I received this on 04 August : Tom, I got my bolt back today! That was a very quick turn-around. Haven’t installed it yet but will this weekend. Thanks for the great service. I will send pix if I am successful this season. Take care and God bless. Ken --then he sent on Sept 2nd -- Hello again, Just following up and saying thanks again. I installed my newly modified bolt and breech plug, mounted a Nikon 3-9x40 and went to the range. I only had 245gr Aero tip Powerbelts and used 100gr Pyrodex and the Winchester 209s. Yes, they stuck just as you stated so, thanks for the tip on getting them out. Barring the sticking primers, all worked well at the range. I zeroed with 3 shots. Shots 4&5 overlapped in the bull. I have been looking – in vain for CCI Primers in my area but had to settle on 777. They seem to work. I’ll take them to the range soon. Eager to go hunting with it. Got some really nice bucks on camera. J I would like to take this opportunity to wish you and your family a safe and happy holiday. Take care and God bless. Ken 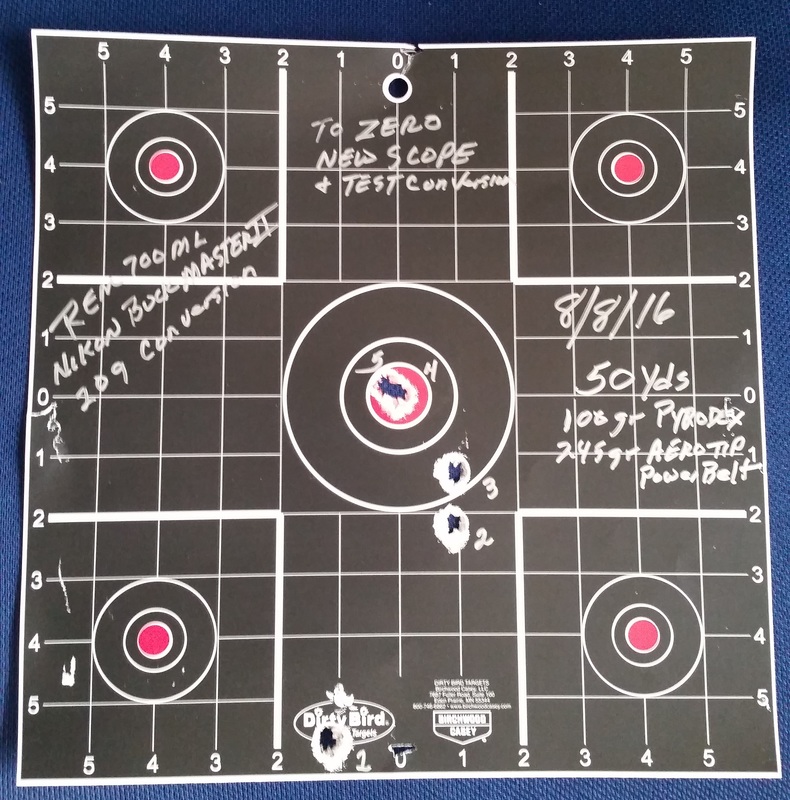 Here is his first sight in target at 50 yds. I believe shots 1 to 3 were walking the newly mounted scope in, then 5 and 4 confirmed its zero. He's stillworking on load variations, but this will certainly kill deer! After I asked (and he agreed) that it was OK to share our correspondence here in the Badger's Den, he sent me the sight in pic above and the pic below of his latest mod. Seems since sighting in at 50 he's decided to spruce the rifle up a bit:  Kenny G's 700ML with Boyds stock. From Tom to Kenny G: What you have now definitely works, and you may have some Pyrodex to shoot up before you are ready, but my parting recommendation is: Get some Black Horn 209, full powered 209 primers (best CCI, like you saw the Winchester tend to stick and require a dry fire to remove) , black sabots, and 225 to 300 gr 45 cal hand gun bullets and shoot some groups at 100 yds with different bullets by starting at 80gr by volume, and working up to 120gr by volume. Zero the load that shot best a couple to three inches high at 100yds. Go home clean the rifle up; you have a sealed breech a deer hammer to take to the woods. Thanks for being a great, understanding client. Please keep me posted and let me know how I can help. Tom |
Welcome to the Badger's Den!
|

 RSS Feed
Orders over $100 ship free. Low flat rate shipping to USA (US, AK, HI, PR) starting at $7.49 for orders under $100 & 1lb. $10.49 flat rate for orders over 1lb & under 2.5lb, bulky or over 2.5lb to 5lb are $15.99, 5 lb and over are $21.99 (mailed USPS to the US, AK, HI, PR). Only specific items will be shipped to Canada (shipping to Canada calculated at check out). No other international shipping. See our Terms of Use for more details.
Badger Ridge Industries
PO BOX 223
Fostoria, MI 48435
(989) 795-2526
Please refrain from calling outside of the hours of 9am-8pm Eastern
If you do call outside business hours, the phone system will only offer you automated assistance or to leave a voicemail
Feel free to use the contact form to get a hold of us!
Se Habla Español